NOW IS THE AUTUMN OF MY DISCONTENT
I’m sure that we’ve all heard the opening line of Shakeaspere’s play, Richard III, even if we didn’t know where it came from. The Bard certainly knew what he was doing when it comes to first lines, ‘Now,’ to fix your attention and ‘is the winter of our discontent’ to make us want to know what it’s all about.
The rest of that opening speech is pretty good too and, reading through it again, I’m reminded that some lines could easily relate to making models; ‘Our stern alarums changed to merry meetings, Our dreadful marches to delightful measures’ describing in a way the process of battling with a difficult kit to make a beautiful model. Certainly Richards description of himself is a sentiment we could also apply to some of our productions:
Deformed, unfinish’d, sent before my time
Into this breathing world, scarce half made up,
And that so lamely and unfashionable
That dogs bark at me as I halt by them;
I don’t know what dogs think of some of our more pitiful models, but I have a couple of cats who have made the occasional dismissive comments on my models and watch on with fascination as I struggle with small and deformed parts.
But I’m being distracted again. In this past month I’ve been struggling with three models that have really tested my patience and modelling abilities. I’m only going to write about two of them because that’s enough whinging for one time and it was these two that reminded me of Richard III’s opening line in the first place.
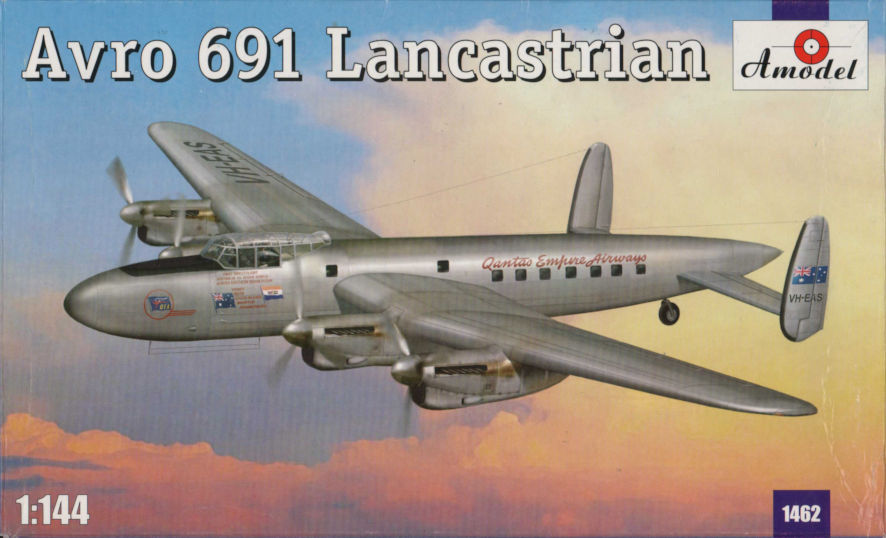
Struggling with the Amodel 1/144 Avro Lancastrian
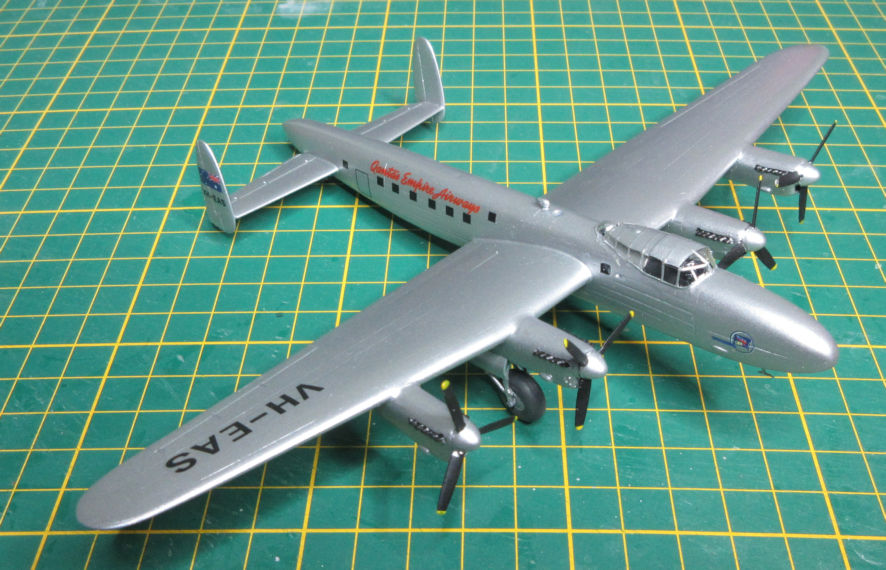
You know those kits where all the parts are perfectly moulded with crisp detail, excellent fit, clear and detailed instructions and an overall design that says this kit had been produced by people who have given top priority too providing us with a great modelling experience. This Amodels 1/144 Avro Lancastrian isn’t one of those. One of the wise modellers in podcast land tells us that ‘Life is too short to make crappy kits’, and he is right. But if you really want to have a model of an Avro Lancastrian in your collection making a crappy kit is your fate. Had I not needed this model to complete my collection of Qantas airliners it would have ended up in the rubbish bin at several points during the construction process.
Before I go on to complain about the problems I encountered in making this kit I must point out that it comes just short of being an excellent kit and a good modelling experience. For a 1/144 kit this one has better than usual reproduction of the shape and character of the real thing and some good detailing. There is some nice cockpit detail and the engine exhausts are good little replicas of the real thing. From the extra parts on the sprues it is apparent that this is also the basis for a Lancaster model with all the necessary parts for turrets more detailed than in some older 1/72 kits. The detail for the engines with etch radiators and fine undercarriage parts is quite excellent. The parts also go together relatively and I’ve lavished more filler on many 1/72 kits than I have on this model.
And yet this is a very annoying model to try to construct. Take the cockpit for example, and leaving aside that this is a cockpit for a Lancaster, not a Lancastrian. There are ten parts for the cockpit but there is no positive location points for them or an indication of where the cockpit should go in the fuselage or positive location points for it. This means a lot of guesswork, test fitting and trying to move parts around before they are properly set. If I had been confident that this was the right cockpit for a Lancastrian, and if I’d felt confident that I had all the parts in the right places, it would have been nice to give it some touches of colour and perhaps even a light touch of dry brushing to highlight the details. However, because of my uncertainties I painted the whole thing matt black, and I doubt that anyone would notice the difference.
Getting the cockpit together and in place is a test of nerves and the engines were the same with little brass radiator fronts that had no positive locations, the exhausts that needed a little cleaning and the slots for them that needed tidying before they would fit properly. Then there were the propellers, each one comprising six or seven pieces. The worst part of them is that the separate propeller blades have virtually no shank so there is nothing except a prayer to ensure that they stay attached to the hub during painting.
After these trials by ideal I was surprised and relieved when the fuselage parts went together well, as did the wings and tail surfaces. Much to my amazement the engines fitted very nicely to the wings though getting this right is up to the modeller because there are no locating pins to help get everything lined up properly. My only complaint is that some of the engraving is a bit severe and I should have done some filling and sanding to rectify that, but by that stage I thought I’d be tempting fate if I did that would cause something else would go horribly wrong, so I didn’t.
Either I’m a modelling dummy or there is something wrong with the instructions because I couldn’t figure out how the main undercarriage legs would fit inside the engine nacelles according to the instructions, so I made that up for myself and it looks okay.
The final insult came when the airframe was more or less complete and it came time to attach the canopy, which is a fraction wider than the fuselage. There might be two solutions to this, either sand down the canopy sides and repolish them, or build up the fuselage sides with a little putty. Sadly, I did neither, being completely fed up with this kit by this stage.
One of the things that kept me at this project was the nice Hawkeye decal sheet for the four Lancastrians that Qantas Empire Airways flew in the second half of the 1940s. The kit also comes with Qantas decals and they looked acceptable, but the Hawkeye decals looked better so I used them. The excellent instruction sheet informs the user that three of the four had de-icing boots and the fourth did not, so I was tempted to make the fourth one just so I didn’t have to spend any more time on this model then necessary. However, a search in the internet found me a photo of a second Qantas Lancastrian also lacking de-icing boots, so that was my choice.
Preparation for painting involved giving the model a thorough sanding all over to remove as many blemishes as possible and give a nice smooth surface for the metallic finish. I’m becoming a serious devote to SMS lacquers and their aluminum went on easily and gave the kind of finish I was after. Then the decals went on, smooth and thin as usual. These days I hand brush a coat of Aqua Gloss over the decals to protect them and because that seems to give them the same level of sheen at the rest of the model so they merge in fairly well.
Finally it was time to attach all the additional details like aerials, doors and propellers. There is no positive location points for any of these and the propellers were a particular nightmare because they had no positive location to the fronts of the engines so I used lashings of five minute epoxy to give me plenty of time to line then up as well as I could.
The end result is a model that looks pretty much like a Lancastrian, but it was a severe test of nerves to get it to the finishing post. Unless you really want one of these in your collection take my advice and go and make something more soothing on the nerves than this kit.
(As an additional thought, my feeling is that anyone setting out to make an Avro Lancaster in 1/144 has only two choices of kits, the ancient Crown kit that is new reboxed by Minicraft or the Lancaster version of this kit. The Crown kit dates from the 1975 and is quite primitive and simple whereas the Amodels kit dates from 2008 and is a much better kit in terms of accuracy, attention to detail and so on. But for the sake of your nerves, it would not hurt to think seriously about making the old Crown kit instead.)

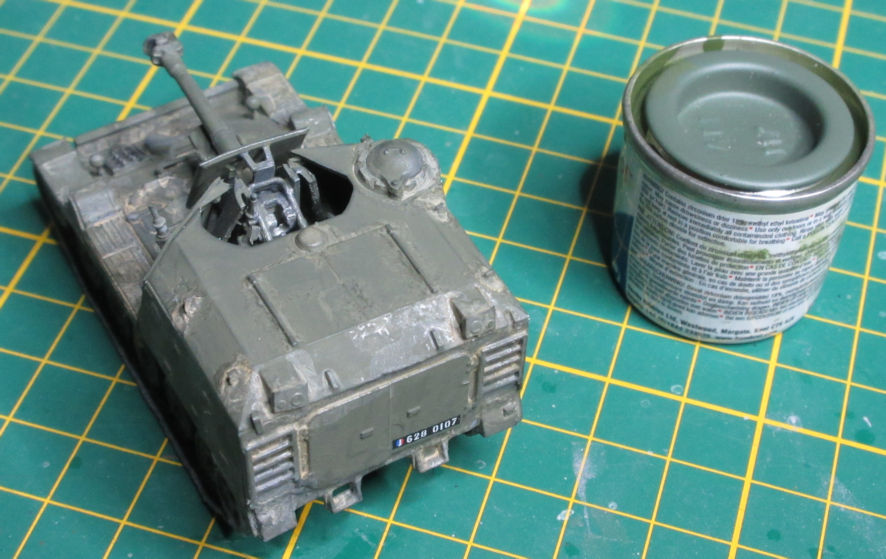
Doing battle with the Ace 1/72 AMX Mk.61 105mm self propelled howitzer
These days I’m not a great tank builder, mainly because there are too many interesting aircraft models that need building. However, I do make exception for French tanks and have a fair collection of them. I thought I’d made almost every 1/72 model of French tanks that existed but recently Ace have released a few more of that nation’s tanks and so, after a gap of almost ten years, I find myself making some more little French tanks.

The first I attempted was this model of a little self propelled howitzer mounted on an AMX13 hull. There are a couple more of these kits also using that hull which I will get around to shortly. It may not have been a smart move to begin with this kit because it is probably the most complex tank model I’ve made and my skills in that direction are fairly rusty. The complexity comes because while the howitzer is surrounded by an armoured metal box there is a big hole in the top of the hull so you can see the gun clearly and a fair way into the rest of the compartment if you care to look. As a result it was necessary to construct the interior as well as the exterior, and it was the interior that took the most time and head scratching.
The kit itself is very nice with parts that fit, for the most part, and some neat little details that build up into a neat little gun with the appropriate handles and control wheels. If there is a problem in relation to fit, it is that the parts fit too well but the joins are not always positive so it is not difficult to cause problems by not aligning the parts absolutely correctly. For example, the return rollers for the tracks are moulded so that is almost no space between them and the mudguards and hull. I discovered this while I was test fitting the parts and as a result I decided to instal the tracks as part of building up the running gear for fear that the tracks would not fit if I tried to slip them into places later. I knew that this might cause problems when it came to painting, but that problem was preferable to not being able to fit the tracks at all. During this part of the build process I discovered that these tracks are glueable, a very nice innovation from when I last made a tank.
While the kit itself is quite excellent, and I would recommend it, I can’t recommend the instruction sheet at all. If you are used to Ace instruction sheets or know the details of this AFV assembly the howitzer might go easily, but it didn’t for me. If you compare the instruction drawings with what photos you can find of the interior of this AFV you might do better than I did, but on several occasions I was on the verge of throwing this kit out because I could make no sense of the parts on the sprues and what I was seeing in the instructions. Perhaps the key problem was that the whole gun and its shielding and controls is mounted on a traversing plate but that part is shown attached to the upper hull at a stage before the howitzer is assembled and there is no indication that all the parts of the howitzer need that base as the basis for constructing the gun properly.
Once the gun was finally constructed the rest of the construction was fairly straight forward. I painted the interior the compartment first, including the rounds in their storage racks, but there is no guide as to what colour they should be. After that the rest of the construction was fairly simple. However, it was necessary to carefully test each part because the many little injection nubs had to be carefully trimmed so the parts would fit properly, and some of them were difficult little areas to reach and trim as much as was necessary.
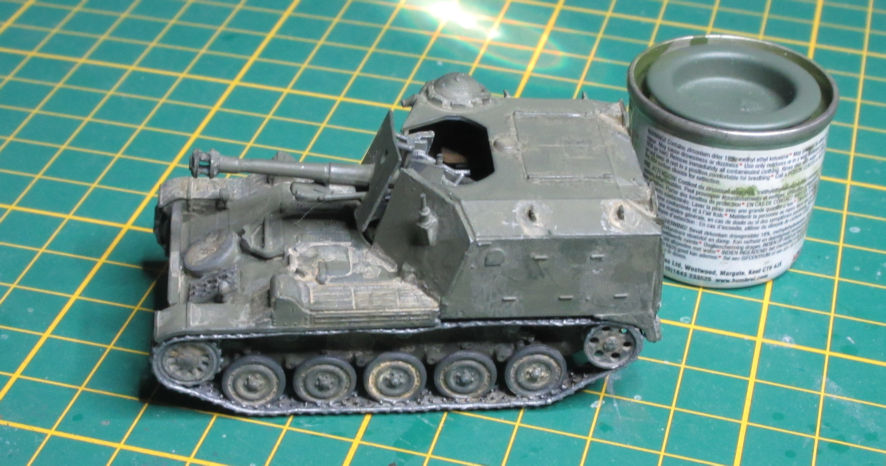
Eventually the model was ready to paint and I decided that it would be simpler to hand paint it than try to mask everything to keep spray out of the compartment. Here my old supply of Humbrol enamels came to the rescue and I painted the entire model in a relatively accurate dark olive green colour. After that I painted the tracks with old Modelmaster Dark Anodonic Grey which I’ve found to be a nice base colour for tracks. After that I painted the rims of the road wheels tyre grey and touched everything up so the colours were all where they were supposed to be. Then it was time for the weathering.
I’m no great fan of weathering aircraft because I reckon it detracts from the look of them. But tanks are fair game. Over the past year of so I’ve been listening to most of the modelling podcasts and the most evangelical of them when it comes to weathering is the Sprue Cutters Union. However, unlike most modellers these days I assume, I do not have all the tools necessary to weathering including the washes, accents, pastels and so on, so I had to make all them myself. I may have got a bit excited because I used four or five washes on this model, all them achieved by simply thinning different shades of Humbrol with a lot of general purpose thinner. I began with a light grey wash, then two or three different shades of brown and then a wash of black, mainly to give some character to this kit’s nicely moulded tracks. I was going to do some very light dry brushing but decided that the model already looked what Will Pattison of the Sprue Cutters Union calls ‘nasty’. In fact a bit too ‘nasty’ for my taste. Besides, since I don’t think this vehicles left France itself it is likely to have gotten fairly dirty at times but was probably well looked after when it wasn’t out in the field, at least that’s what the couple of reference photos I’ve found suggest. So dirty it is, but not banged around too much.
Apart from my great frustration with the instruction sheet and the many teeny weeny little parts I enjoyed making this little AFV. If you want to make it I suggest you buy two copies, one on which to make all the mistakes I made because I didn’t know what I was doing, and the other one to make properly once you’ve figured out how all the parts go together.
Leigh Edmonds
May 2022
 Amodel 144 The Little Aviation Museum")