(Krautprojekt 2/11)
History
After a discussion with your editor we each decided to model ugly aircraft. He has a lot of silly French ones. The Ha 139 project arose because we each had a kit of the same aircraft at two different stages of its life – initially beautiful, then horribly defaced.
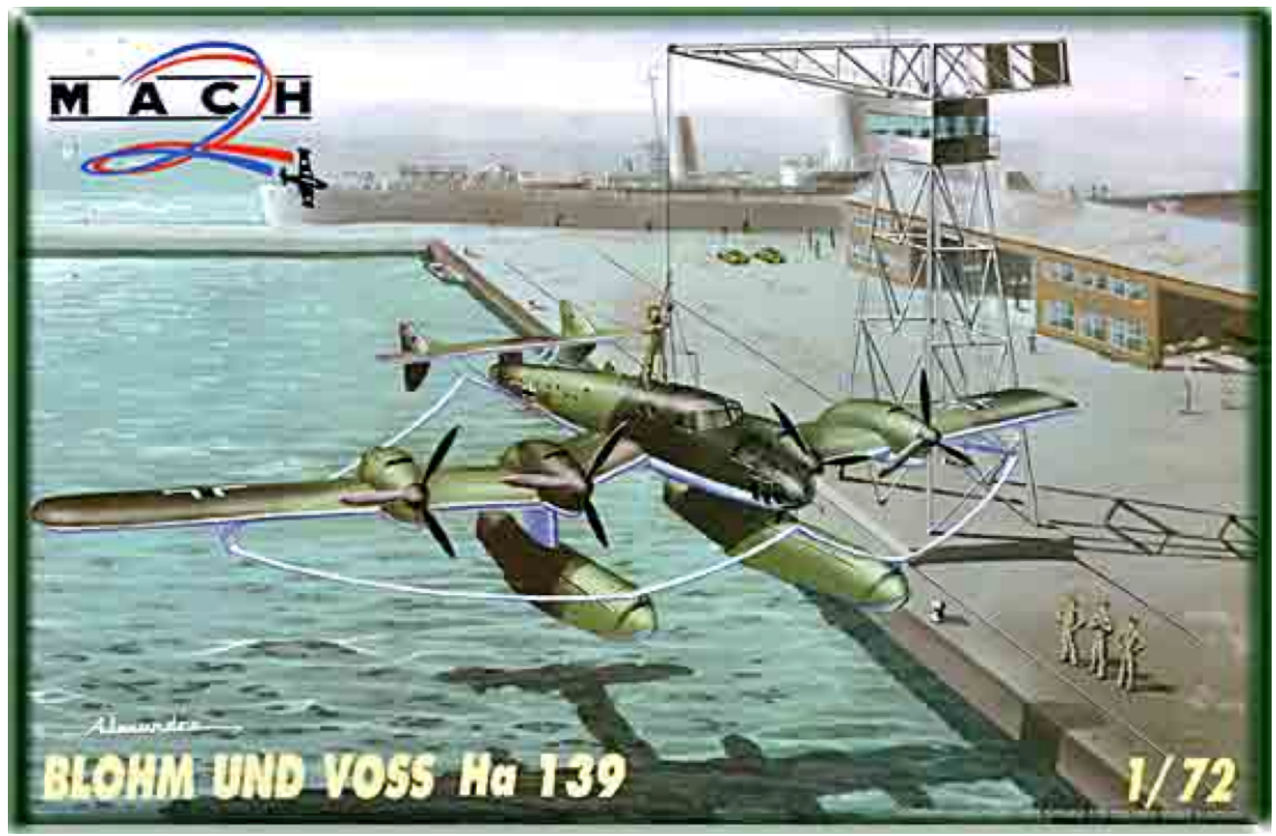
Beginning in 1936 Blohm und Voss designed and built three fine long-range floatplanes to transport mail across the Atlantic, designated the Ha 139 V1, V2 and V3. These were powered by four Jumo 205 diesel engines and carried large quantities of fuel in their wings and floats. Their range was over 5000Km and they entered service in March 1937 on the South Atlantic route. They were launched from a catapult ship moored in Bathurst, the Gambia, and flew non-stop to Natal, Brazil. They also flew the North Atlantic route from the Azores to New York.
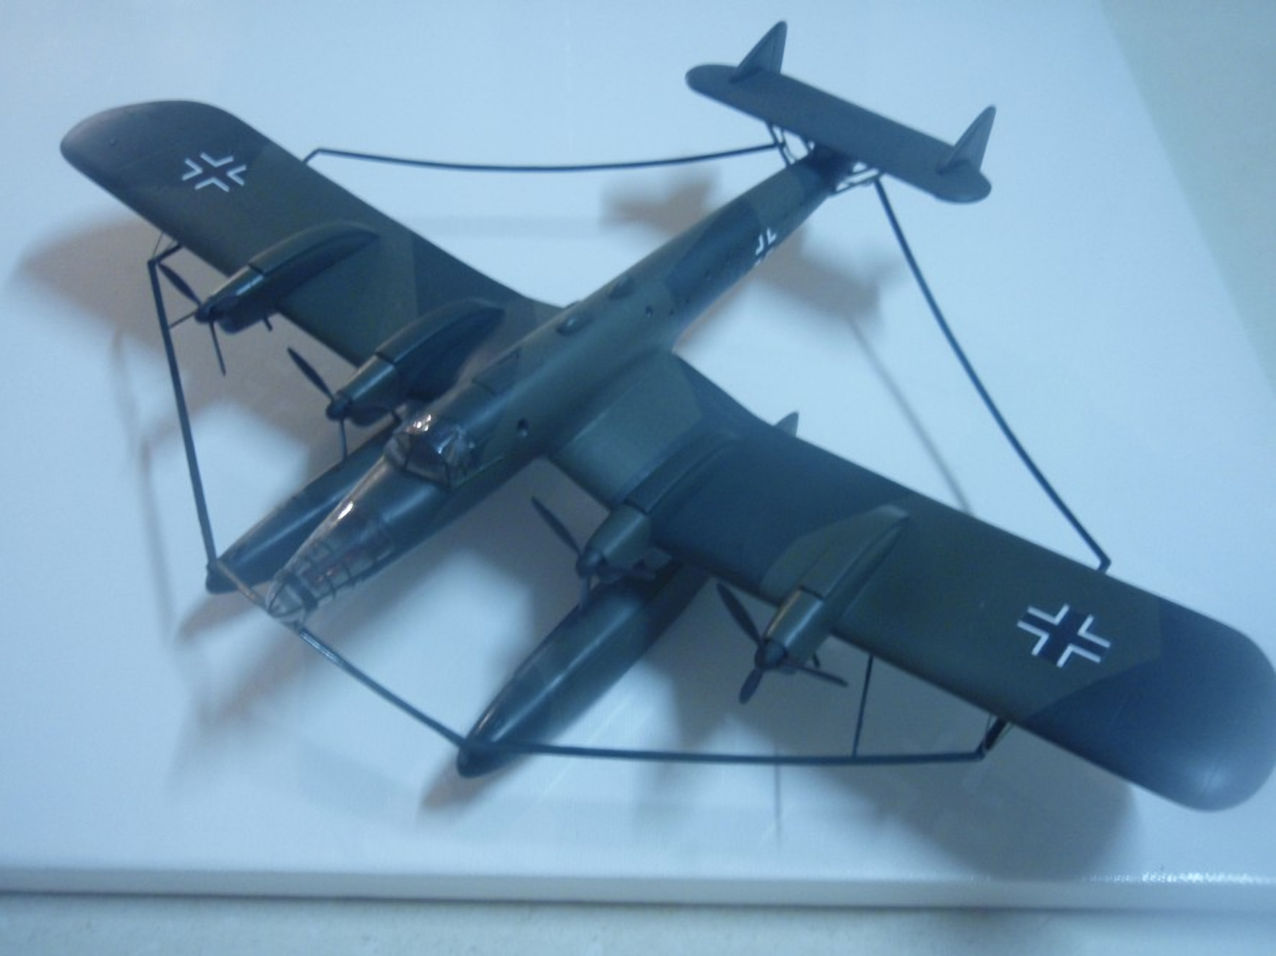
As the Prof’s model shows, the aircraft in their initial form were graceful and beautifully streamlined (Blohm und Voss Ha139V-3). This was to change at the outbreak of war, when they were taken over by the Luftwaffe for transport and maritime reconnaissance. In 1942 the third aircraft was rebuilt as the Ha 139B/MS, with a huge degaussing ring for minesweeping and a bulbous glazed nose for an observer. It looks as if it is wearing one of those Groucho Marx party masks with a silly false nose and moustache. The only game in town for this aircraft is in 1/72 scale by Mach 2.
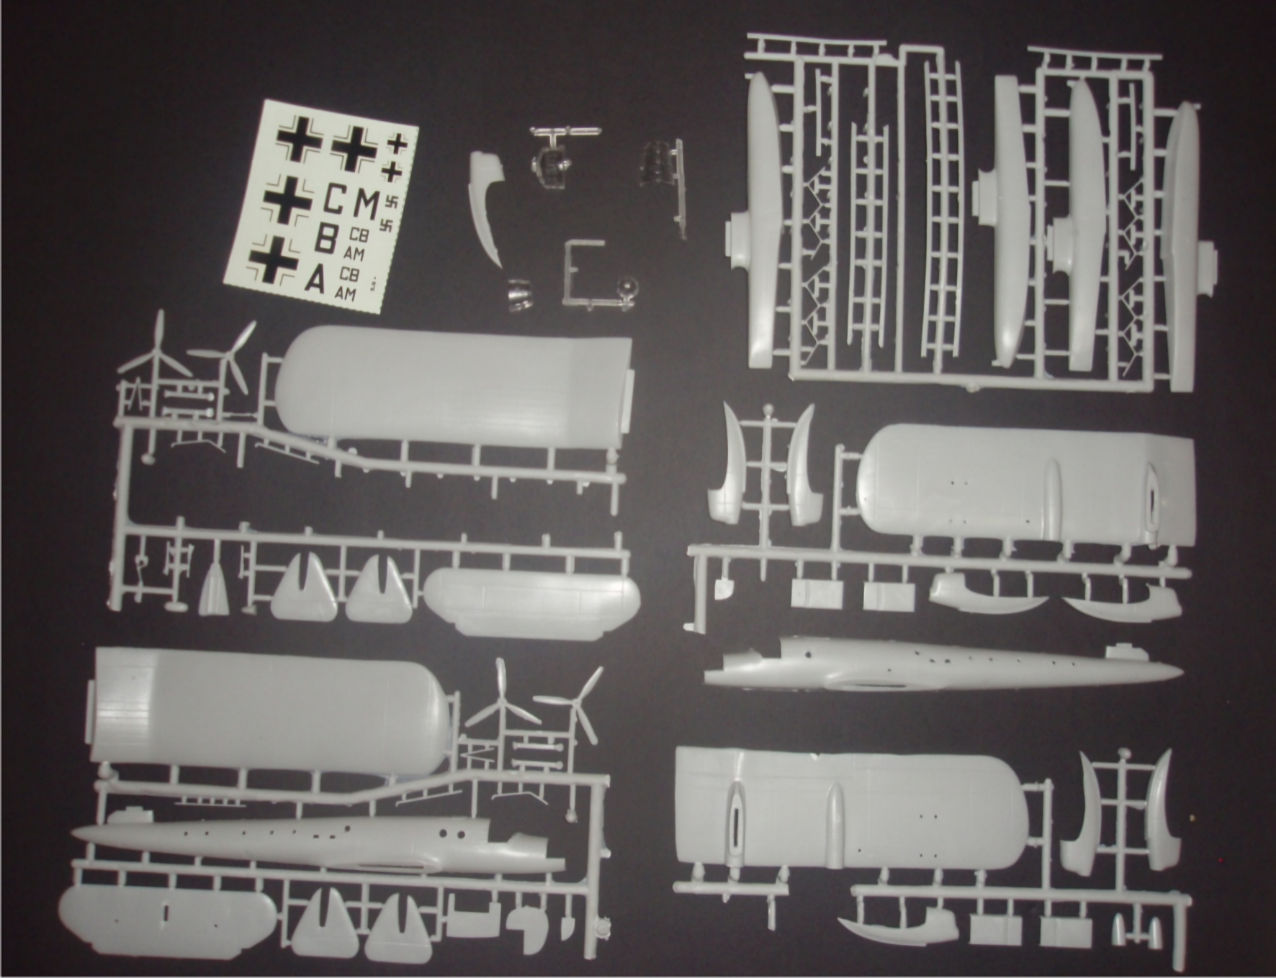
M. Didier Palix, founder of the Mach 2 organization, has an eye for the unusual. Here is a picture of what is in the box. I got the kit for $40 at a swap’n’sell. The going rate in shops is about $80.
Some of the parts had broken free of their sprues and there was flash everywhere. Engraved surface detail is a bit soft. There were little raised wiggly things over the surface of one of the wings – it looked as if something foreign (Ash from one of the shift workers’ Gauloises perhaps…) had got in while making the moulds.
The instructions are minimalist, schematic and a bit post-modern. However, they clearly show the mounting of the de-gaussing ring.
The nose and ventral gun positions are represented but AFAIK armament was not carried once the ring was fitted. The decals are fictitious and primitive.
There are a few positives – the outlines are accurate and there aren’t too many small parts to fail the ten-cent test. There are good detail photos of the machine in reference books and on the internet. The Mach 2 website shows some photos of the real thing and a completed model, indicating anything is possible.
I could smell trouble and it lay untouched until the Prof suggested an ugliness build. This kit really is an endurance test.
The Build
Pythagoras strode purposefully into the shed. He had heard rumours about modelling ugliness among the disciples, and showed disapproval at the sight of the kit. He pointedly asked where the Ha 139B/MS conversion and the creation of ugliness lay on the pathway to wisdom. I had no answer. However, he made no attempt to dissuade me from commencing the project, knowing that the journey to completion might bring about improvements to my soul. He gave a muffled grunt, remarked that the shed was too cold, and headed off back to a mild Mediterranean summer in Croton.
That night, seven of his Golden Verses came to mind, causing me to examine the project:
40. Never suffer sleep to close thy eyelids, after thy going to bed,
41. Till thou hast examined by thy reason all thy actions of the day.
42. Wherein have I done amiss? What have I done? What have I omitted that I ought to have done?
43. If in this examination thou findst that thou hast done amiss, reprimand thyself severely for it;
44. And if thou hast done any good, rejoice.
45. Practise thoroughly all these things; meditate on them well; thou oughtest to love them with all thy heart.
46. ‘Tis they that will put thee in the way of divine virtue
The following morning I knew that the Ha 139B/MS Krautprojekt was the next step along my path to wisdom.
I started with the flying surfaces. The wings have an inverted gull form and one wing half was “short shot” at the trailing edge. Sprue gates are very thick and needed to be cut with a razor saw (a bandsaw would have been better). Fortunately the plastic is soft and easily worked. The wings were built in parallel using jigs to make sure each had the same angle. Staged gluing and clamping were necessary, followed by a fair bit of filler and a lot of sanding to get rid of the surface lumps. The tailplane and fins were also in need of a bit of sharpening up but at least fitted well.
The engine nacelles are numbered. The instructions indicate where they need to be located with unspecified consequences if this does not happen. Even when correctly located they don’t even get close to fitting without plastic shims, a slather of filler and a fair bit of sanding. The radiator air inlets needed rebuilding with plastic sheet. Exhausts were made from brass tube.
The props are no good and were replaced with a set from a Lancaster Mk 1 cut down to match the diameter of the kit props.
The surfaces of the floats are also a bit lumpy and needed a good going over with sandpaper. Stiffeners were made from plastic strip. Lots of primer coats and spot filling were needed to get a decent finish.
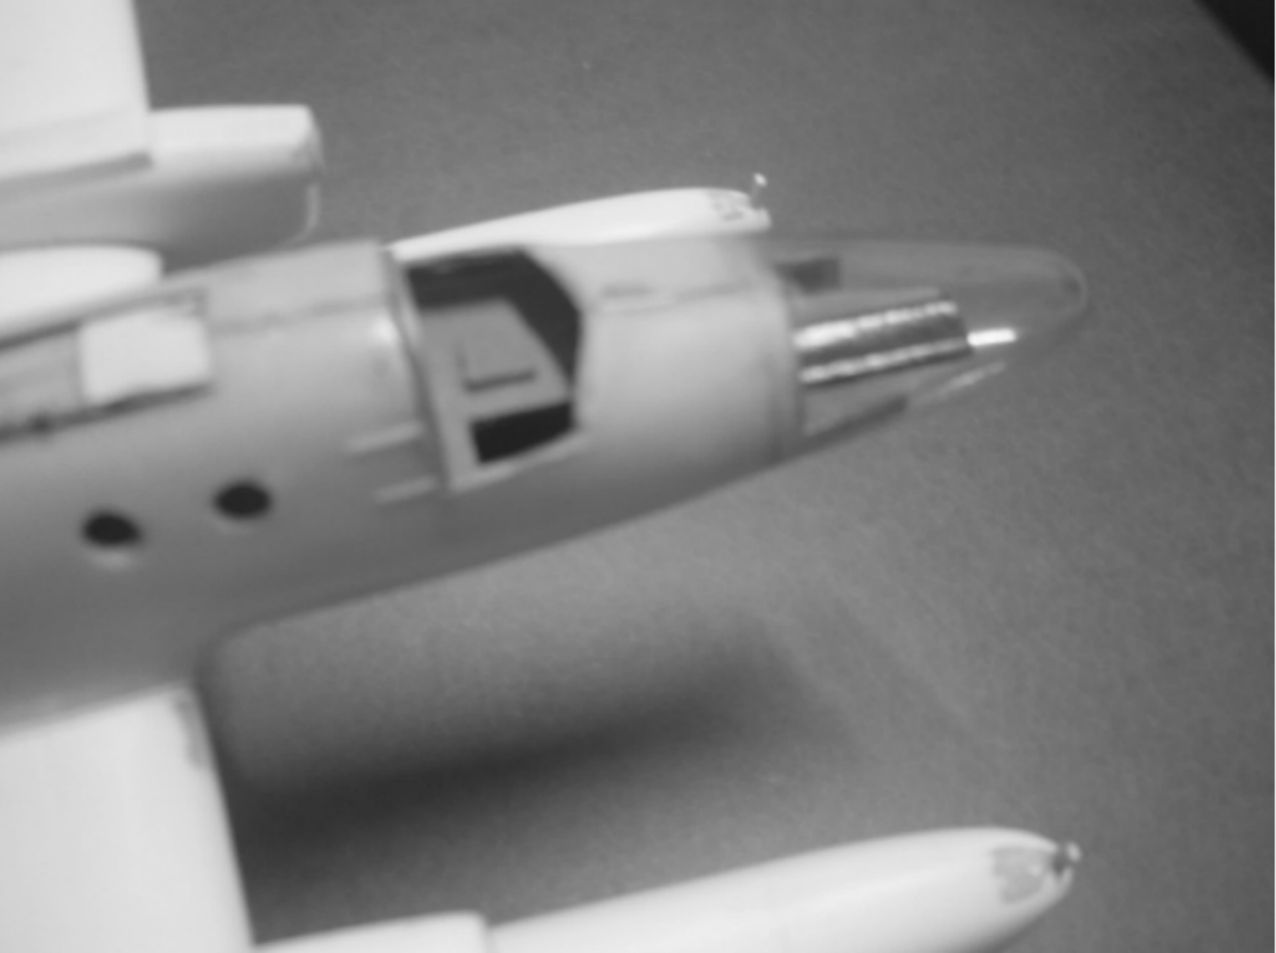
The transparencies are irretrievable. In the end they were used to smash mould replacements from plastic food packaging. (Hint: Don’t waste your money buying sheet acetate to thermoform canopies – plastic soft drink bottles and food containers are just as good and cost nothing. A good old-fashioned heat gun is the best source of heat IMHO.)
The heavy external frames and sliding panels were represented with plastic strip and acetate sheet. The smaller frames were made with painted decal strips.
The porthole windows were left out – they are better done with drops of PVA after painting was completed.
Because the transparencies had been fixed the cockpit interior became visible and had to be improvised from plastic sheet and bits from the spares box. The crew compartment behind the cockpit is empty. Fortunately some interior shots on the internet gave a fair indication of the layout. I drew out the locations of the seats, engineer’s panel, navigator’s table and radio equipment in the cabin, then test fitted the interior fittings before gluing them in place. The kit part for the observer’s bench in the nose is a bit oblique but OK.
Once the interior was fixed up the fuselage halves came together without too much trouble. I sanded the moulded sliding hatch off the top of the cabin and replaced it with plastic sheet and strip.
Fitting the wings was a big problem. Because of their inverted gull form it is difficult to use metal braces through the fuselage. The wings don’t fit the fuselage anyway and it was necessary to widen the slots and make a jig to establish the anhedral of the centre section.
The wings were fixed in place with liquid glue and the large irregular gaps remaining were filled with strips of plastic soaked in liquid glue and slathered in filler. Elbow grease in plenty is required to make these joints smooth and secure. This didn’t stop the port wing from coming adrift twice during the removal of the masking.
(Note to self – next time remove the wing locating tabs altogether and in their place use an aluminium plate bent to shape. Further note to self – there won’t be a next time)
The floats need to be parallel and level and their pylons vertical. This is harder than it sounds and once it is done there are large defects at the joints where the pylons don’t quite meet the wing. The degaussing ring mountings are clumsy and should be thinned out or replaced.
The last time I used this much filler was 2008 – the year of the Mach 2 RB-57F. I think M. Palix has some deal with the manufacturers of Squadron Green putty.
Once the basic airframe is completed there is a bit of work to do to restore the surface detail. I didn’t do it all. Perhaps M. Palix has another deal with the blokes who make scribers too.
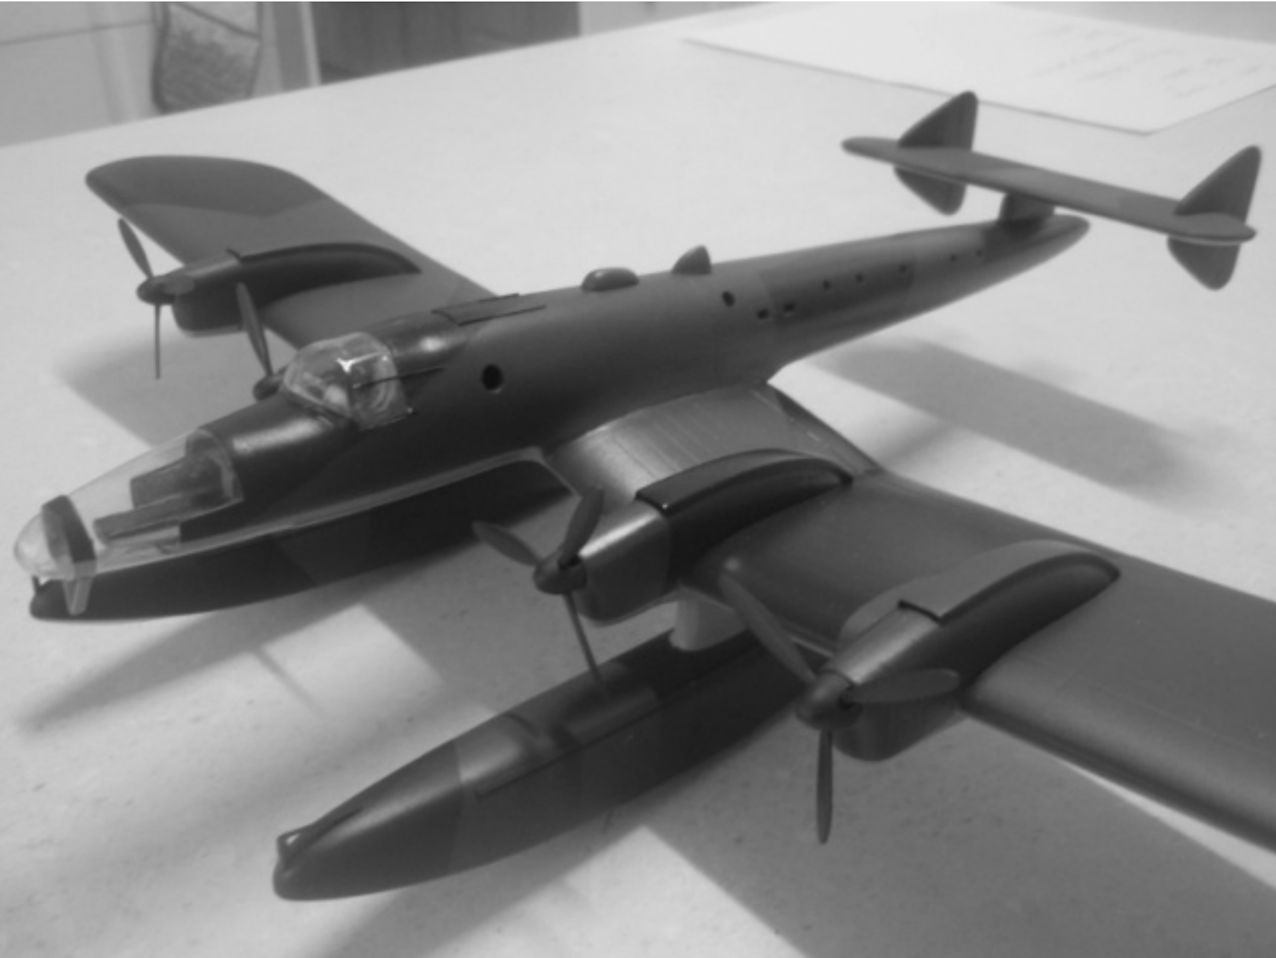
The degaussing ring is in several parts and ended up in several more before it finally assumed its position. It needs a jig to hold it in place while the struts are secured. The struts are crap and better replaced by wire and plastic rod bent to shape.
Paint and Decal
Lots of priming and sanding had to happen before the top colours could be applied. Xtracolors make acrylics for RLM 72 and 73, but they sprayed all lumpy despite the use of their proprietary thinner and a lot of agitation. Checking out the mixes required to make these colours suggested a combination of Gunze IJN Green for RLM 72 and IJA Green for RLM 73. These match the colours of the Xtracolor lids pretty closely. Gunze RLM 65 did for the undersides.
It is easier to paint the airframe first and apply the decals before cementing the pre-painted degaussing ring in place. The model was sprayed with few coats of gloss varnish before applying the decals. This also helps the look of the transparencies.
The codes (P5+GH) were printed on BMF clear decal paper using an inkjet printer in a font on my computer that looked about right (Mittelschrift AusD). The print was sealed with Testors decal varnish. The home made decals worked sort of OK (They silvered a bit). The others came from the spares box. A couple of coats of matt varnish tied everything together.
The aircraft didn’t do much flying as a minesweeper and the available pictures of it show it spick and span and ready for sea trials. I tried to keep the squeaky clean look, so apart from a few exhaust stains that was about it.
Philosophical Evaluation
Three months after his last visit Pythagoras popped in to the shed as the model was nearing completion. The first blowflies heralded the spring thaw and his attitude to ugliness had mellowed a bit.
He told me that at the time of his last visit he had been pretty pissed off about all the writings bearing his name that were clearly forgeries, and was distressed by the realization that he couldn’t do much about it 2500-odd years down the track. He had thought about it, and decided that he didn’t really mind too much as long as they were faithful to his philosophy.
He explained by analogy that however ugly or beautiful the subject, the beauty of the model finds expression in its faithfulness to the spirit of the original. This revelation improved my soul. His exposition took a while, however, so I went inside to make a pot of tea after an hour or so. He was still going on about it when I came back out to offer him a scone from the oven.
Mark Pilbeam
December 2011