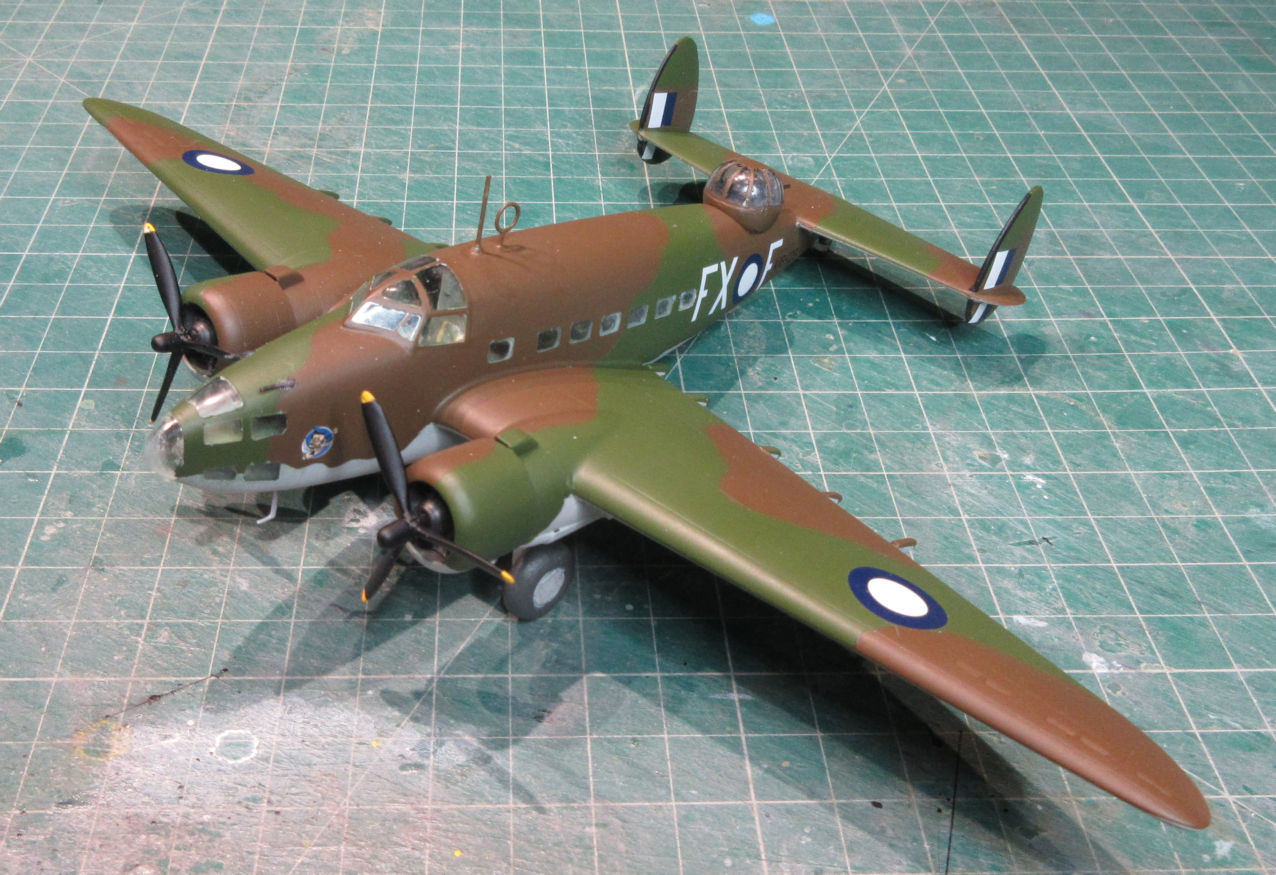
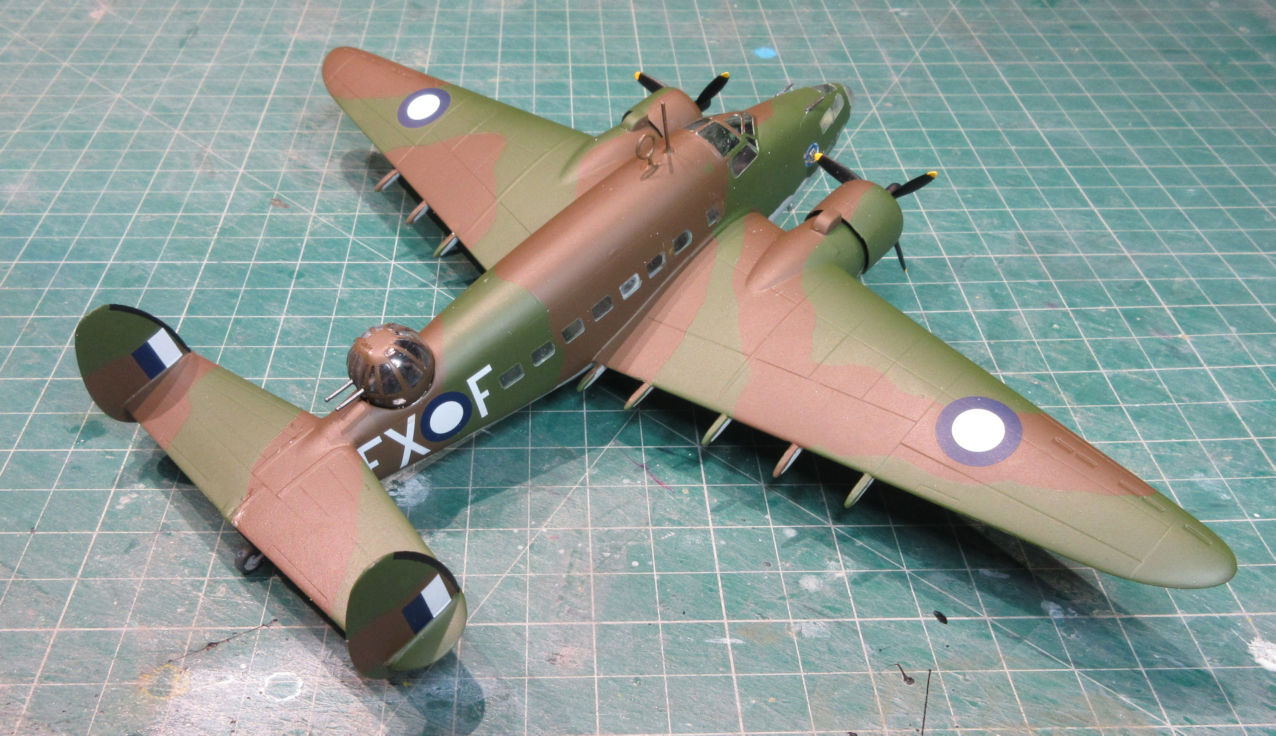
If you are interested in early World War II aviation you will have come across the Lockheed Hudson. It is a strange looking aircraft, clearly an airliner that has been hacked about to turn it into something a bit more military. Those Hudsons with the huge turret on the back look particularly ungainly, but I guess they look like that for a reason.
Some Hudsons came into the possession of the RAAF before the Pacific War broke out and so they fought the Japanese all the way down the Malayan peninsula and into Papua New Guinea. With a lot of Oscars and Zekes about it was not a good time to be crew on Hudsons, but they were the best the Air Force had, so they had to make do.
Since I have an interest in this era it was inevitable that I’d buy the new Italeri kit of the Hudson when it appeared, almost a decade and a half ago. I was in no rush to make it and the thought of having to mask all those airliner style windows was enough to delay a start for many years. Then Chris Wallace announced the ‘Let’s Get Pacific! Group Build’ and I thought it might be time to get out and dust off the Hudson kit. A ‘now or never’ sort of thing.
The Italeri box for the kit is very attractive and the look of the kit parts in the box is very promising. The parts are very nicely moulded with fine detail. The clear bits are nice and thin and the decal sheet offers lots of options and is beautifully printed. Brett Green thought the same thing when he wrote an in-box review of this kit when it was first published. ‘Highly Recommended.’ he wrote. That’s the trouble with in-box reviews. You know the old saying; ‘the proof of the pudding is in the eating’. There should be a new one for modellers (and perhaps there is); ‘the proof of the kit is in the making’.
Perhaps I could make life easy for you by linking you to the review of the same kit that appears on the Fine Scale Modeler website. It goes into the kit’s problems in some detail. It concludes; ‘I would recommend this kit only to modellers with the skills to deal with the various fit and construction issues’. To that I would also add that the builder needs bucket of patience, an ability to read the mind of the person who produced the instruction sheet and more sense that I had.
There are no locating tabs and no more than hints about where all the interior detail should go. To give you only a couple of examples of the problems with lack of positive location. There is a little seat that the gunner sits on in the rear turret but it goes onto the floor in the rear of the cabin. Because there is no useful indication of where that attaches to the fuselage lining up the gunner’s seat with the turret itself is either guess work or an hour or two spent testing and fitting in the hope of lining them up successfully. I was not entirely successful but it turns out this is not evident in the finished model. Similarly, the engines slip into their cowlings (after extensive filing to make them fit) but there is nothing to indicate how far they should go. This forced me to spent an hour or two looking at photos of Hudsons to work out how far the engine hubs protruded from the front of the cowlings.
I could go on at some length about fit problems but why bore you. Just bear in mind, if you are making this kit, that there is an awful lot of test fitting before any parts can be glued together. There is a lot of interior detail in this kit and I was rather mezmerized by it since I had always wondered how the airliner had been turned into the military aircraft, so I dutifully assembled all. I also though that it might be necessary since you’d be able to see inside through all the windows down the fuselage sides. I became so keen that I also did some detailing, some dry brushing and a wash of sorts, which is rare for me.
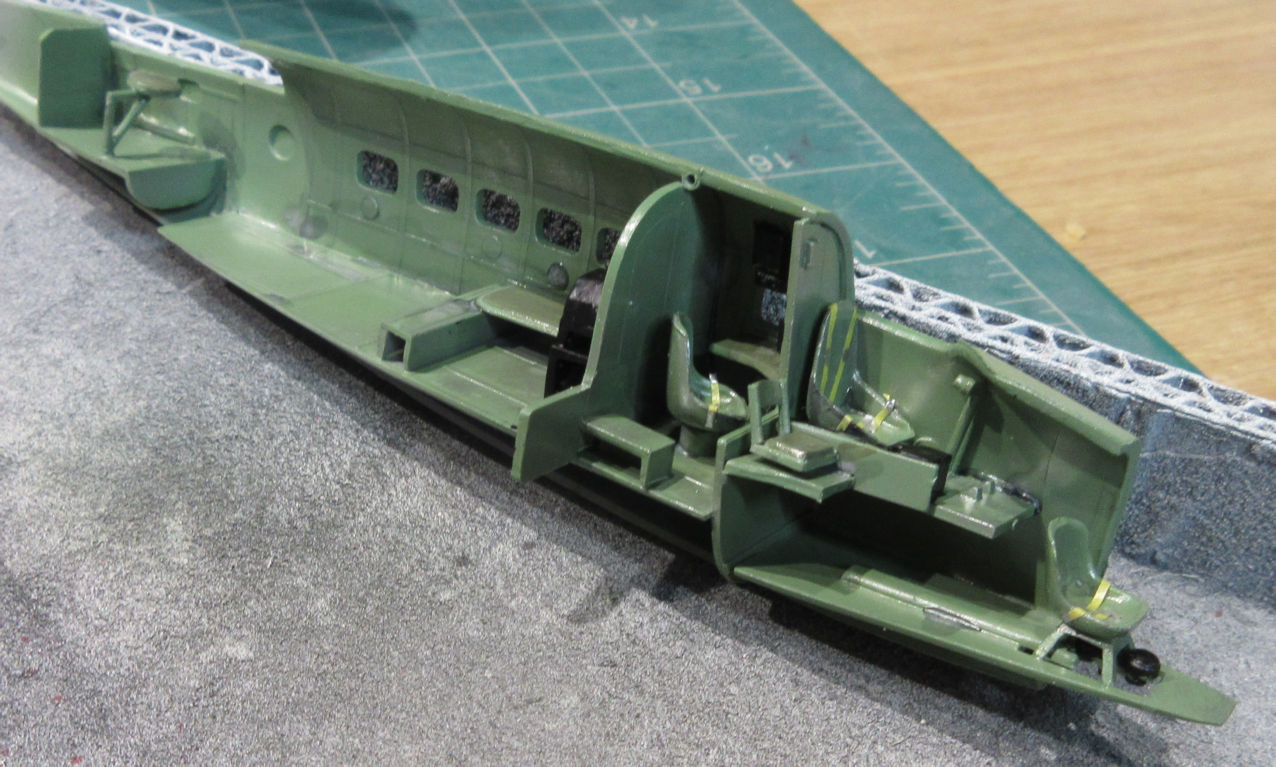
Guess what? Apart from the pilot’s cockpit you can see virtually nothing through the side windows so all that time and effort was wasted. Take my advice and throw out everything after the radio operator’s little cabin and paint the interior black. This will also help with the problem of the side windows.
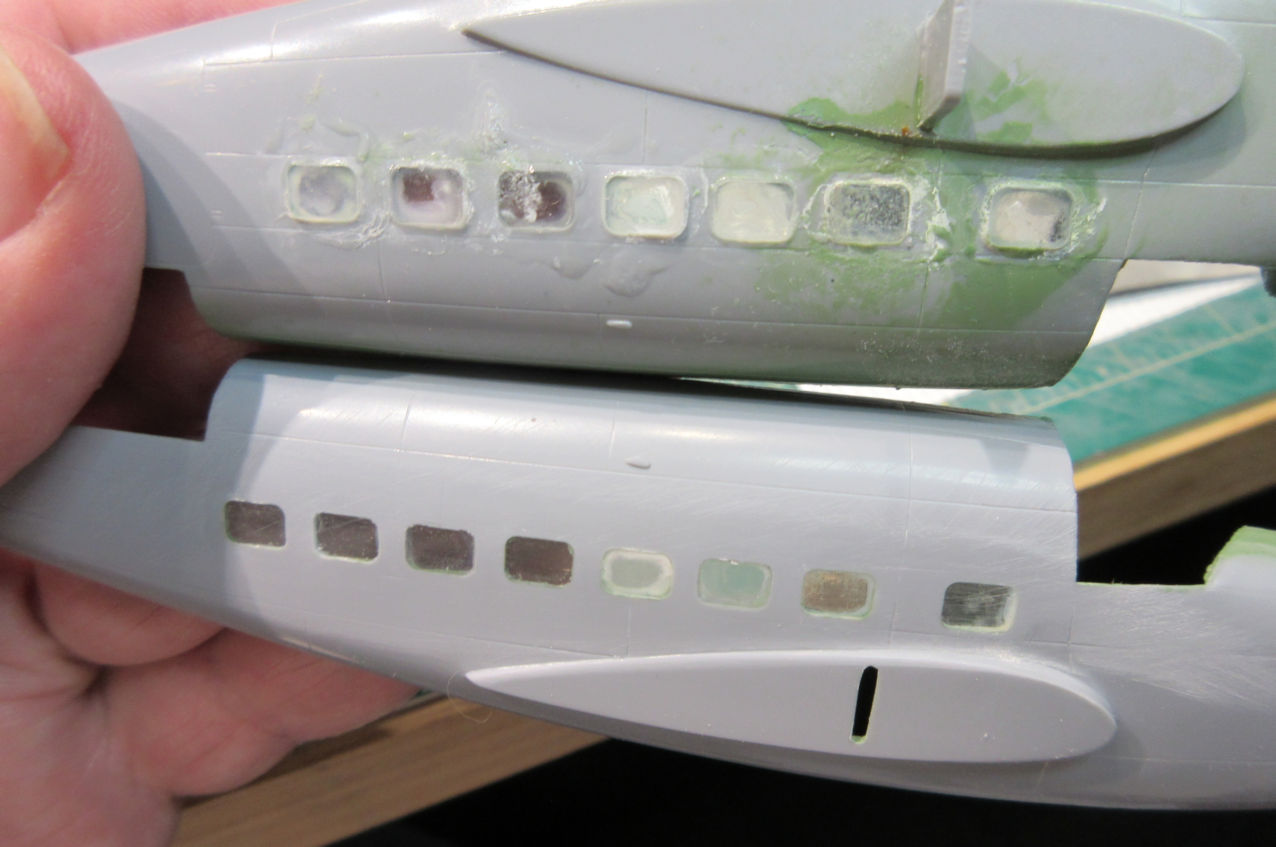
Working under the misapprehension that I’d be able to see the cabin interior through the windows I debated what to do about them. The simple solution would have been to say ‘who cares’, leave them open and fill them in at the end of the work with some fluid that dries transparent. However, I thought I had to put something in the windows to preserve the carefully prepared interior so the only apparent option was to put the windows in. And since they would come in for a lot of aggressive handling with sanding, polishing and masking, the bond had to be strong. The only workable option I could see was superglue, which is always a gamble when it comes to transparent parts. I was successful with most windows, but not all.
The nose of the Hudson would have been even more difficult had it not been moulded in three transparent parts which, fortunately, the super glue did not damage too much. I’d bought a set of paint masks for this kit which promised to make getting all the transparent panels in the nose right but achieving that outcome was not easy because of the confusing instruction sheet and almost complete lack of indication on the glass parts about where the masks should go. Research, which meant looking at lots of photos of Hudson noses, and good fortune, finally got all the masking parts in the right places, more or less.
The turret was also a problem, mainly because all the kit provides is a couple of machine guns. I thought they would look rather odd sitting in that big open turret all by themselves so I spent a lot more time trying to find out what else was in those turrets and scratch building some supporting equipment. However, you can barely see any of it through the completed turret glass.
Having got through all that building work with only a few mental scars it was time for painting. SMS offer a range of RAAF wartime paints which I bought and applied. As usual they went on beautifully. Nothing more needs be said, except, get yourself some.

The kit offers a good range of decals but I had also bought the DK Decals set which offers a lot of RAAF Hudson options from the beginning to the end of the Pacific War. I was after something that was as early in the war as possible but with the unique Australian blue and white rondels so the choice came down to FX-F flying with 6 Squadron from Milne Bay in 1943. Both the DK and kit decals offer FX-F, probably because a restored Hudson flew with those markings for a while so it is well known. However, the decals offer the registration A16-123 and the aftermarket decals suggests A16-129, so some research was needed. The simple answer to this conundrum is that the registration offered on the kit decals is for the restored aircraft whereas the DK decals are for the aircraft that flew in the Islands. That made the choice of which decals to use simple.
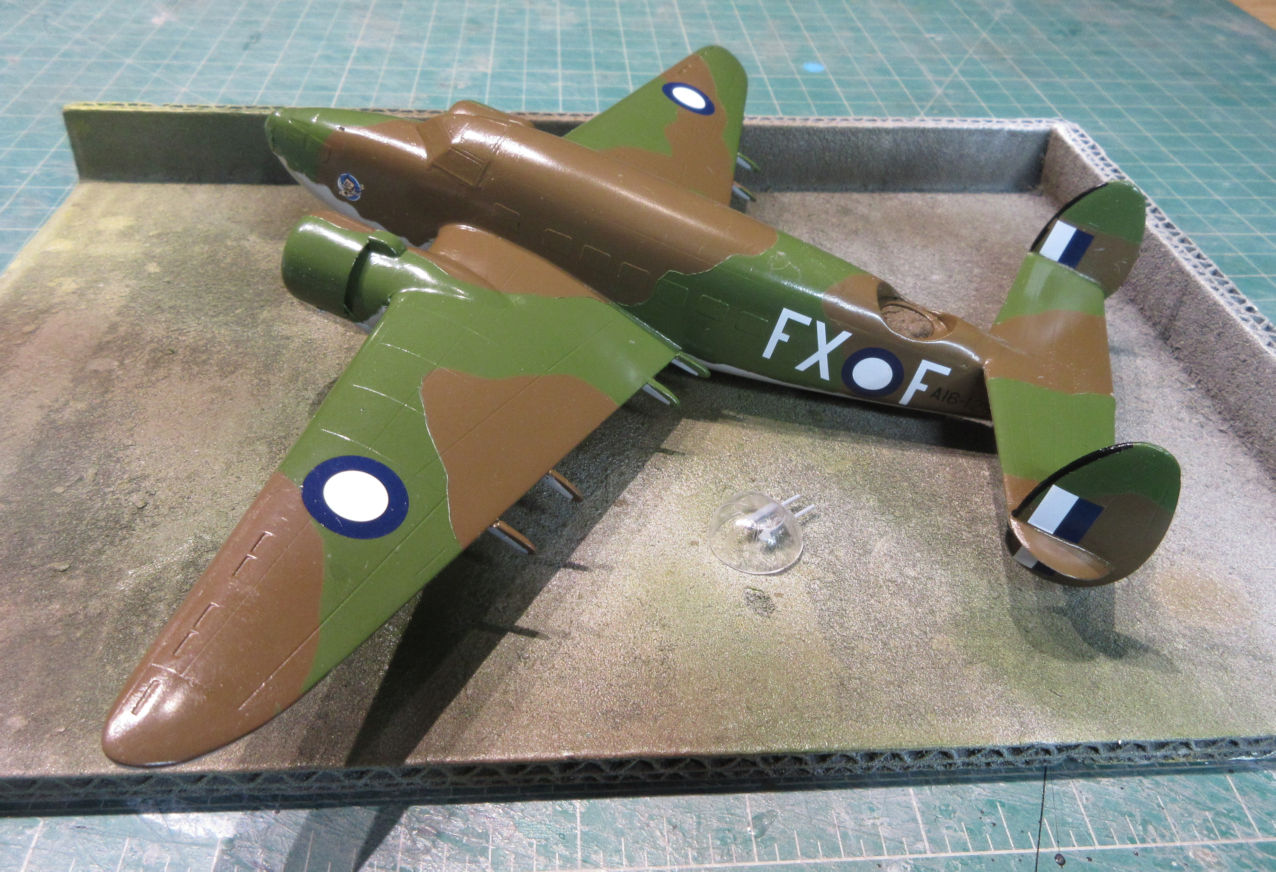
Finally, a couple of coats of SMS Flat Clear and it was time to remove the masking. I had hoped that the superglue crazing on some of the windows was not as ghastly as it turned out to be on the completed model, but it is. Apart from that, it’s not a bad looking little model but it sure took a lot more effort than you’d expect for a model of this size and complexity. Not recommended for any but the most hardened and fearless of modellers.
(After looking at this model for the past week or two, and discussing the problem with Mark who is also making this kit, I’ve decided to leave the model as it is, despite its flaws. Partly it’s because I’ve already spent more than enough time on this model and partly because of the fear of making the problem even worse. Mainly, however, I think of it as a form of punishment for thinking that I could defy the modelling gods and get away with using superglue where it should never be used, and for my hubris in thinking I was better than I actually am. Maybe it will be a lesson for me to be more cautious in the future. Though perhaps not.)
Leigh Edmonds
February 2023