History
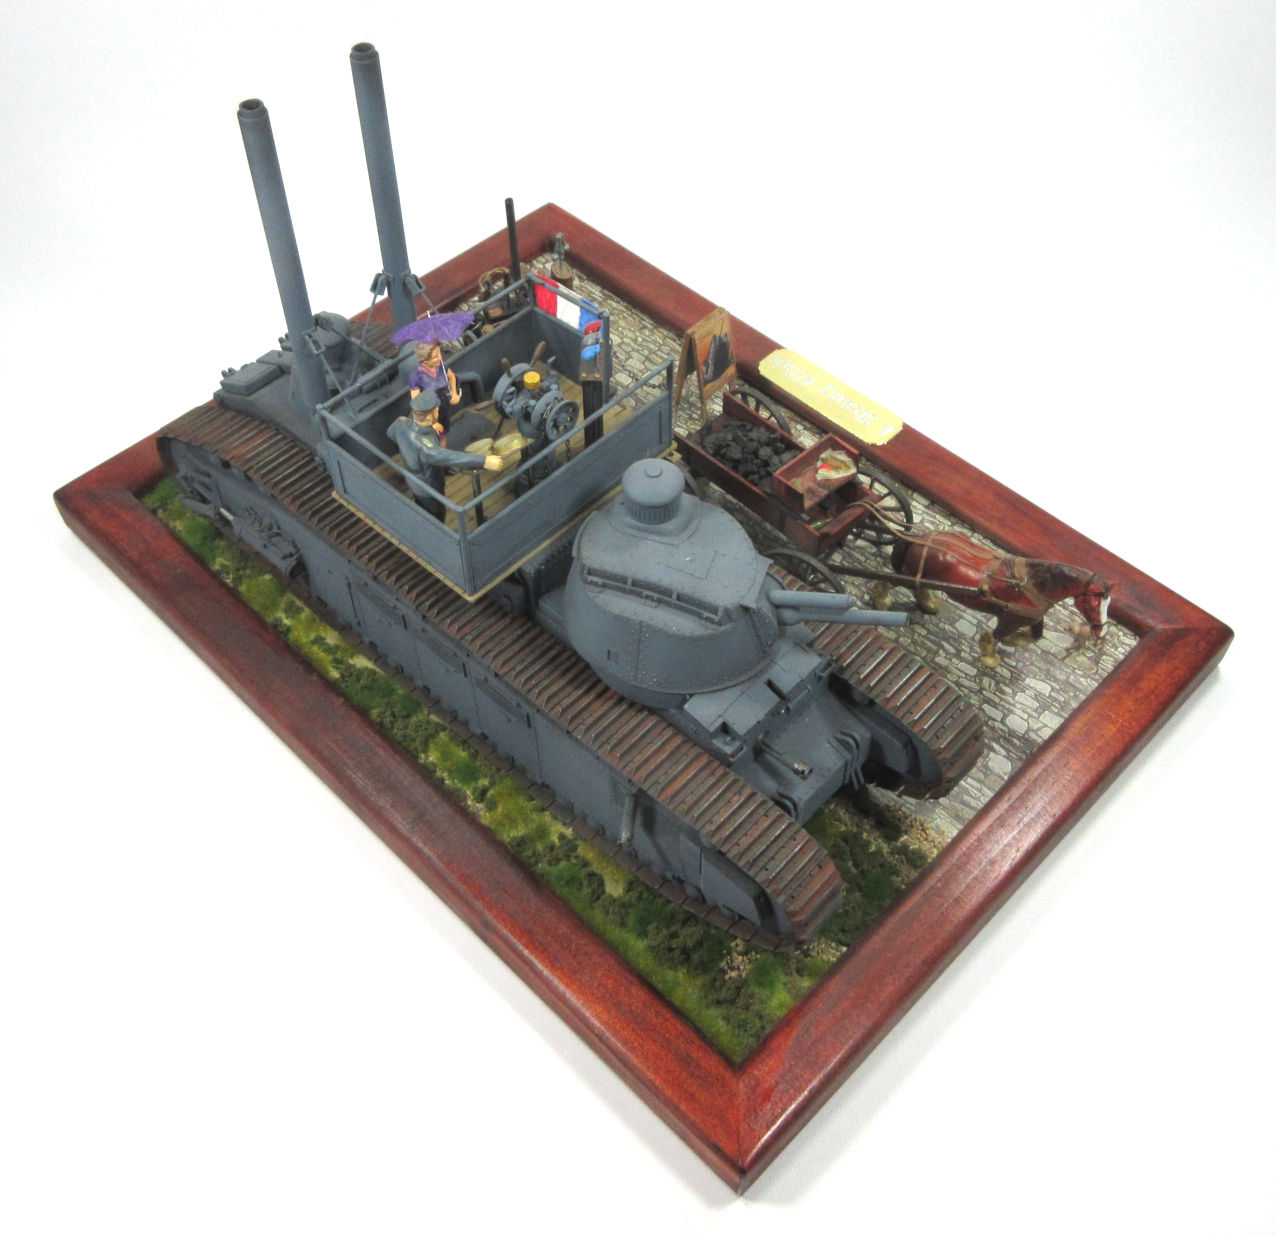
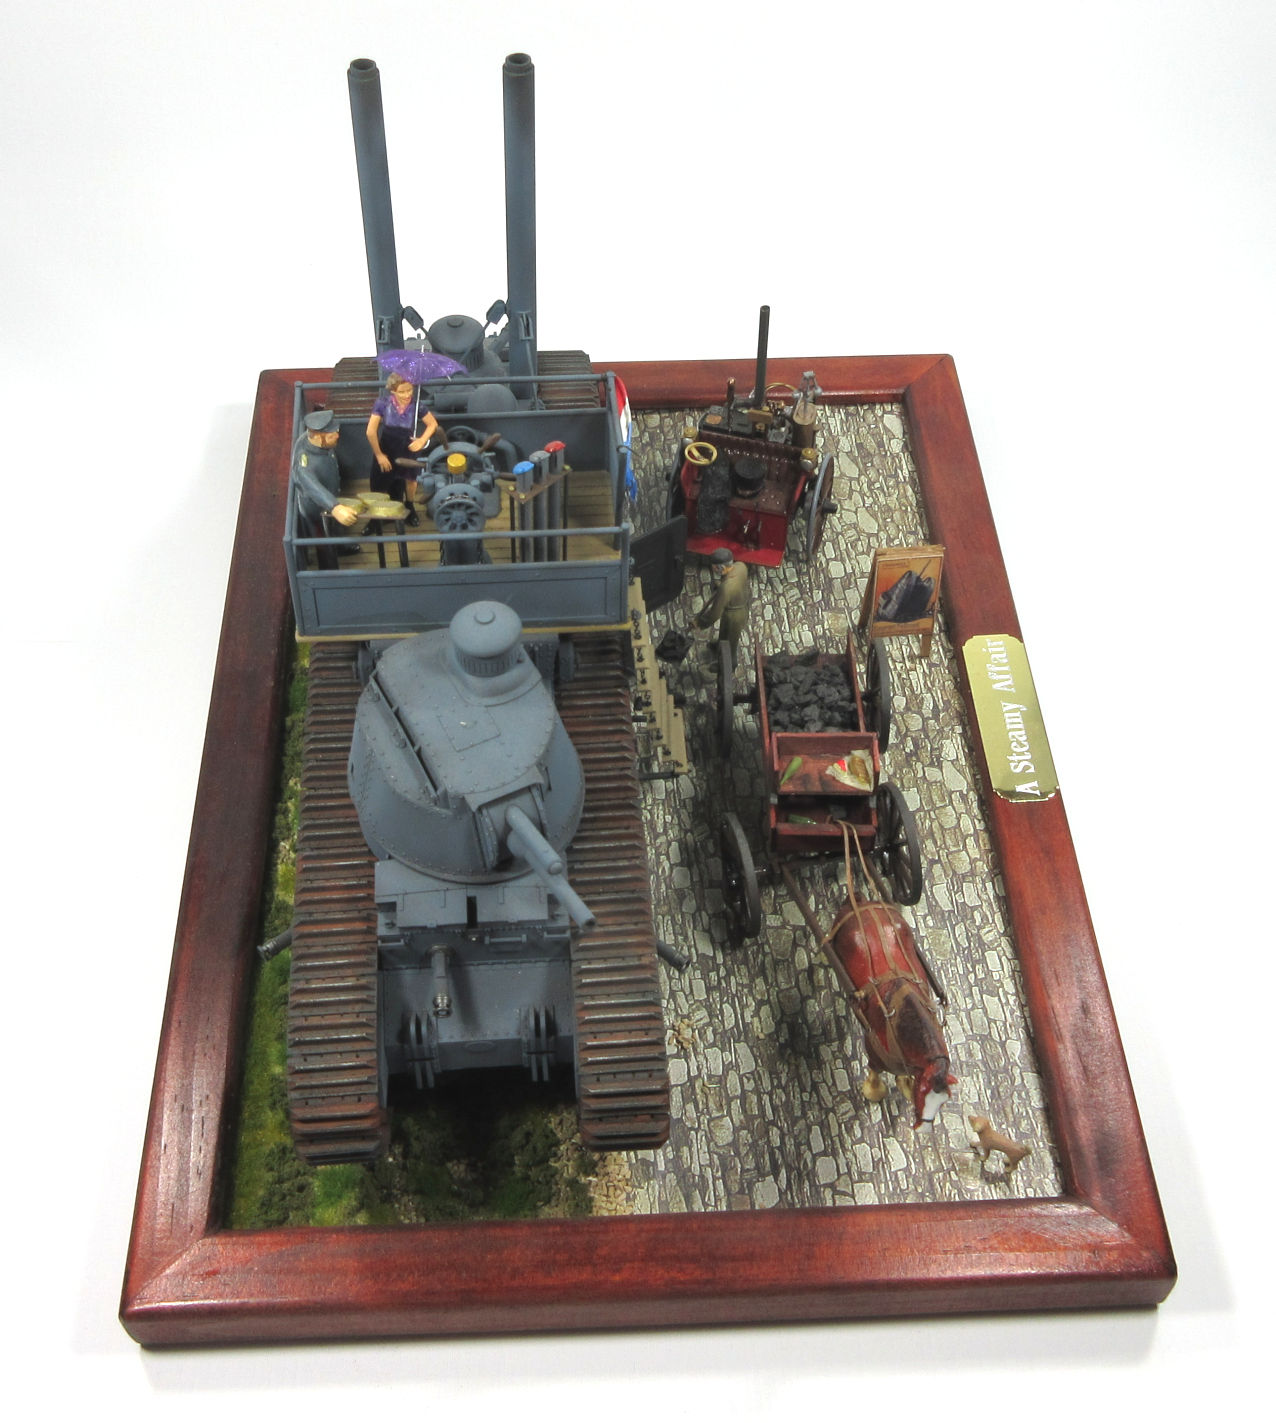
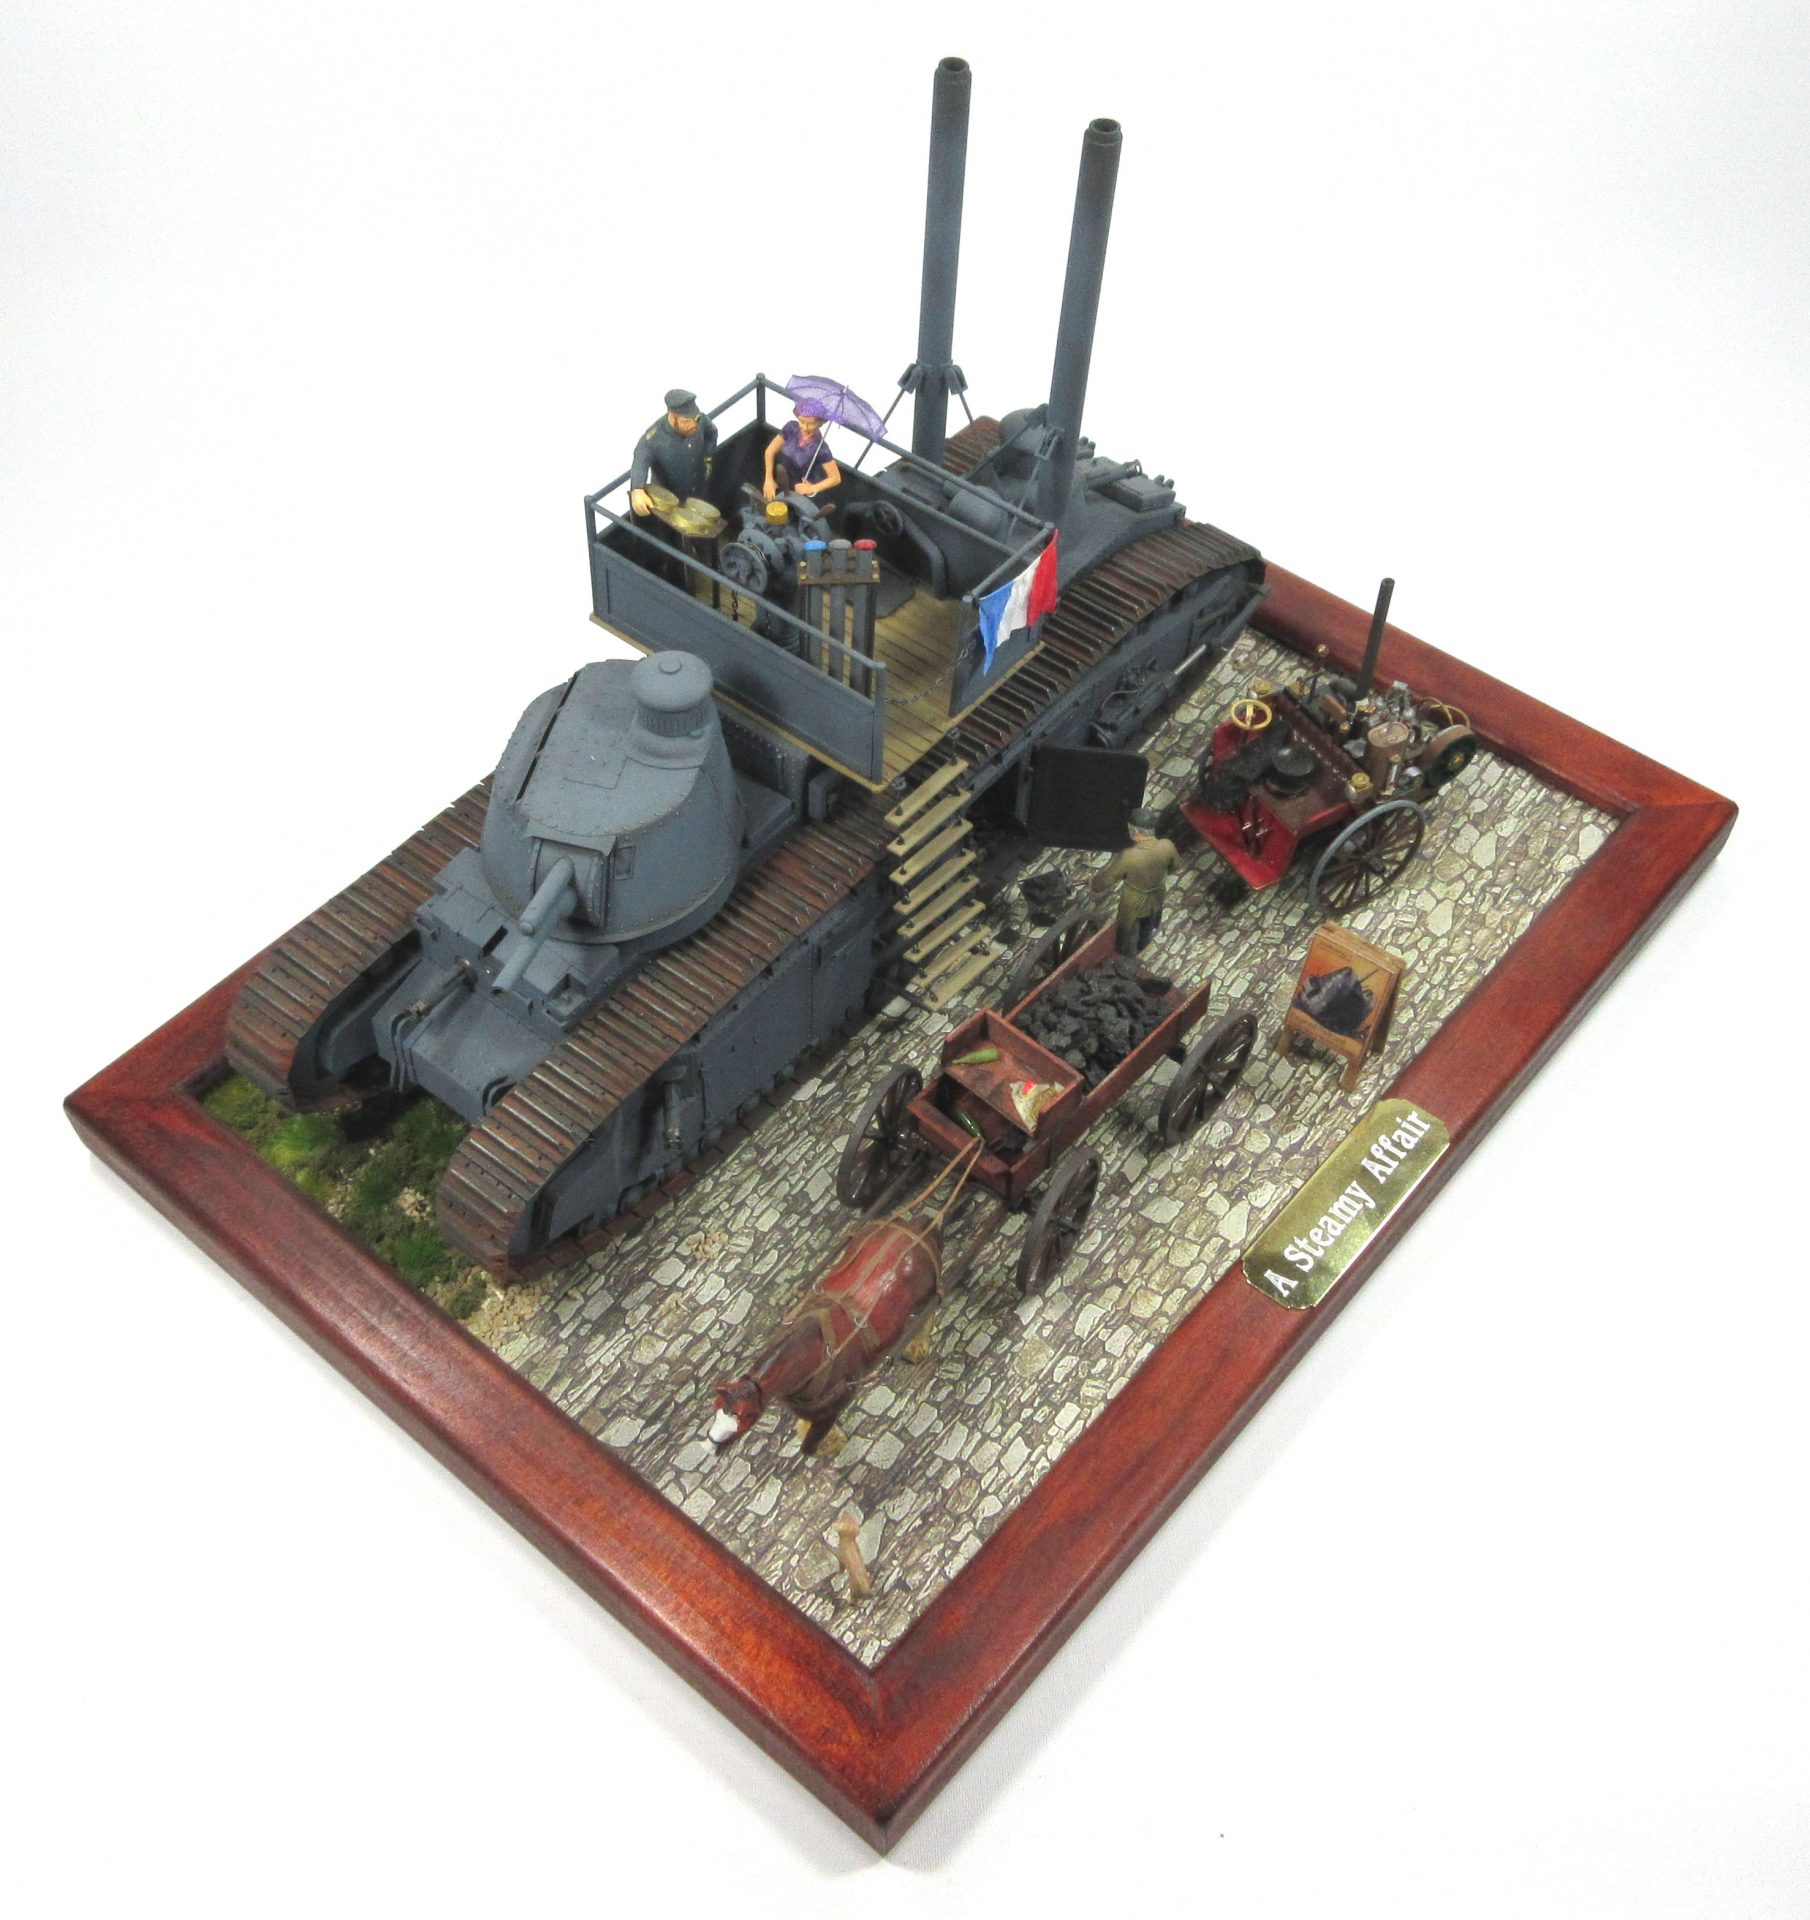
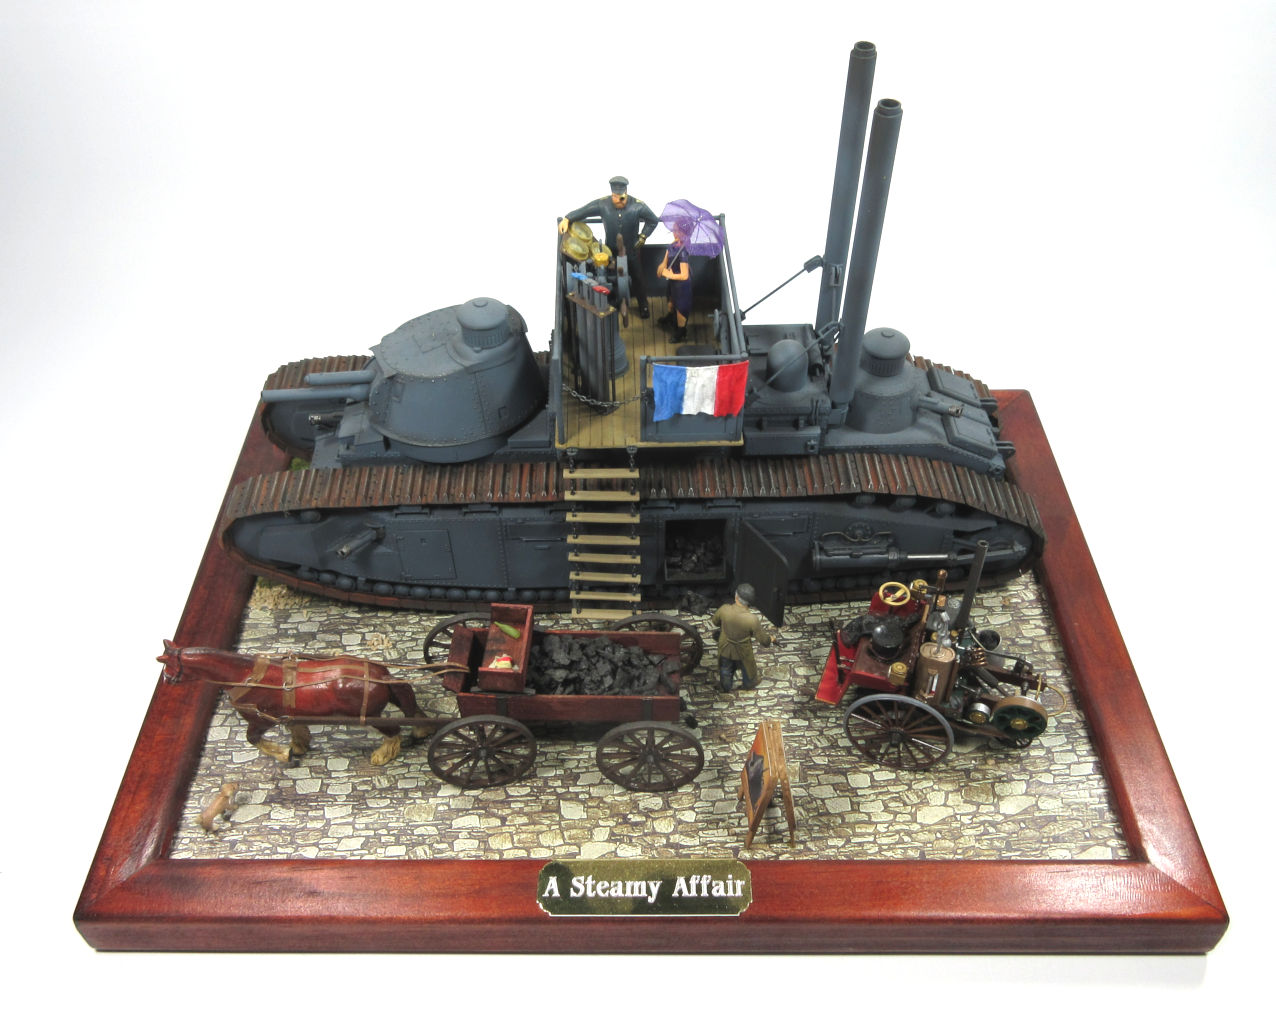
A Steamy Affair – 1/35 scale Steampunk
Sunday 28 Oct saw a unique event on the modelling calendar. This was the first Science Fiction and Fantasy modelling competition held by IPMS, Gunpla Builders and sponsored by SMS and Andrew’s Hobbies in Caroline Springs. This event was held at a scout hall in Melton and looks like it may become a regular event.
So, what sort of thing would you find there? There were about 130 models entered into a variety of categories mainly centered around Japanese Anime tie-ins. The most popular of these are Gundams, these being giant fighting robots. Gundams are big business in Asia, with such market penetration that they can be bought from vending machines and in convenience stores.
The competition was organized along the lines of Gundams and everything else. The everything else was broken down into Star Wars, Star Trek, Sci-fi movie merch, war-gaming armies, non-gundam mechs, figurines and busts, with one solitary Steampunk model in the Diorama category. The event itself was a fairly small affair, with a couple of traders selling Sci-fi and modelling supplies. I’m not sure how many punters attended but there were about forty nerds assembled for the trophy presentation.
‘What is Steampunk?’, you may well ask. Wikipedia says:
Steampunk is a subgenre of science fiction or science fantasy that incorporates technology and aesthetic designs inspired by 19th-century industrial steam-powered machinery. Steampunk works are often set in an alternative history of the 19th century’s British Victorian era or American ‘Wild West’, in a future during which steam power has maintained mainstream usage, or in a fantasy world that similarly employs steam power.
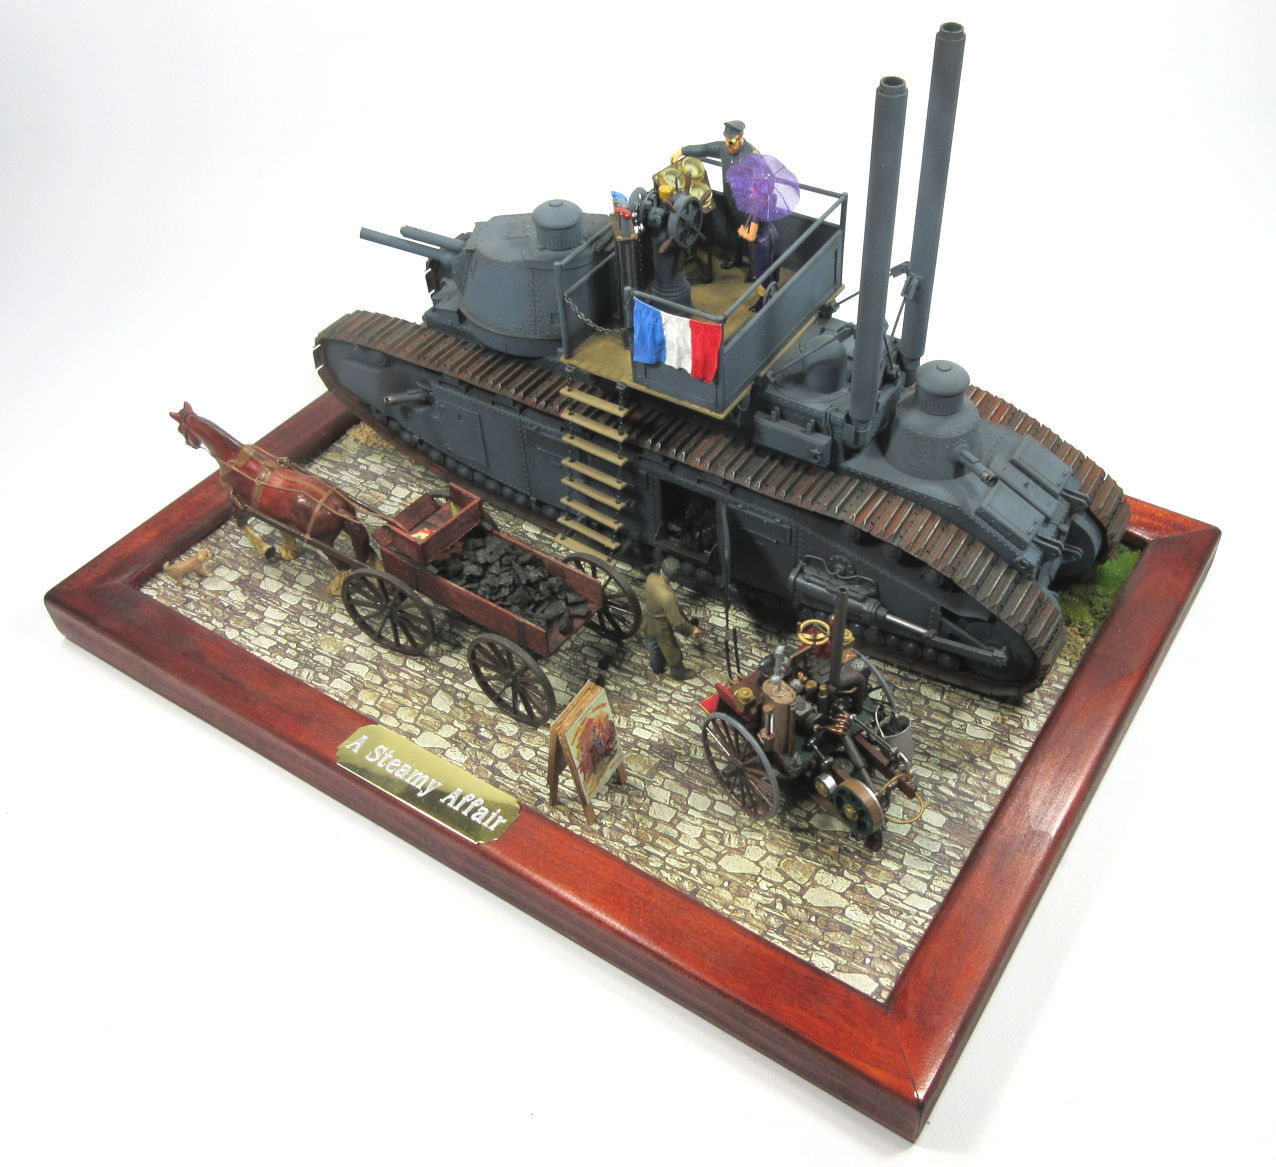
In the pages of this very publication and many moons ago, I had threatened to steampunk a French tank. I’ve finally got off my arse and done it, so don’t say I don’t deliver on my promises.
Meng Char FCM 2c
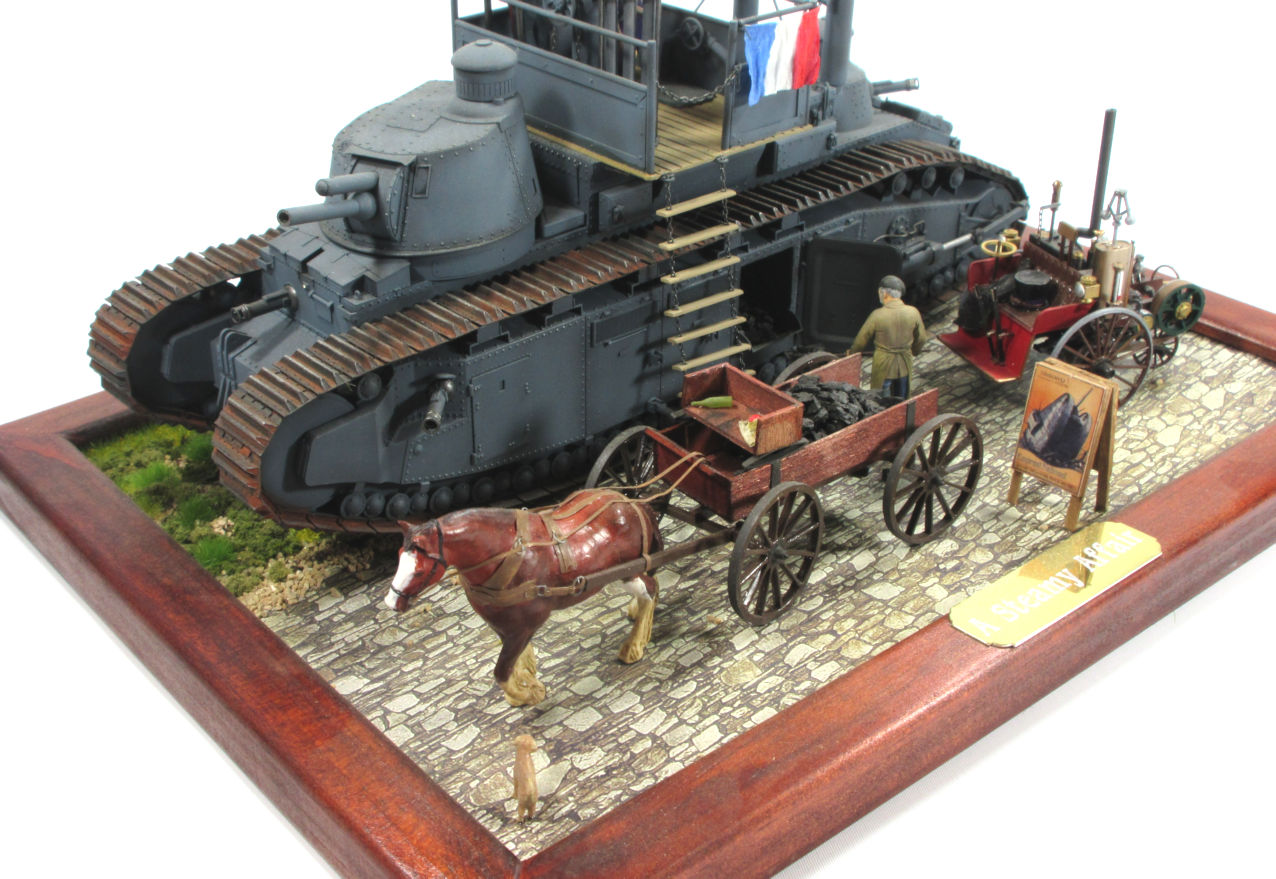
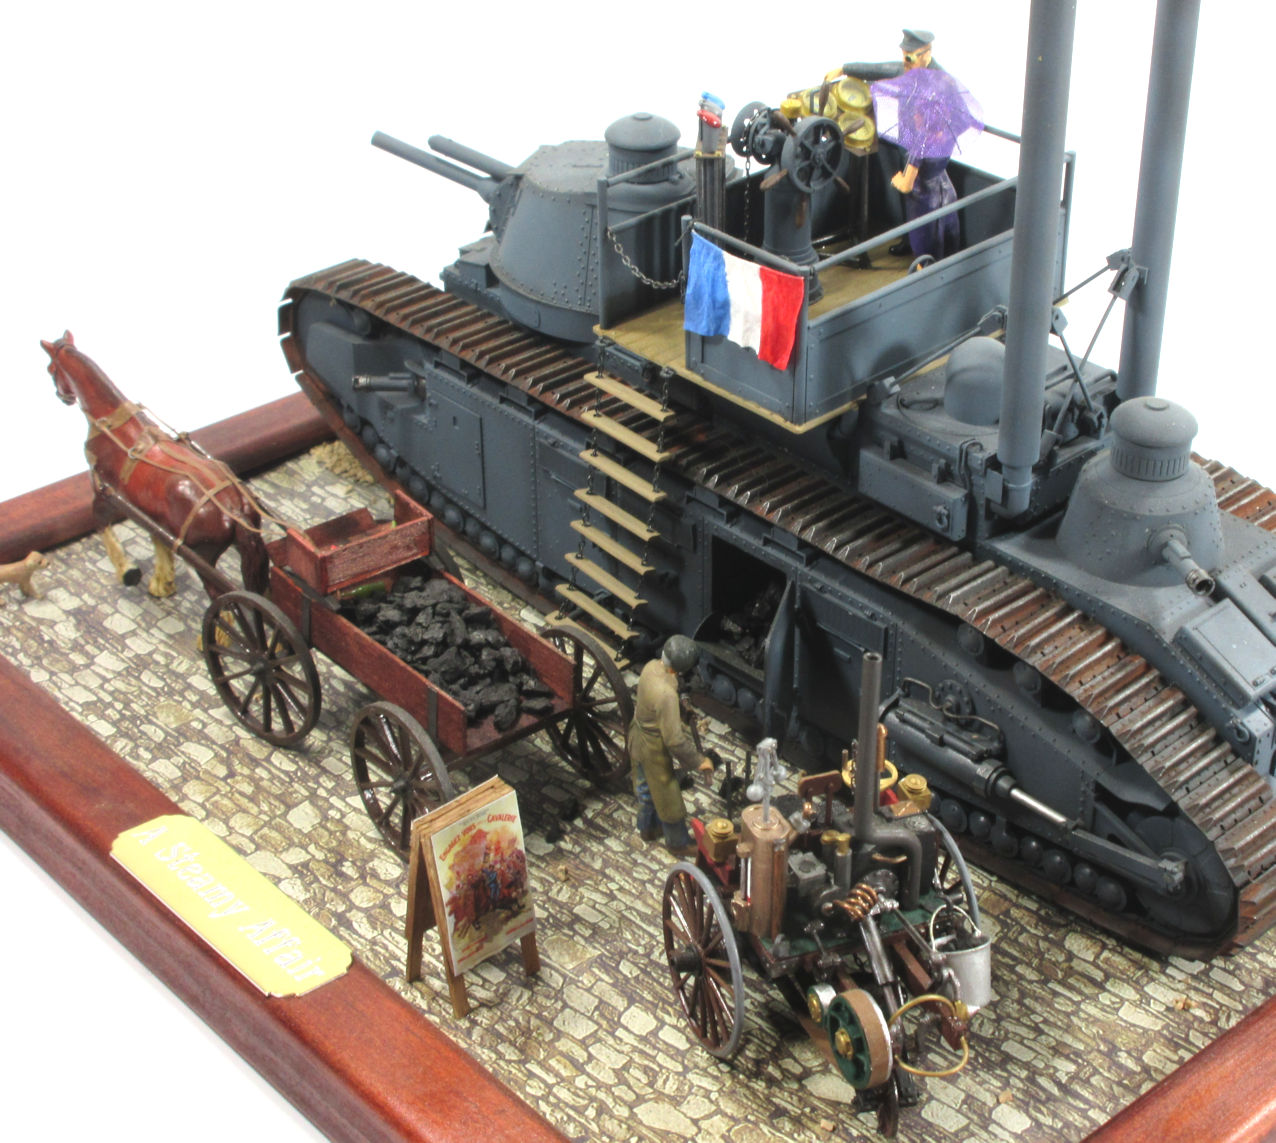
The Char 2c was a tank developed in France during the First World War that was not utilized until after the war. During the development of the early tanks, they were known as landships and it wasn’t until after British tanks were shipped to France that the term ‘tank’ was applied. This was due to the misnomer ‘water-tank’ being applied for security reasons. The tank is, by dimensions, the largest tank built to date.
The model was chosen for steampunking as it is pretty steampunk to begin with. The vehicle is covered in rivets, has archaic fixtures, and looks like an uninformed artists concept draw from a description, without the benefit of ever actually seeing a tank.
So then, if I am going to have a land ship that is steam powered, what would it need?
The first and most obvious requirement is a steam propulsion system. The base model used for this diorama was the Meng Char 2c. The model was one I had built several years ago but had not got around to painting. I still have one in the stash, but the thought of building the 300,0000 road wheels prompted me to take the lazy path and use the built one.
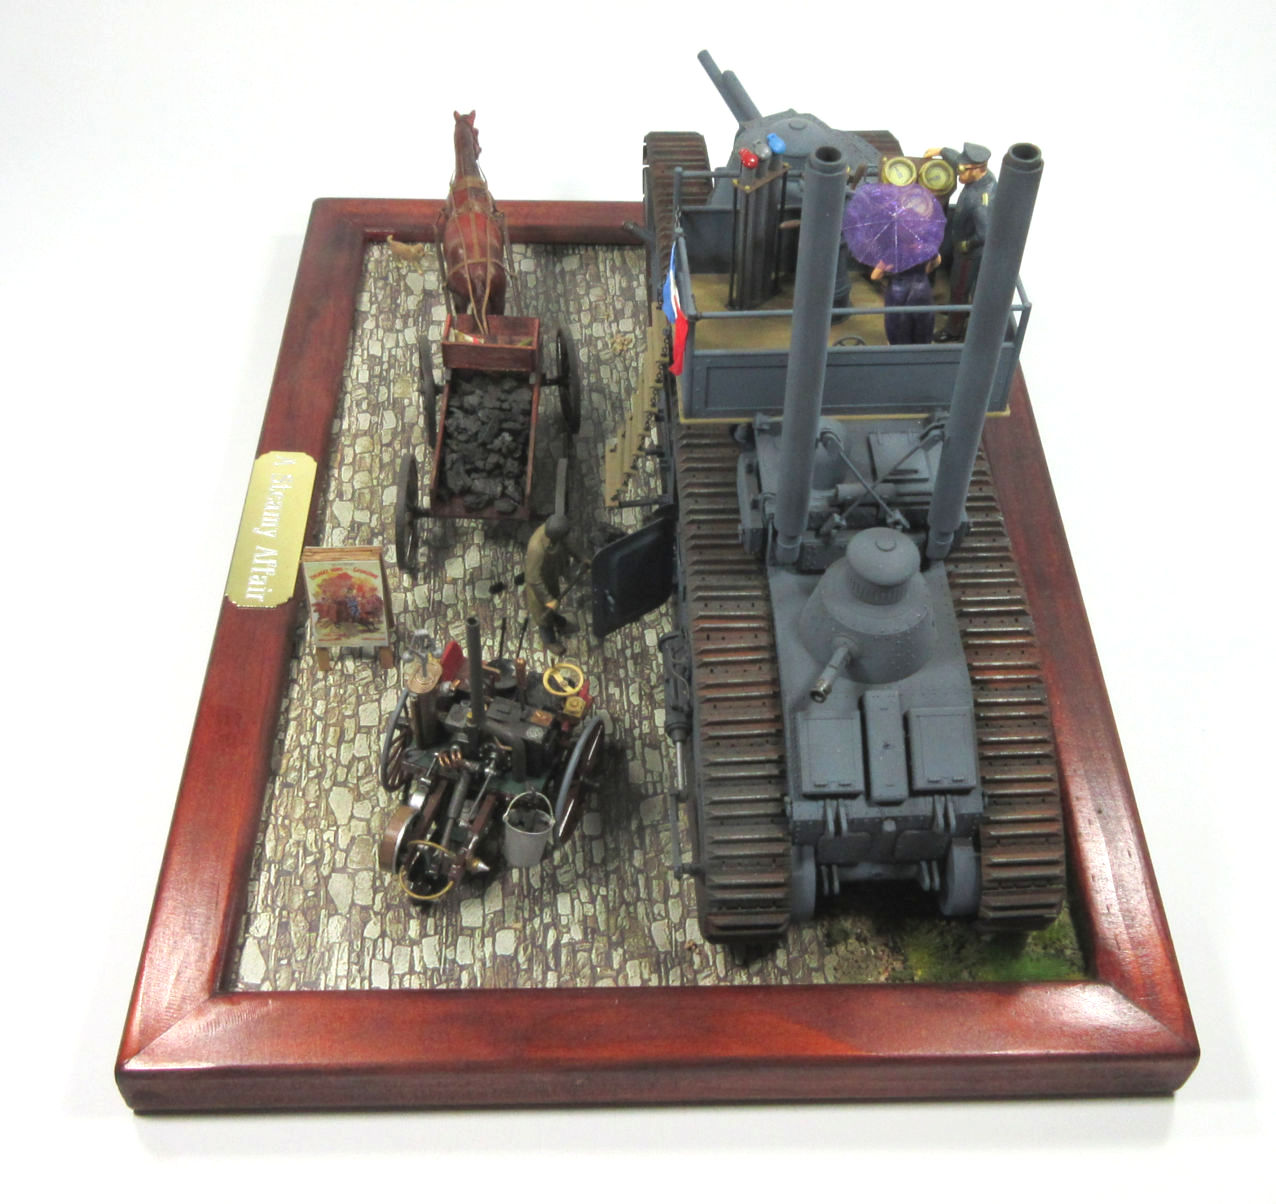
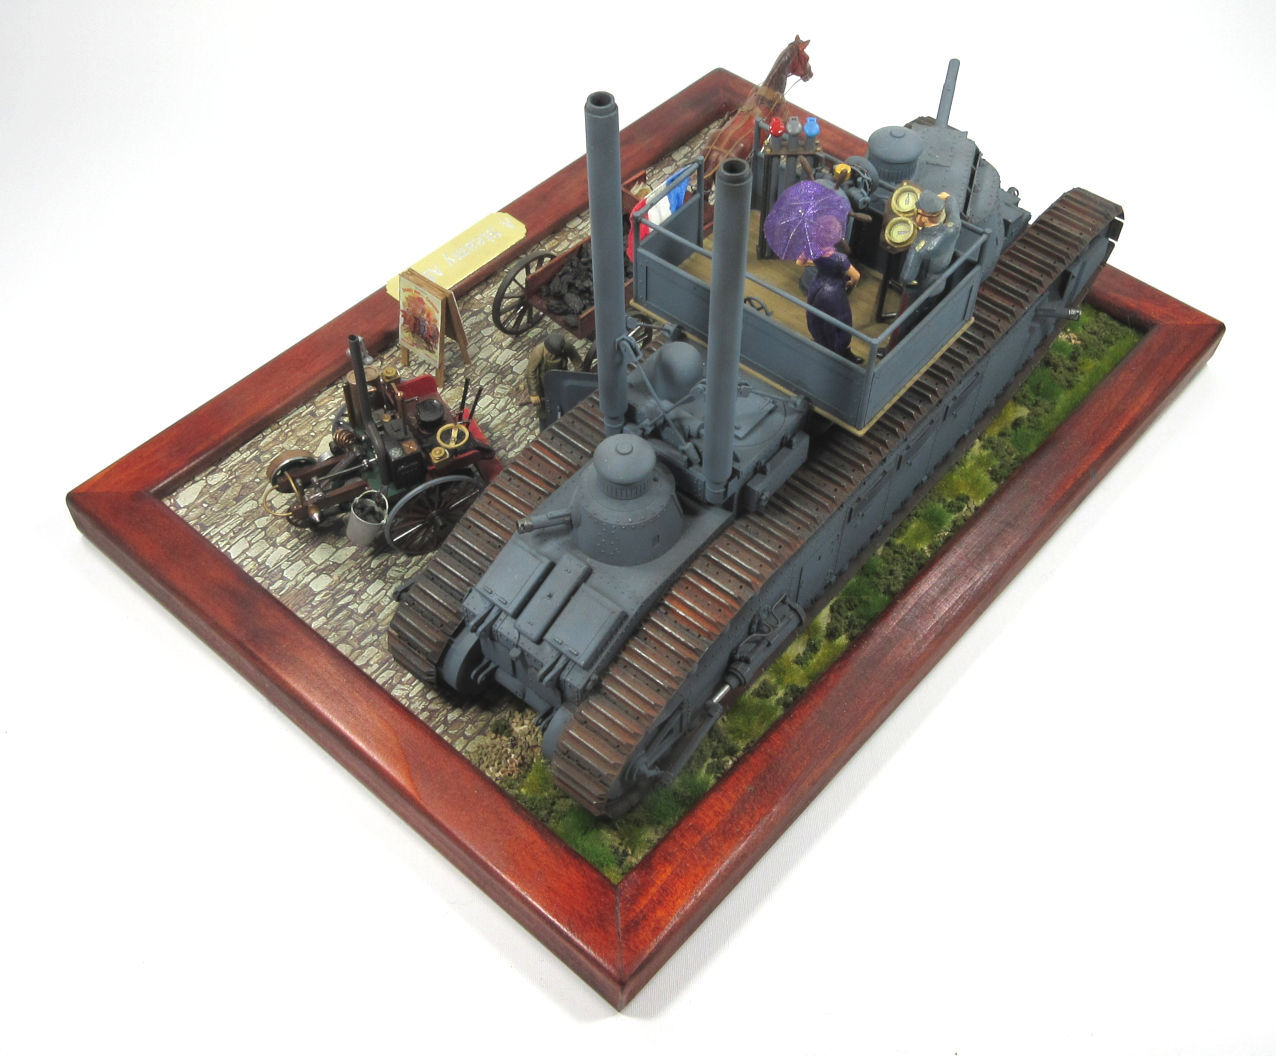
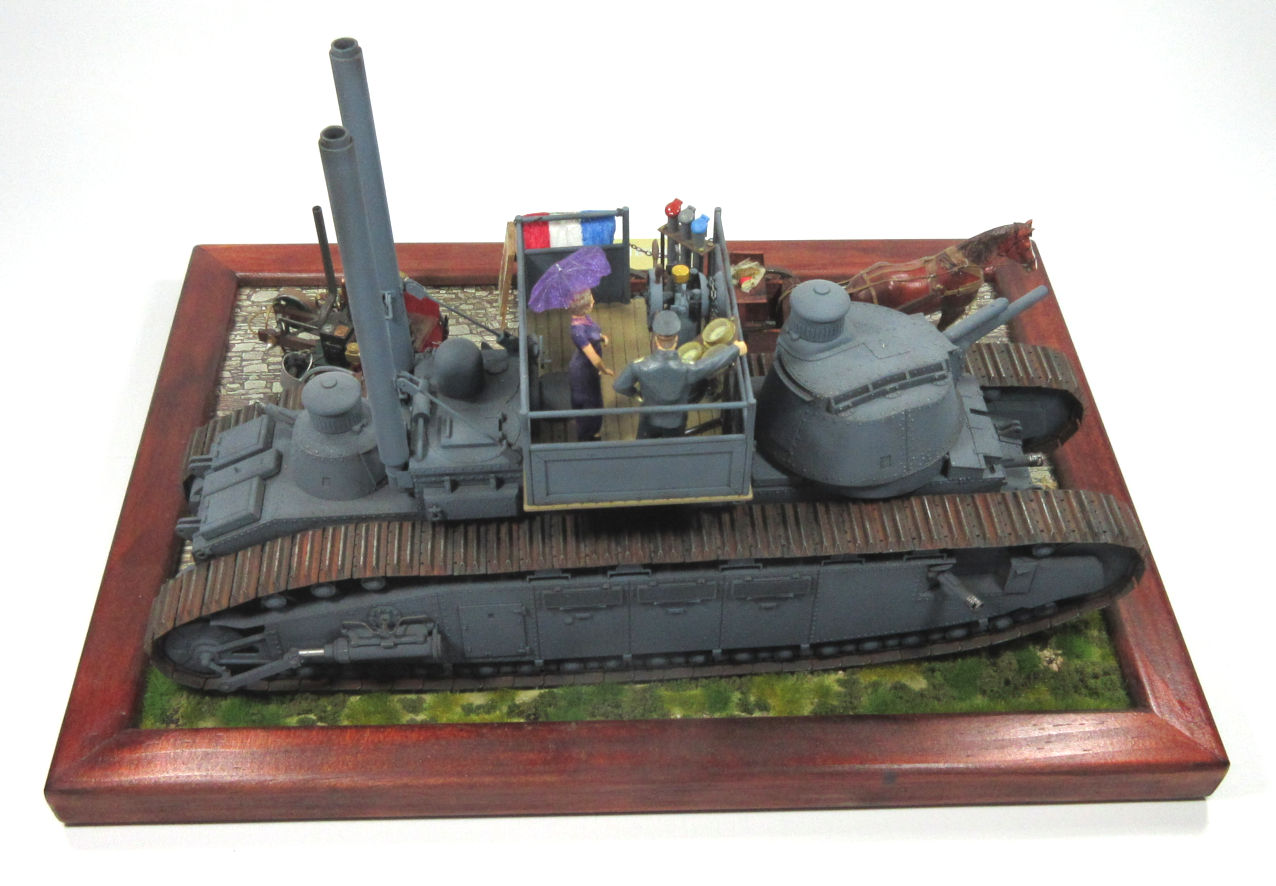
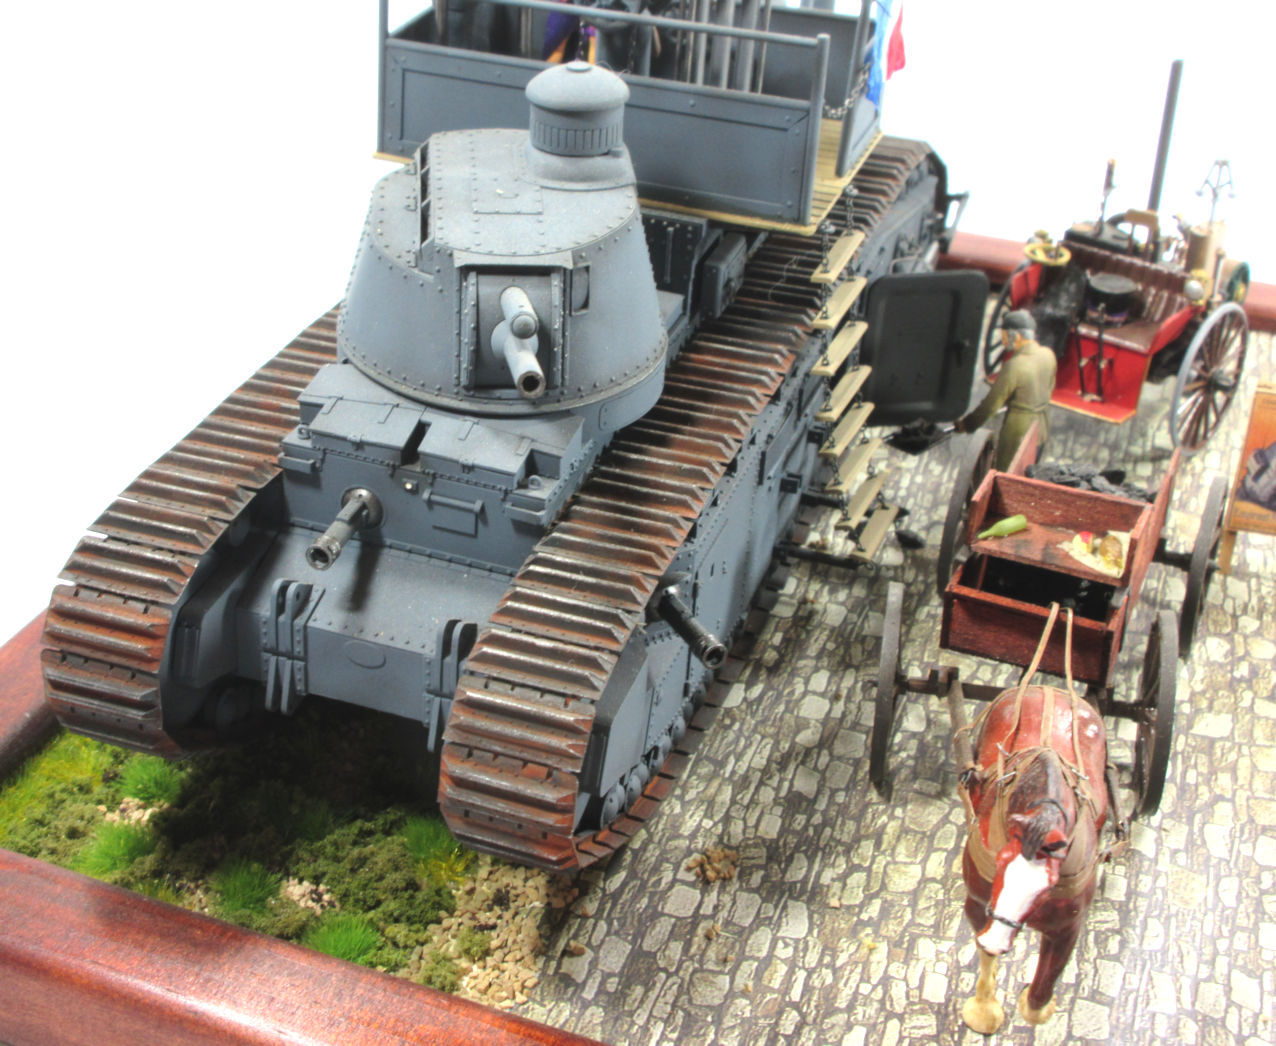
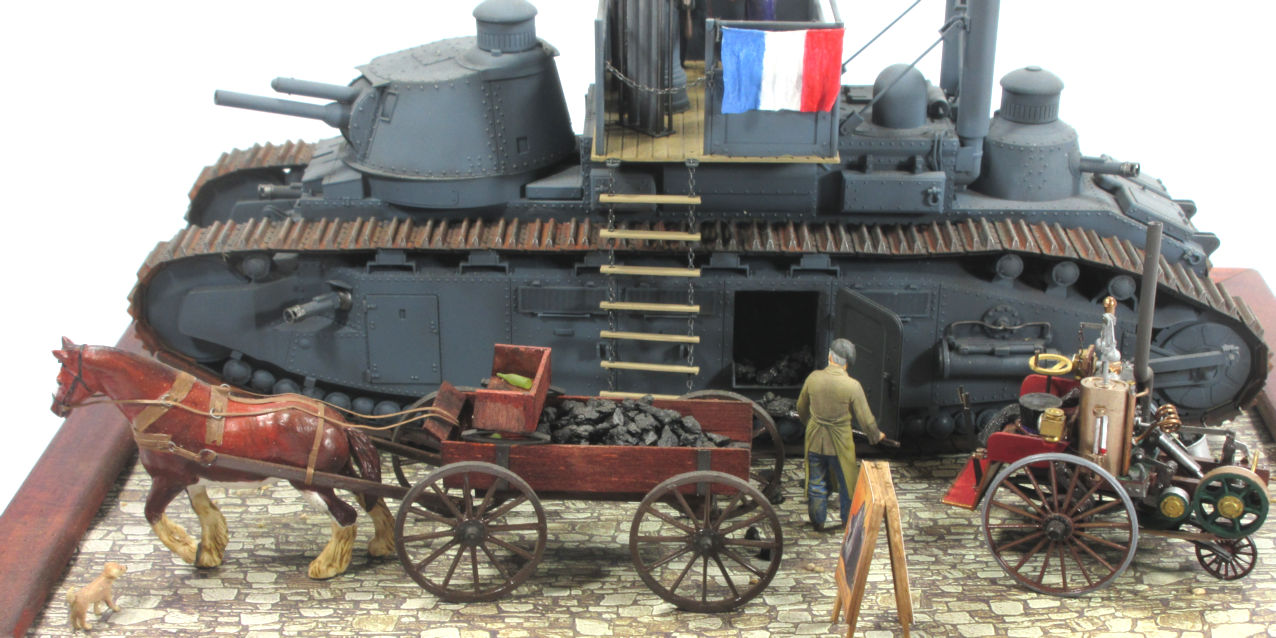
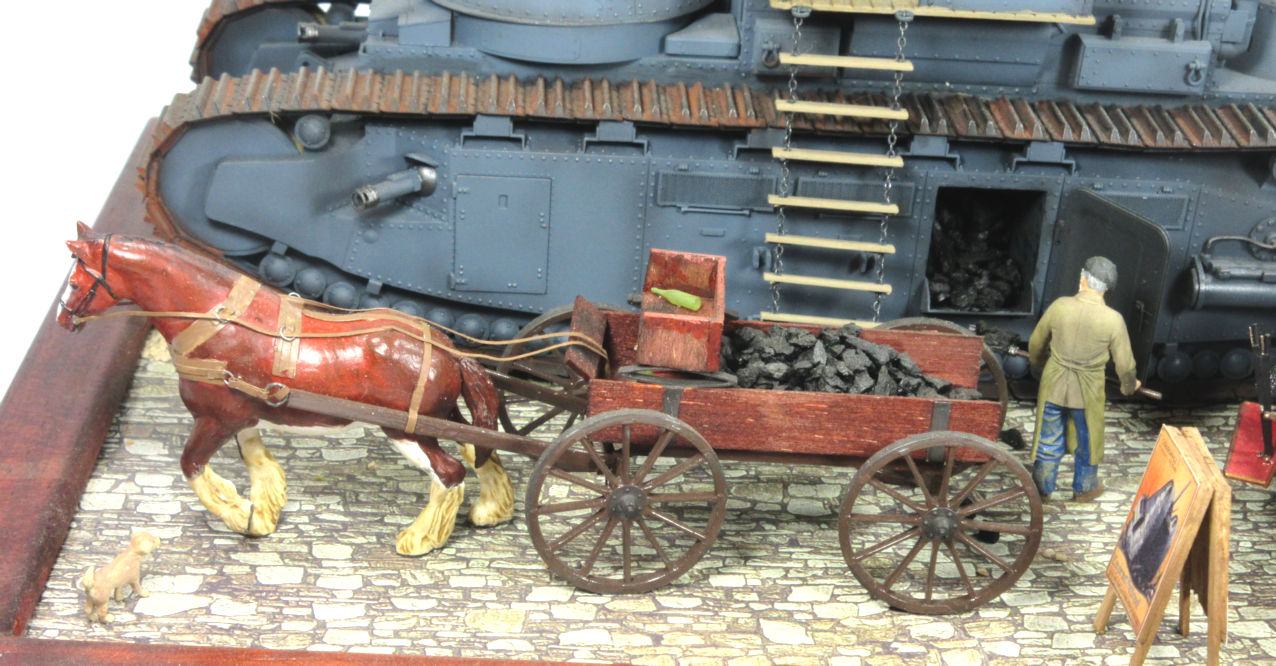
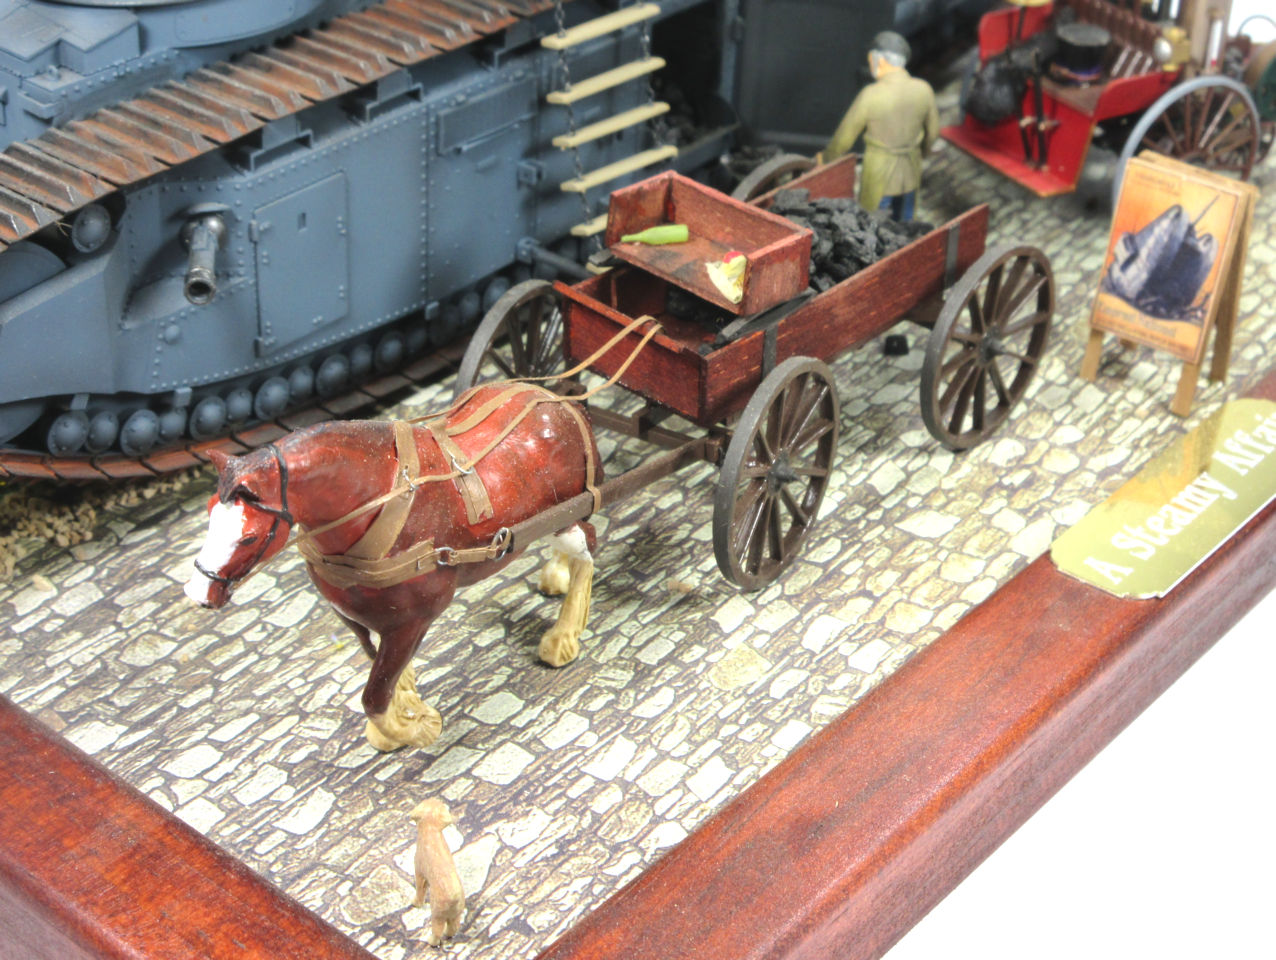
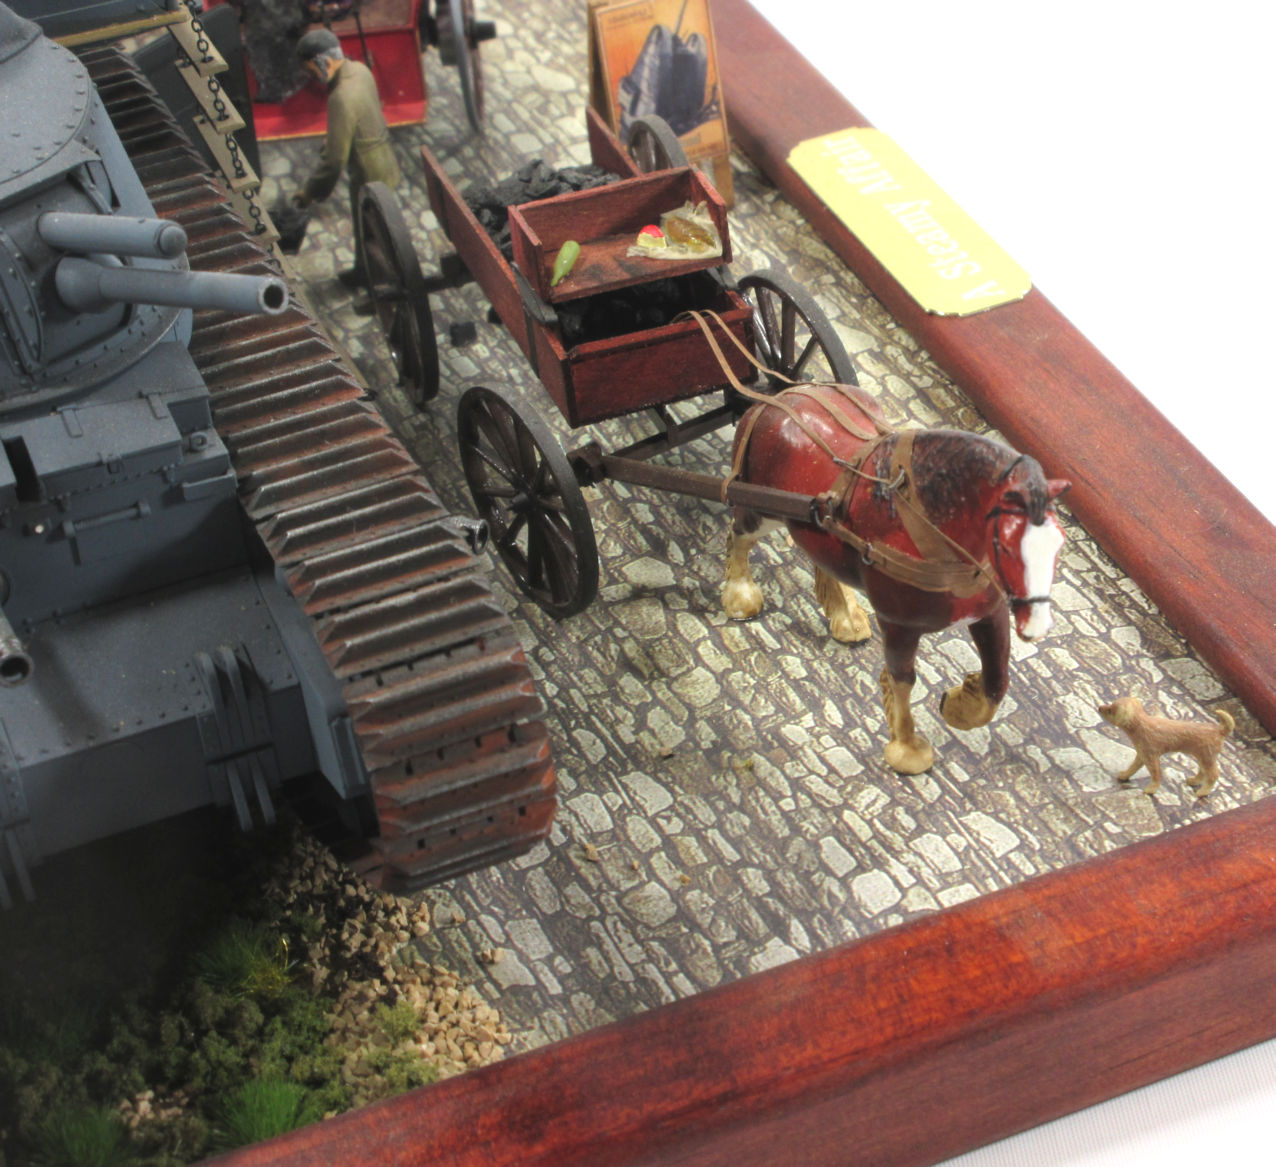
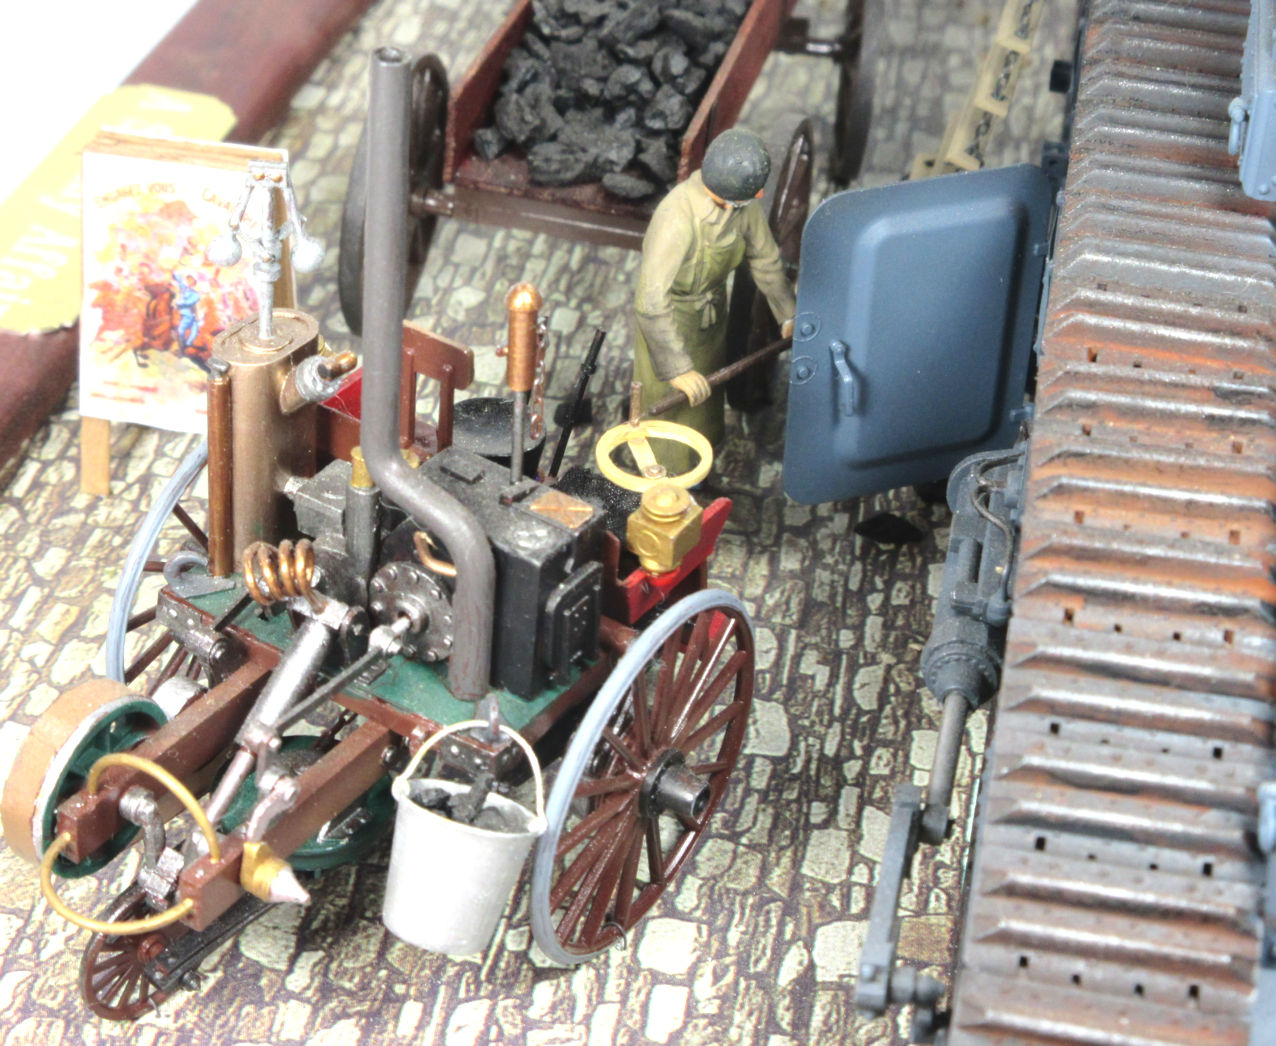
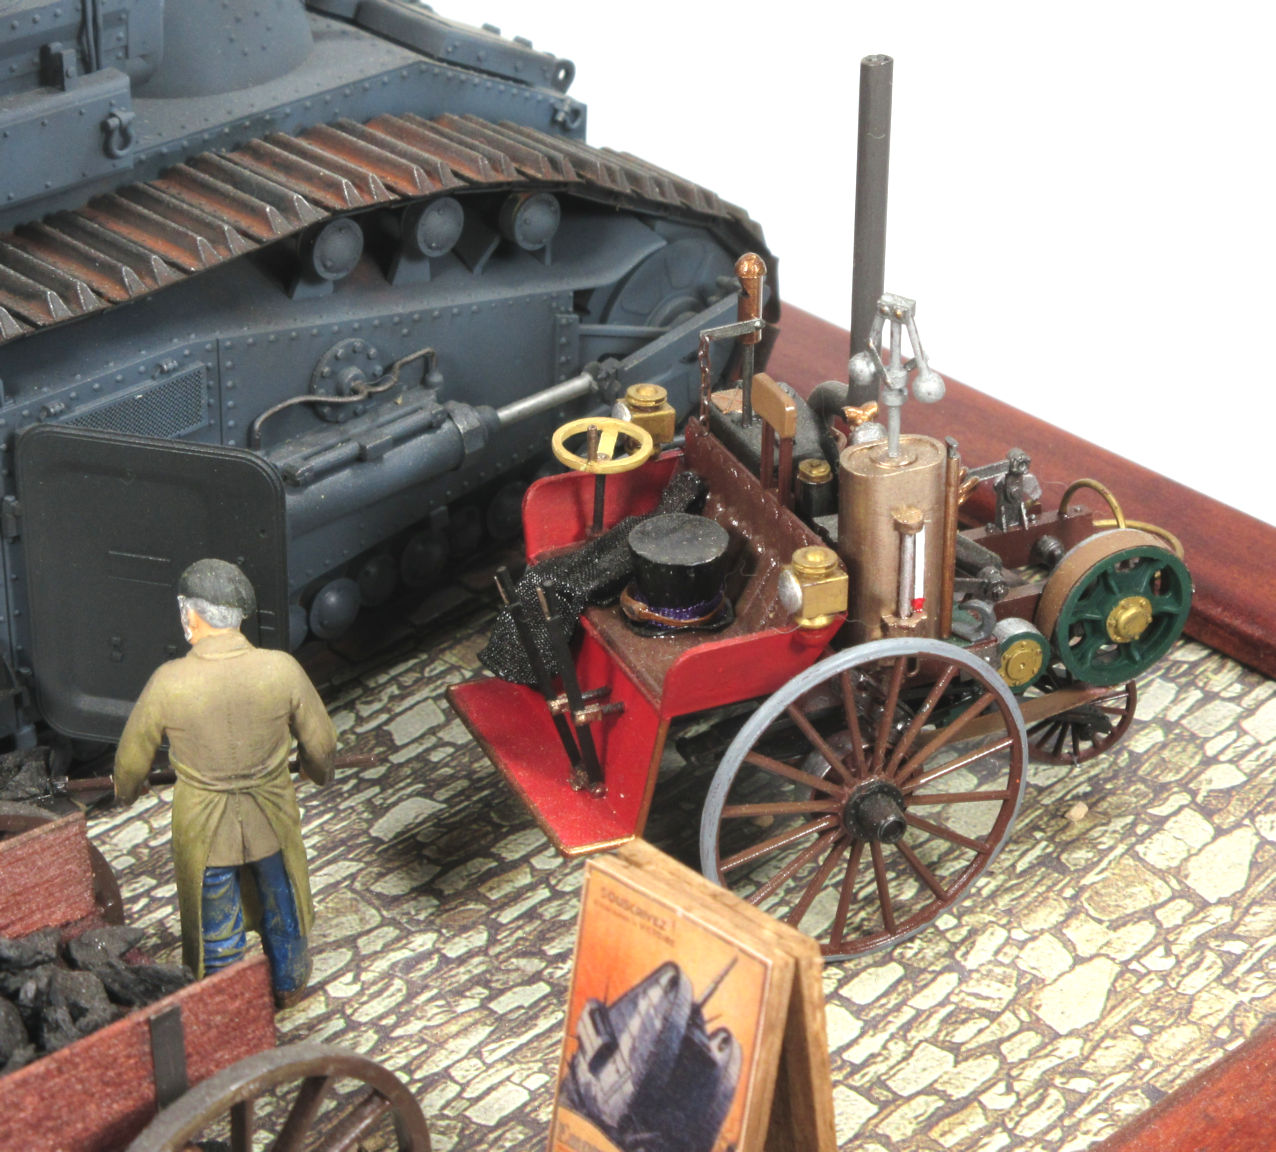
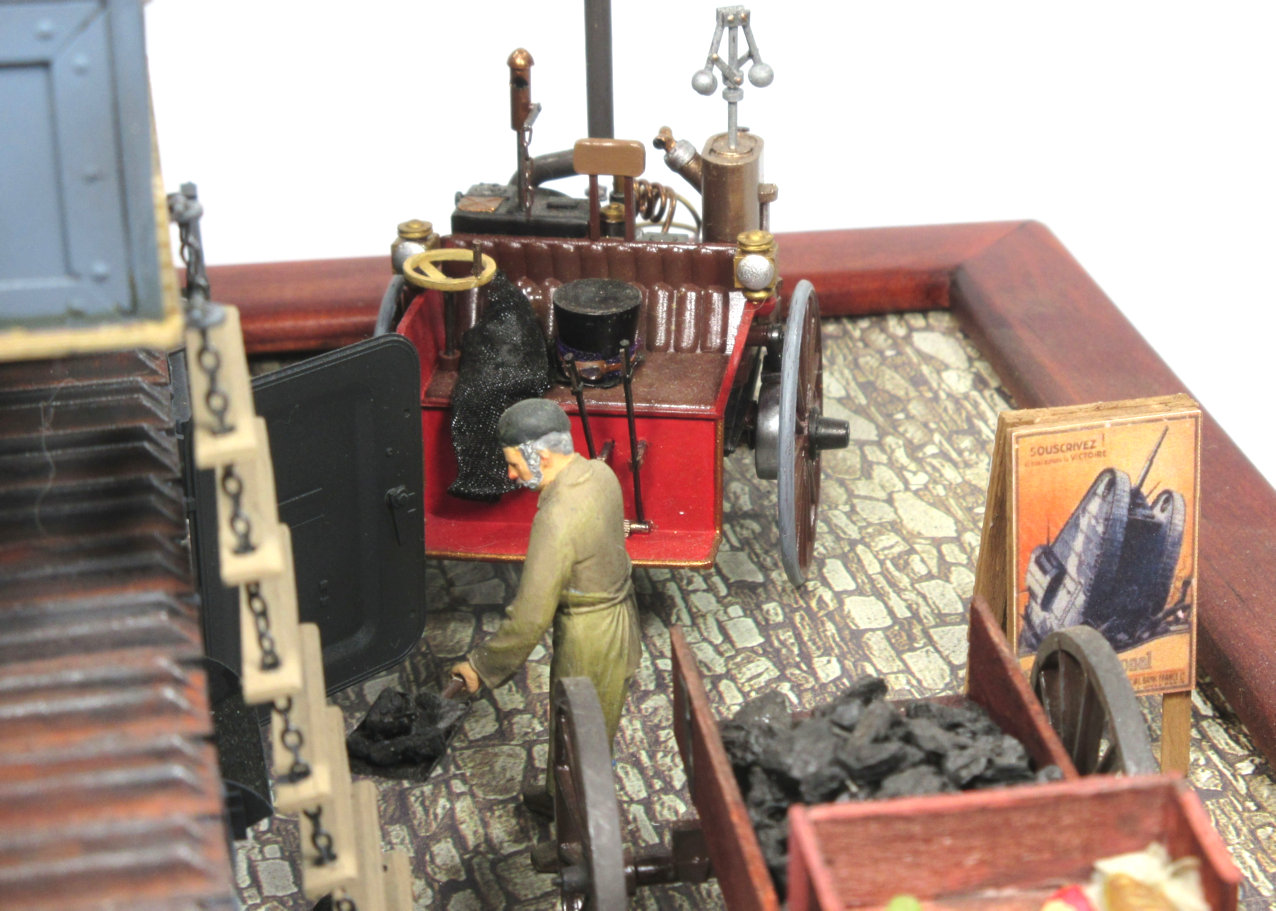
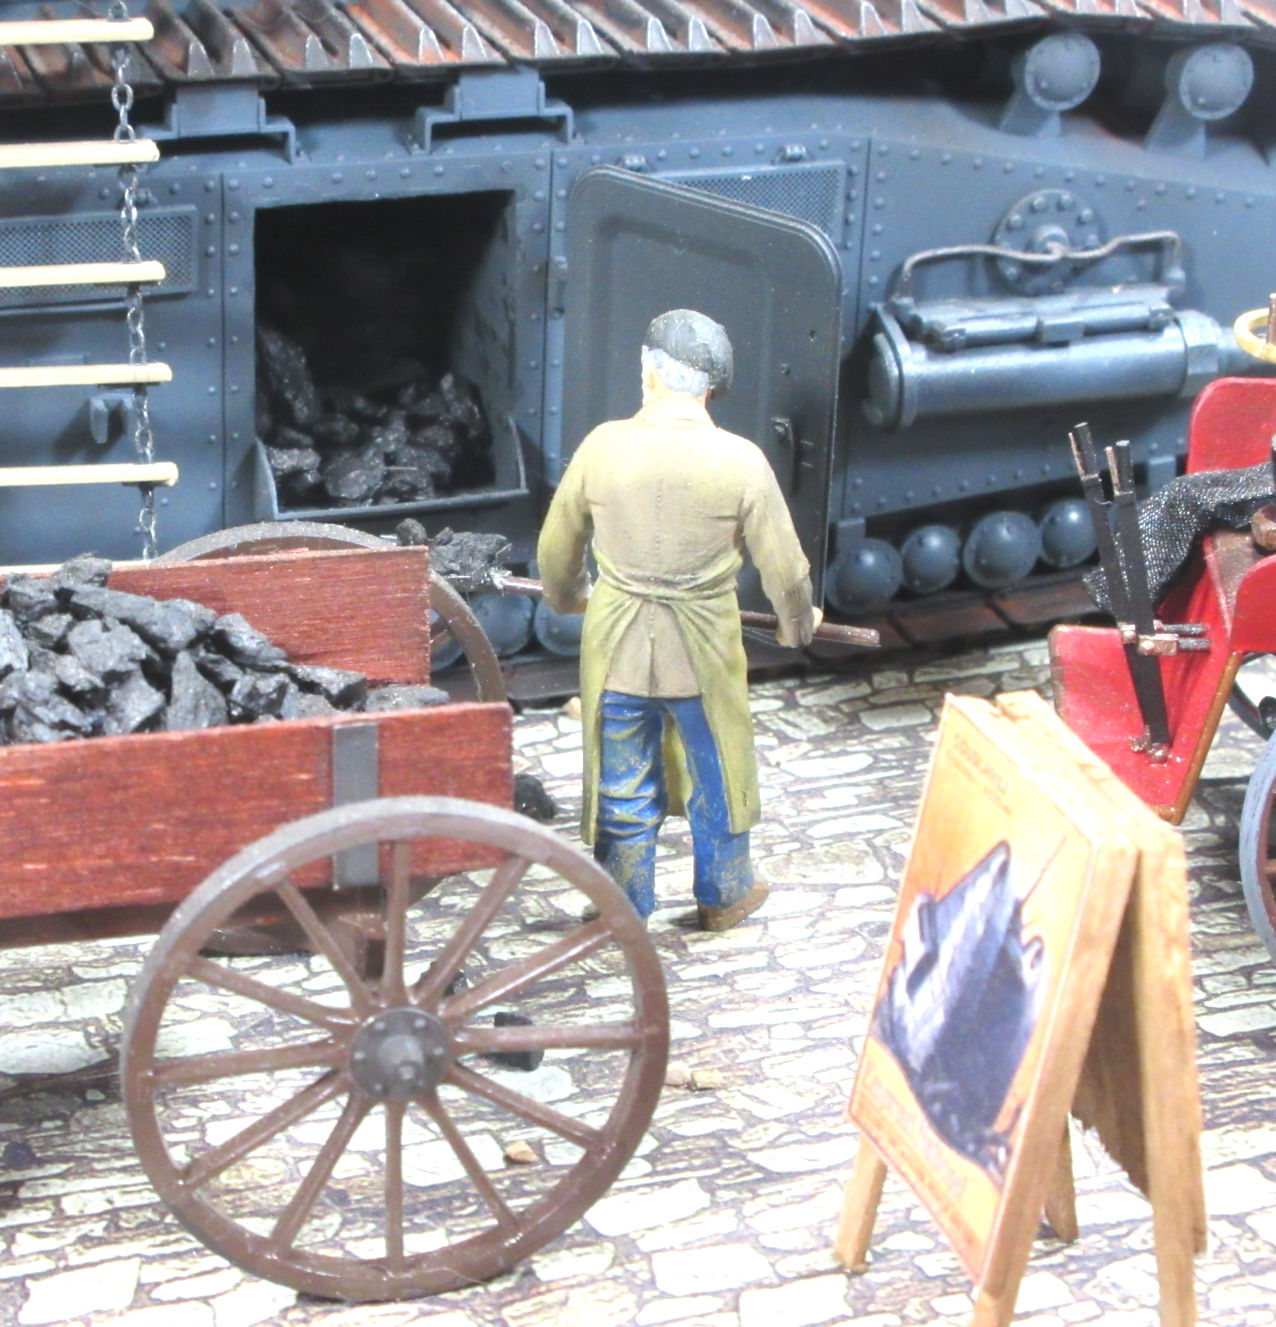
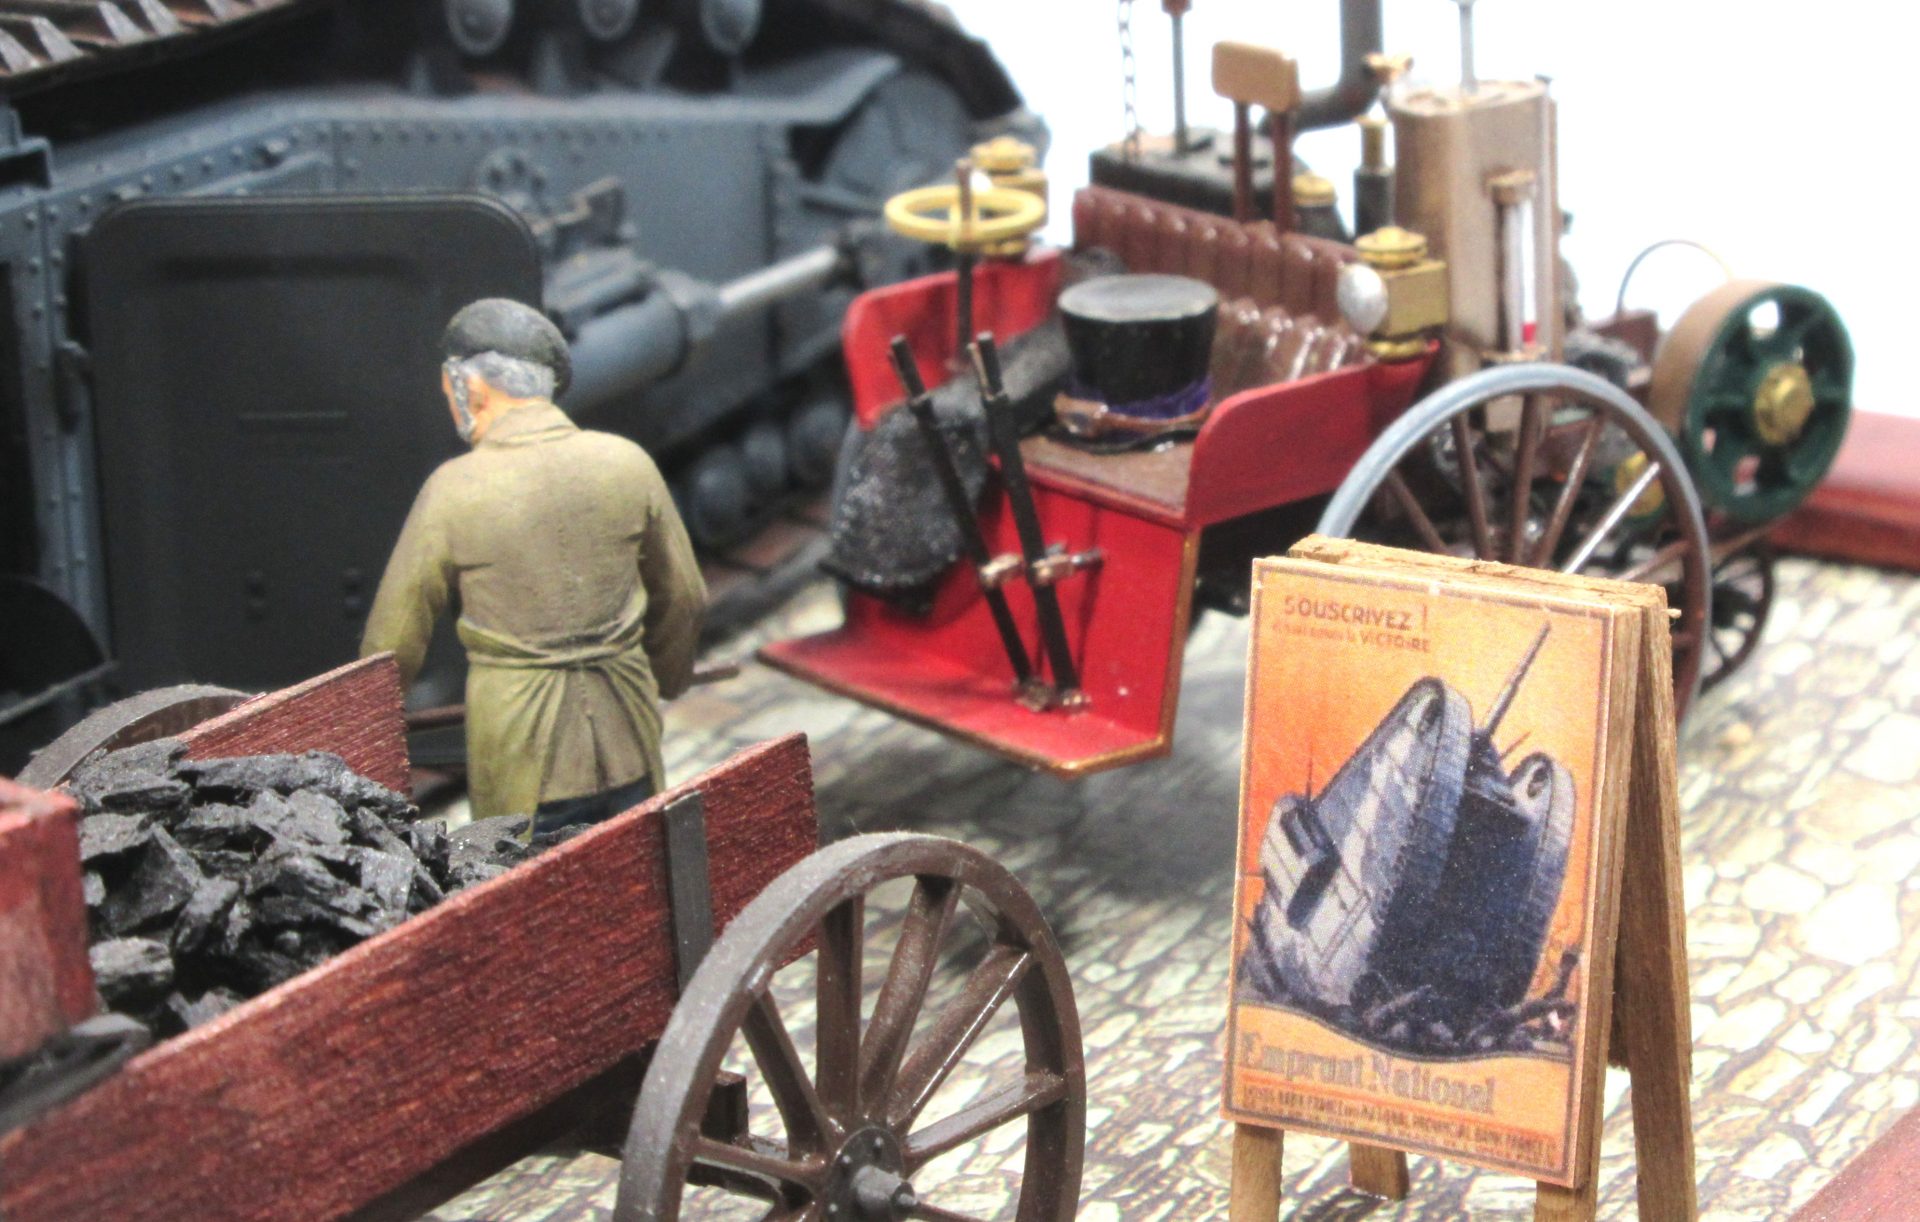
The first thing that was done was to remove everything above the roof line between the turrets, to give a flat position to mount a new superstructure. Next a coal bunker compartment was added amidships made from styrene sheet. This required a large hole to be cut in the side in the panel in front of the rear turret. The compartment was built from sheet styrene with the sheets being inserted into the hole diagonally and then being stood up. This allowed the compartment to be larger than the access hole. A small chute was added to the bottom, to keep the coal in, and an external hatch added. The hatch was a left over from a Chinese APC, so hinges and door locks were also fabricated. For the coal, activated charcoal fish tank filter media was used. This was mixed with some diluted PVA and the resulting paste, spooned in, and allowed to naturally settle into a pile. PVA appears to work quite well on this charcoal but it does suck the water out of the glue, reducing the drying time.
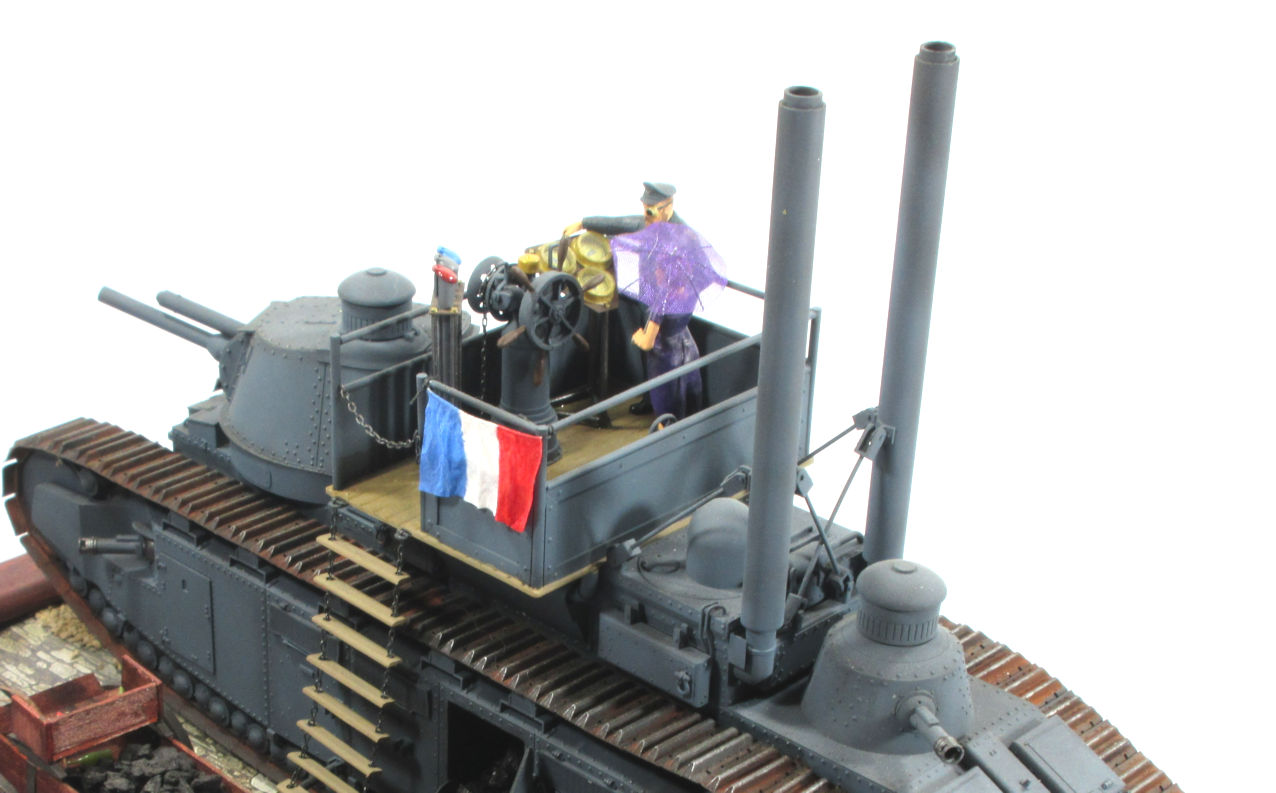
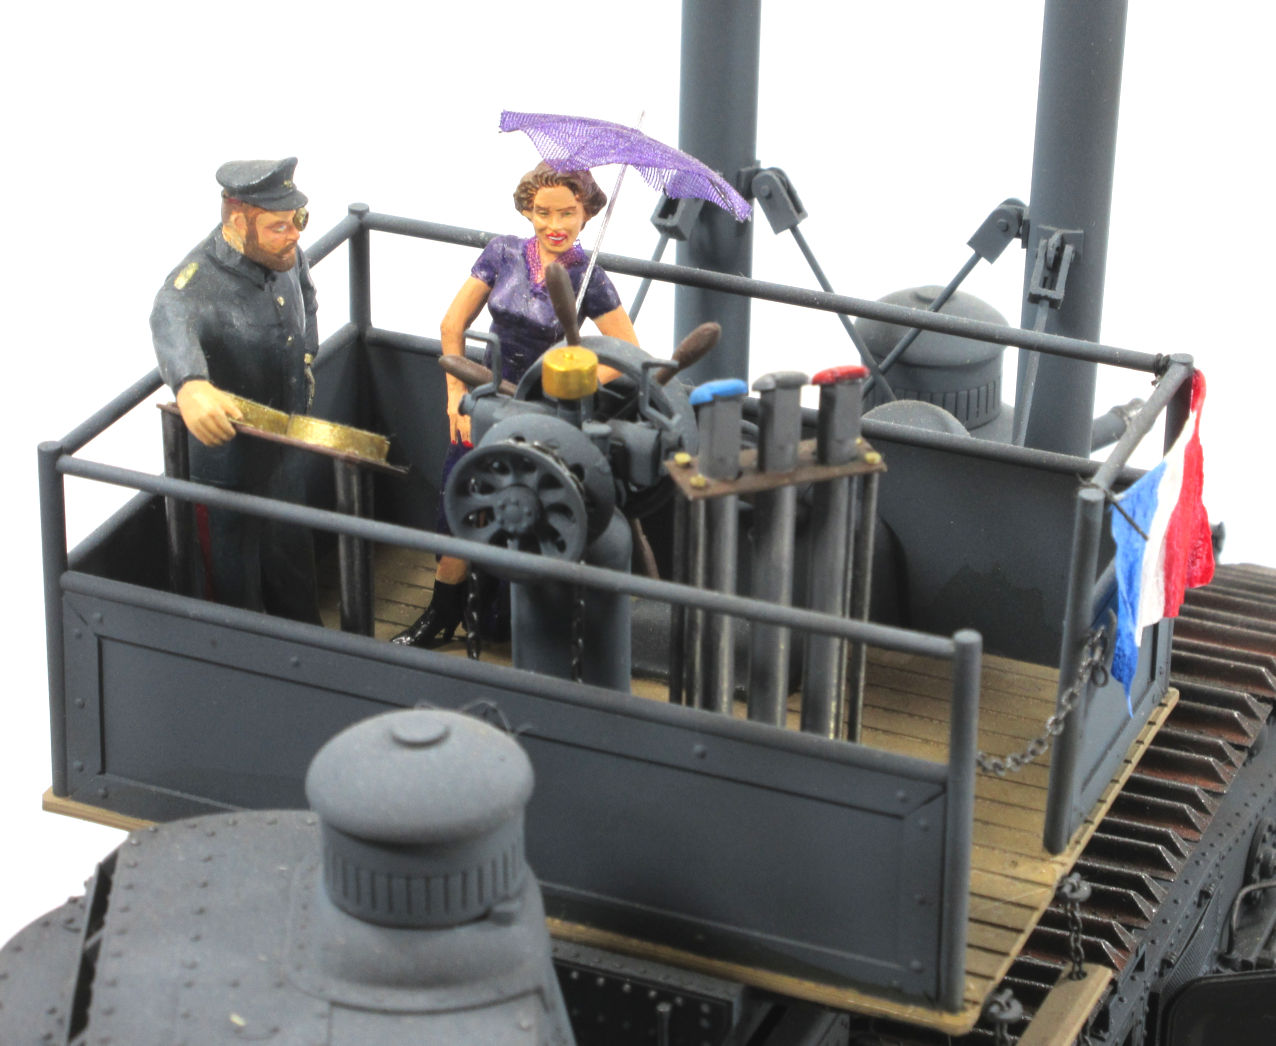
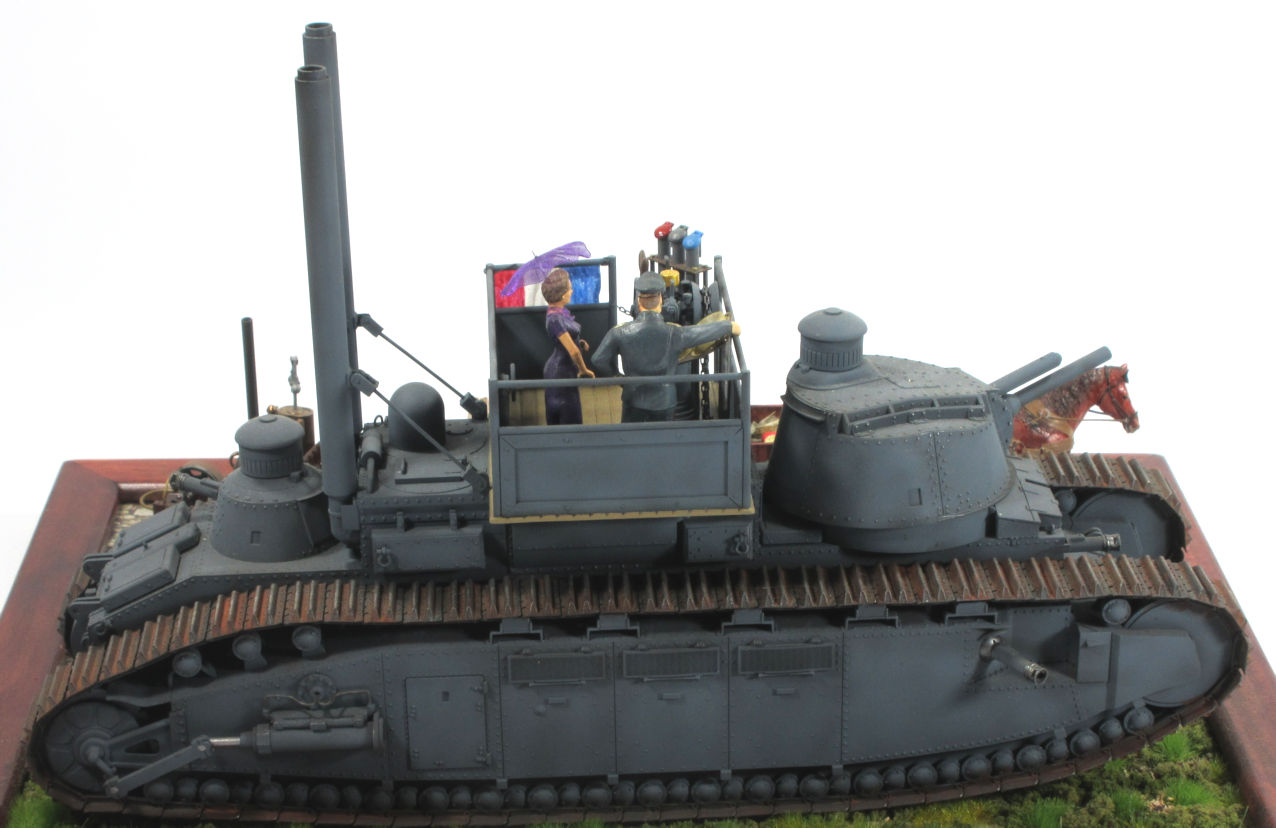
Every ship has a bridge, so a land ship should be no different. A basic bridge structure was built up out of sheet and rod. The main features would be a binnacle, a set of gauges and some voice tubes. The binnacle would prove to be the most complex part of the model. Every part was cobbled together from left over crap from my junk box. The main section consists of parts from a M26 engine and a cream can in 1/35. The steering wheel is a combination of a sanded down Sherman idler and 1/72 Blenheim bombs for the handles. The sprocket for the chain drive are 1/72 Wellington engine covers. Other bits and pieces were added to give it a nice busy look. With the binnacle as the centre piece, I started on some gauges and voice tubes. These 2 structures were mostly from rod, tube and sheet styrene. The dial gauges were printed on paper, cut out and inserted under some clear styrene disks.
The next consideration was how would the crew get onto the bridge. I tried a few different things such as a rope ladder and a fixed ladder. I eventually went with a chain and slat ladder, this being easier to get properly spaced than a rope ladder and sufficiently ‘olde timey’ for the theme. A floor hatch was also added as a bolt hole for the deck crew.
Steam pistons were scratch built and added to each side and connected to the drive wheels. These were again built from tube with the ends coming from the junk box. One end was again Wellington engine centres, while more M26 engine bits such as manifolds were used to dress it up a bit. All conrods were sheet styrene. A pair of stacks were added to let the smoke out, with braces made from rod. Finally, all machine guns were replaced with cannon barrels. Any self-respecting steampunk needs a really big gun, so the piddley machine gun barrels were not going to cut it. These were replaced with the smoke dischargers from a Sheridan, which were suitable tarted up with rivets.
Next I needed some figures for the scene. The ‘Captain’ started life as an ICM Afghan freedom fighter. Fortunately, he gave up has terrorist life style and joined the Land Navy, rising in rank to command a landship, but losing an eye and a hand in the process. Any steampunk will have a least a few brass prosthetics and the poorly moulded hand was painted brass for the purpose. Half of a goggle was added to his eye along with a strap. His original dress was carved off, and his jacket converted into a uniform jacket by building up with Milliput. Once dry, this was sanded into shape and small details added such as buttons, collars and epaulettes.
His lady friend, let’s call her ‘Tennille’ for want of any other name, started as a Masterbox pin-up girl. Disturbed by the constant public exploitation of her body, she put on some clothes. Seeking to settle down, she has started seeing an older gentleman with matrimony in mind. Here I went against the core conviction of science fiction, that all women should wear as little as possible. I had to convert a bikini clad pinup into a Victorian lady, so a long gown was added out of Milliput sheets, with additions from organza ribbon. Organza is a type of polyester and frays like crazy so it necessary to heat seal any cut edges. The temperature range is quite critical as too hot, it will curl up, too cold and it won’t seal. The best method is to use a soldering iron when its heating up, turning it off when the ribbon begins to melt. Organza ribbon was also used for the parasol, being superglued to thin wire, and then belt to shape.
The final figure was a grubby lower-class peasant. This guy was originally a German cook, but has defected to France to pursue a career in the energy resources sector. He is a mismatch of various brands, but the main torso came from the Tamiya field kitchen set. I wanted him to be shovelling coal, so a bit of rod was used for positioning the hands and arms when the glue dried. This bit of rod would later become the handle to the coal shovel. The head was a generic replacement that had a rather questionable beret added, and whiskers added from Milliput.
Milliput can be a bit tricky to work with. Too fresh, it sticks to everything, too far gone, it won’t stick at all. After initial mixing, I set it aside for about an hour before trying to work it. Thin sheets were made by rolling a blob between sheets of glad wrap. These were then cut to shape and applied to the figures. Positioning and sculpting were done with tools that had been dipped in water. This prevents the tool sticking but too much will dissolve the uncured resin.
Steam Tricycle Velocipede
Victorian inventors were a mad lot and I wanted a vehicle to be typically mad. Although engineering could make something work, there was no concept of ergonomics or health and safety. This velocipede was built to embody all the worst aspects of the early automobiles and late industrial age steam machinery. The vehicle was assembled entirely out of sheet styrene and junk from the spares box. The intent was to build a vehicle that would be as dangerous to drive as it was inconvenient to operate. It features unprotected flywheels and belts, unguarded pipework, a braking system that would cause the vehicle to flip, offset controls, a trundle steering wheel to give ‘shopping trolley’ precision steering, and the inability to feed the firebox whilst moving. In a concession to modern safety, there are no seat belts, the driver’s seat is totally unprotected and the driver’s head in grave danger of being stuck by the governor. This thing is not just dangerous but suicidal, and as such is a suitable personal transport for a lady.
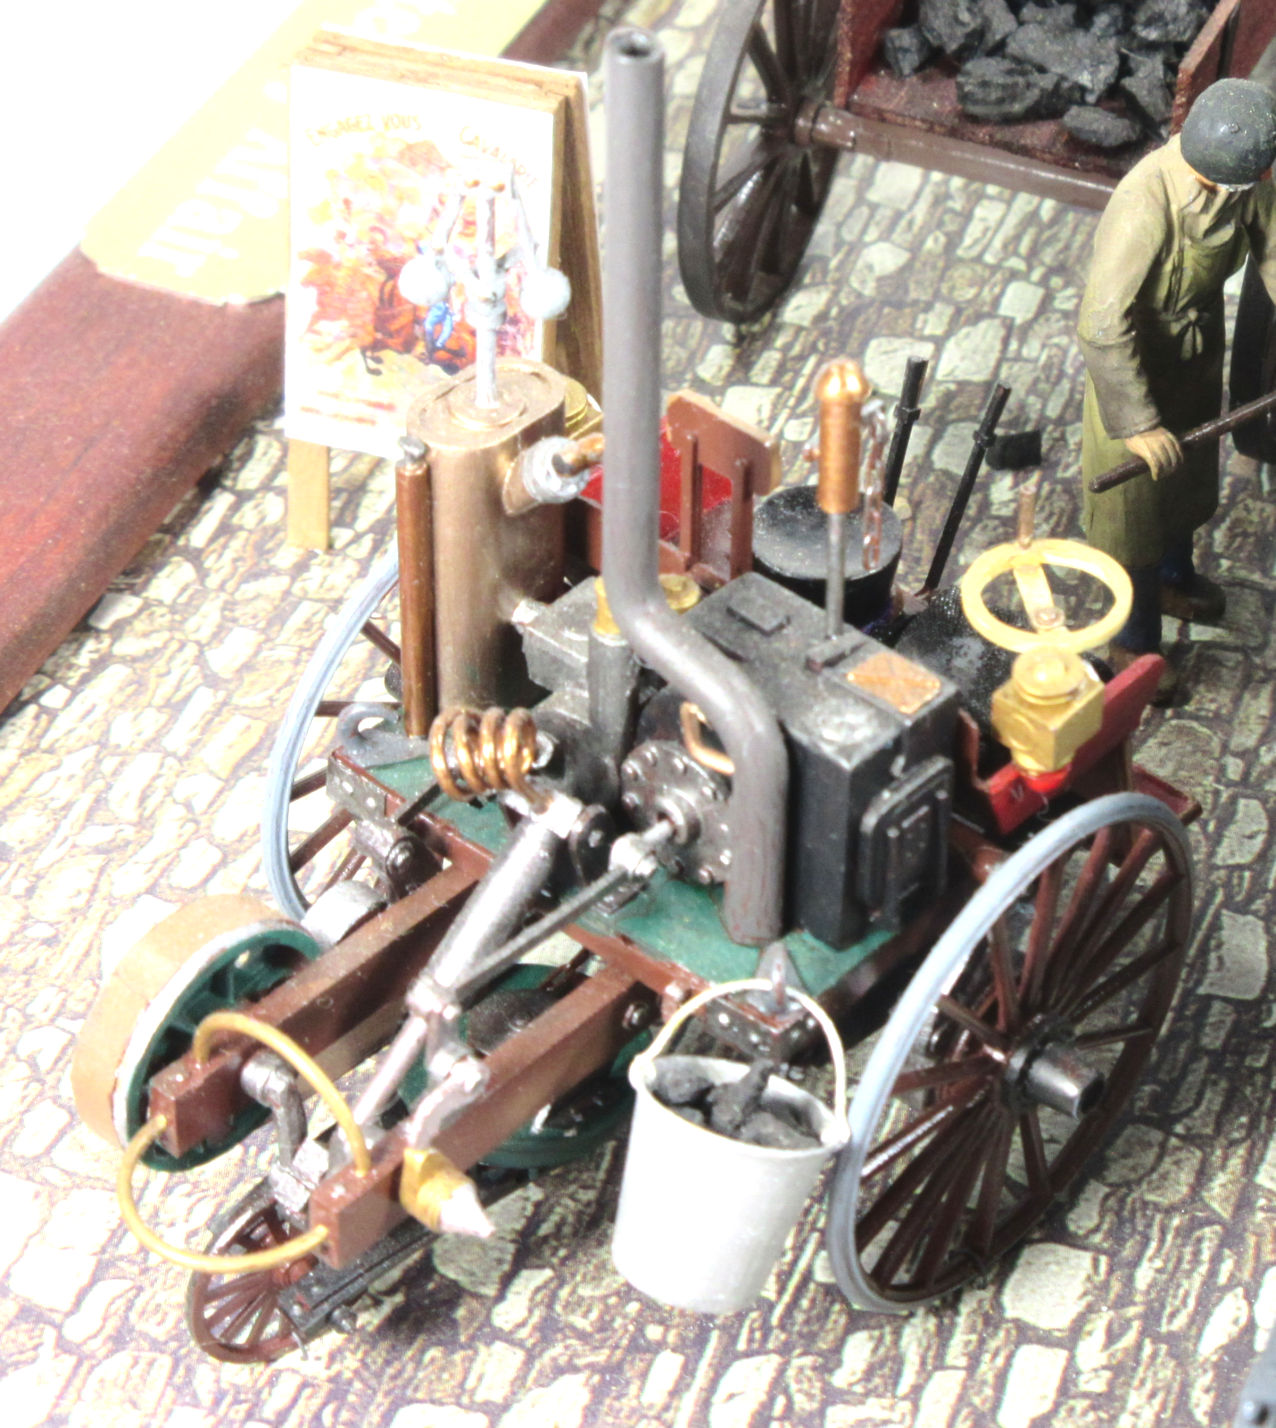
Most parts for the Velocipede came from the M26 engine parts, with a few Sherman bits and wheels. The Carriage wheels and seats were recycled from an old Minicraft 1910 International truck kit. The design was kind of organic as it came about from randomly gluing bits wherever they fit, with a vague notion of what a steam engine needs to run. As it was, I forgot to put in a coal bunker, so a bucket full of coal was hung off a hook at the back. There is of course, no way to feed the fire box with the vehicle moving. This is no job for a lady, so I might yet add a footman whose job it would be to run along behind and stoke the fire whenever pressure drops. I have yet to find an appropriate butler like dude that would not need too much modification.
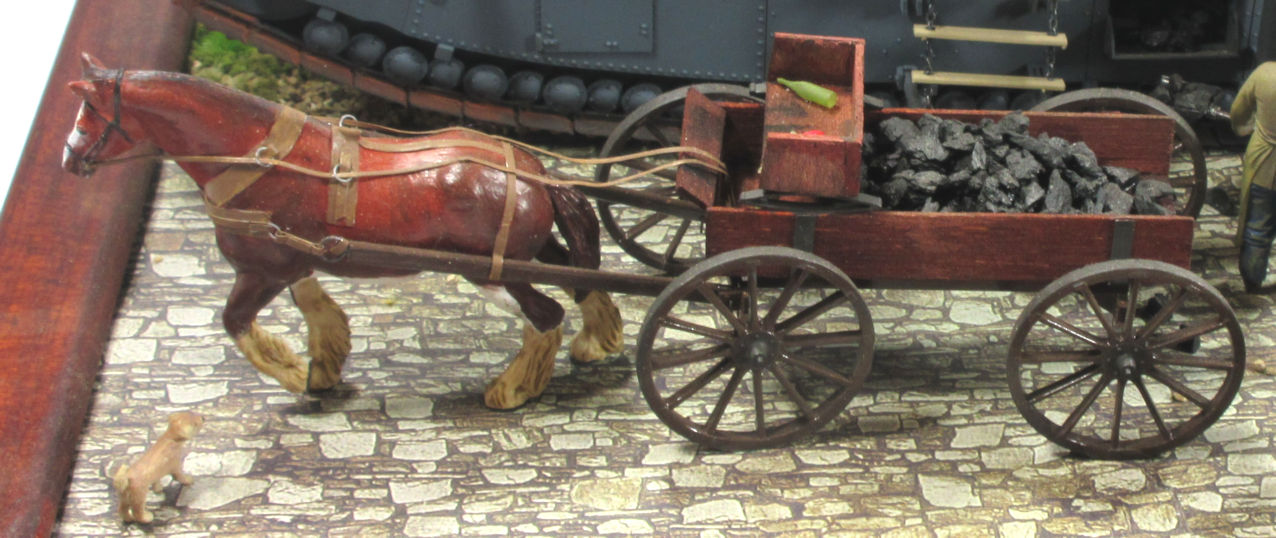
Horse Drawn Buckboard
A buckboard was a small cart designed for package delivery in towns. It was kept small which prevented overloading, and was usually drawn by a single horse. This buckboard was roughly knocked together from balsa and strip styrene. The horse and carriage wheels are Tamiya items from an old Gulashkanone kit. Coal was again added with charcoal, and I also added some empty wine bottles, a wedge of cheese and a baguette for our grubby peasant’s lunch. The horse’s bondage gear was fashioned from lead sheet. Unlike an English cart, the French don’t appear to have made much use of large collars so the leather straps were patterned from a French rig from the turn of the century.
Base Board
The base board was a piece of MDF, built up with balsa and covered with plaster to give a bit of texture. The cobbled road is a pre-printed cardboard train scenery, usually used to represent stone walls in 1/87 scale. Strips of balsa were laid underneath to give a bit of a rutted look. The cardboard was glued down with PVA, and weighted down until dry. The back of the board was a transition to grass, so plaster was spread over randomly spaced, glued bits of broken balsa. The plaster was then coated in glue and a variety of ground work poured on. Most of the ground work was for HO/OO trains but is okay for larger scales. The ground work consisted of tiny stones, small bits of green sponge in 2 different shades of green, tea leaves and clumps of static grass for weeds. These where glued randomly, and touched up with an airbrush to tone it down a bit and to transition the colours.
The models were attached by wire through small inconspicuous holes and tied off under the base board. The exception was the tank and this had a bolt inserted in each turret opening. The base had a simple square frame added from a timber molding. A bottom MDF sheet was added with felt glued to it. This was attached to spacers at each corner allowing the bottom base to be in contact with the ground.
Data