A few weeks ago I was reminded of a talk I gave at a dinner held to mark the centenary of the Wright Brother’s first flight in December 1903. Looking at the famous photo of that flight reminded me that one of the first models my parents bought for me as a present was the old Monogram 1903 Wright Flyer which came with thin thread for the rigging and little hooks on the struts to make the rigging simple for young people like me at that time.
Scalemates tells us that the kit was in the odd scale of 1/39, no doubt to fit inside a standard size box, and that it was first published in 1958 so it was either that of the 1963 boxing that I made. I had that model for many years but it disappeared in one of my many moves. I haven’t seen the kit for many years and if I did I probably wouldn’t buy it again, even for nostalgia, because of that odd scale.
Scalemates also tells us that there are three kits of the 1903 Flyer in 1/72, and I have two of them. One is the old Renwal 1964 kit that comes in the same box as a 1909 Bleriot XI. Both are injection moulded with naked airframe exposing the spars and formers that can be covered with tissue to replicate the real thing. The other kit is the Historic Wings etched brass kit which also has exposed details that can also be covered with tissue. The third 1/72 kit is from Aerobase and is also in etch brass so it may be the same as the Historic Wings kit, but I haven’t been able to check.
Both the Renwal and Historic Wings kits are parts of series of kits of the earliest aircraft and I’ve collected most of them over the years. None of them will be easy to make, which is probably why I’ve avoided them until now, and now that I feel the urge to make some the covid caused delays to our renovations means that I don’t have access to any of them at the moment. The only kit of the very early aircraft I have access to it the very old Frog 1909 Bleriot XI which was first published in 1965 as part of their ‘Trail Blazers’ series and has been reboxed by several companies since then, including Eastern Express. That is where my copy of this kit came from.
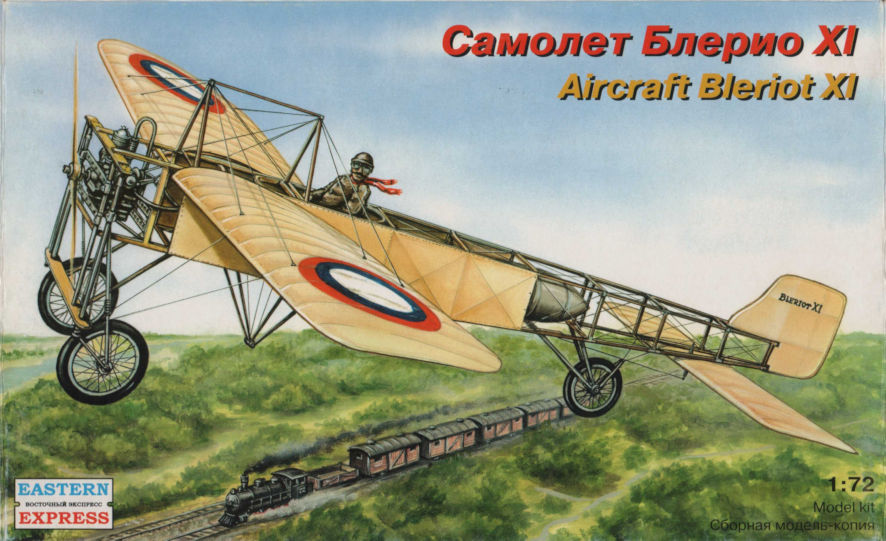
When you’ve got an itch you’ve got to scratch it. That’s my only excuse for making this model. I have Renwal and Historic Wings kits of this aircraft, and I see that Chomszy Modelbud published kits of several versions of the Bleriot XI in 2010 which might be a better choice. Almost anything would be better than this old Frog kit so, if you have one, dispose of it now so you don’t get tempted, as I did.
The first and most obvious thing to say about this kit is that you can’t make a good replica of the original aircraft from it. This is mainly because the thickness of the struts make it look as though the aircraft was made from 6×4 planks rather then the very thin and light structure of the real thing. I gave a moment’s thought to making the model using appropriately thin plastic rod but that was impractical. Instead, I took the academic approach and decided to make this kit as an exploration of the potentialities of a 1960s plastic kit to meaningfully replicate the Bleriot XI that was the first aircraft to fly over the English Channel. Either that, or just admit that I am a lazy modeller.
I need to emphasize the point that I think this kit is supposed to replicate the Bleriot XI that M. Bleriot flew across the English Channel. After that successful flight the aeroplane was very popular and over a hundred were ordered. However, there appears to be a great deal of variation in the models that were made, in particular the controls and engines, so a lot of the photos found during research were not appropriate to the Bleriot that flew across the English Channel.
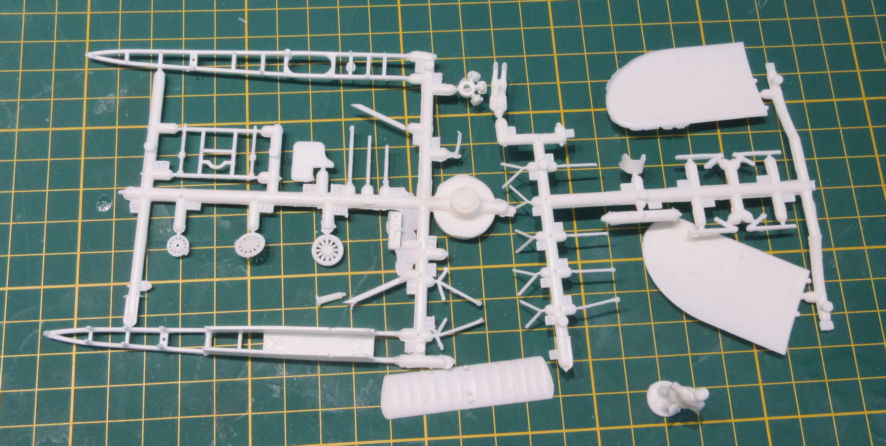
Even if I am willing to admit that I might be a lazy modeller, I can assure that this is not a kit for a lazy modeller. To begin with, every part has to be liberated from copious flash and then the strident seam lines have to be removed. The fuselage is moulded in two parts with the top in one part and the other three sides in the other. However, due to the requirements of 1960s moulding the sides are far from parallel and I had to resort to gluing plasticard to them and then sanding it back to make the sides parallel and the fuselage a square box. This caused problems with other parts of the structure later on.
I’d estimate that around seventy percent of the time spent in making this kit was in preparing the parts for assembly. As I was trying the find the Anzani three cylinder in the lump of plastic the kit provided I was reminded that Michelangelo said that when he was sculpting he was revealing the figure already hidden in the marble. Perhaps, if you were to find one of the earlier boxings of this kit you might be spared most of that work, but if you find that kit it will be a collectors item so you will be spared the pain of having to build it.
Assembly is more or less straight forward but on occasions trying to find the relationship between the pieces of plastic in the kit and the instructions is elusive. In those cases, particularly with the undercarriage, it was time to go back to peering at photos of the real thing to see what was going on and how to replicate it. Somehow during the construction process, or it might be built into the kit, the fuselage became slightly warped so that the wings and the tail planes do not line up perfectly.
Painting this model was a serious pain. I ended up using some of my old Humbrol enamels for most of the painting with four or five different shades of brown on the woodwork. I’d forgotten how easy and pleasant it was to hand paint enamels on small parts and I will be dusting off my old Humbrol collection if I make more models like this. The fabric covered wings and tail surfaces were entirely a different matter. I have a bottle of the MRP Clear Doped Linen, Bleached, which is a very nice shade for the unpainted fabric on very early aeroplanes, but it’s so thin that it needed many coats to get decent coverage on those fabric parts. This might be alright for your normal aircraft model but not this one and trying to hand paint enamels over that was not a happy experience.
There were no decals for this kit, which was a blessing. For me rigging is worse than going to the dentist so I didn’t do any. However, for the brave modeller a touch or rigging might do a lot of good for this model.
My final feeling is that putting this kit together it was an authentic modelling experience that I will hard to forget. Apart from decal application it tested all my skills and took a lot more time to make than its visual simplicity suggests. As for it being an authentic realization of a 1960s kit of a 1900s aircraft, it is only fair to middling. If I was to make this kit again there are several things I would do differently, but I’m not going to, and that’s final.


Leigh Edmonds
March 2022
 72 The Little Aviation Museum")