Everyone fondly regards the Boomerang as a plucky ground attacker renowned for its close air support at tree top level. Pity is that it wasn’t designed for that role. Ground attack is what you do with fighters that are too old or too useless to do their primary job, that is the destruction of enemy aircraft. The Boomerang was an emergency fighter tasked as a point defence interceptor. With the lack of early warning radar, the Boomerangs couldn’t get high enough to attack the Japanese bombers. The best they could do was to buzz around threateningly. This usually resulted in the Japanese bombers ejecting the bomb load and running away. The Boomerang couldn’t catch them. Result, town not bombed, job done. In the full service life of the Boomerang, there was only one air to air encounter recorded when 2 Boomerangs stumbled upon 3 Japanese Betty bombers. The Boomerangs opened fire at 250 yards however the Bettys fled without apparent damage.
The Boomerang wasn’t all bad, it was just bad as a fighter. So bad in fact that it was often compared to that other pariah of the fighter world, the Brewster Buffalo. A stripped-down Buffalo was used in comparison trails. The Boomerang was slightly faster and better armed but was less manoeuvrable. The Boomerang did however have a decent amount of armour. Being based on the Wirraway trainer it was fairly easy for new pilots to transition to the type however early versions suffered from poor visibility over the nose. This was partially rectified by relocation of the gunsite on later models.
The Boomerang was deployed to fighter squadrons from Apr 43 but were replaced after 8 months by Kittyhawks. After replacement in the air defence role, it was assigned to Army co-operation roles where its duties included bombing, strafing, resupply drops, artillery spotting and even anti-malaria spraying. It would continue in these roles for the rest of the war becoming famous for its ability to get down in the weeds and provide fire just ahead of the infantry on the ground. It was also commonly used to mark targets with smoke bombs for Kittyhawk and Corsair fighters. With the end of the war Boomerang operations ceased and the type went out of service by Aug 1946. About a dozen survived the breakers yard. 1 fully original aircraft is located at Point Cook. There are about 6 restored to flying condition that do the airshow circuit. There are others in various stages of restoration.

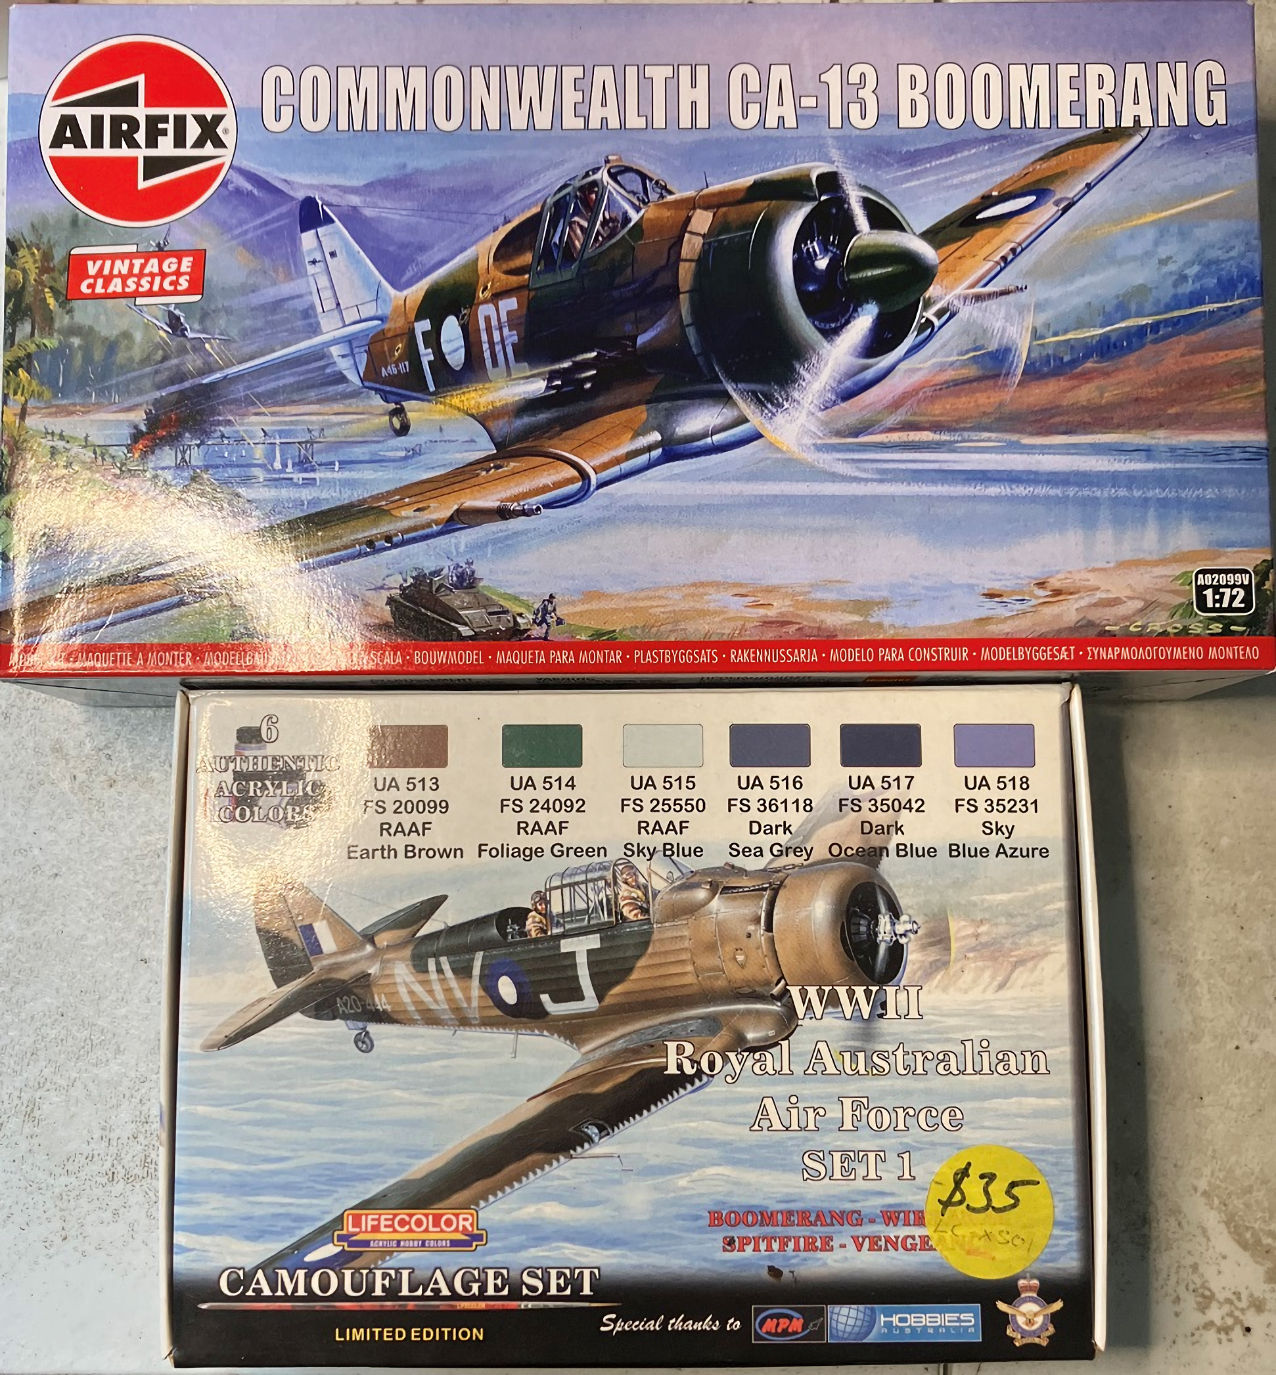
The Kit
Airfix have recently released the Boomerang under there “Vintage Classic” program. This kit was first released in 1965. Unlike other kits in the range, the moulds don’t appear to have been cleaned up at all. It has new decals with 2 new schemes so if you built one in the past, at least you can depict different aircraft. The kit itself is quite basic at 31 pieces. Detail is mostly raised with only the control surfaces being engraved. There is a large amount of rivet detail. There is a small amount of flash and some parts have intrusive knockout pins. The cockpit detail is non-existent but the transparent parts are quite thick so not much can be seen. The instructions, although new, have the drawings from the 70s issue blister card release.
Construction
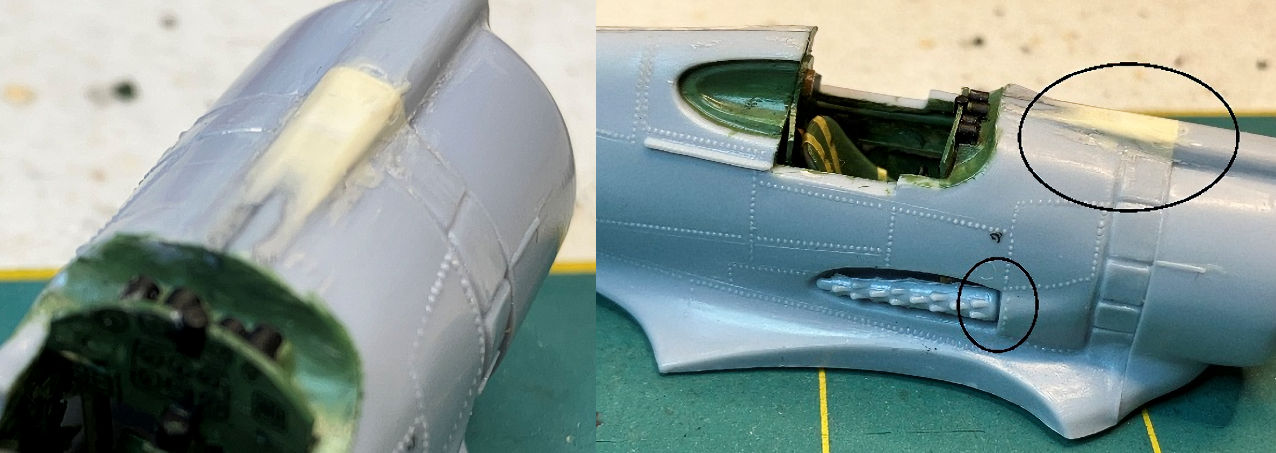
The first step would have you glue the pilot to his seat and attach this to pins in the joined fuselage halves. The pilot figure is absolute crap and the seat is not much better. Both were consigned to the bin. The mounting pins in the fuselage were cut off and the fuselage halves joined. The RH halve is slightly larger than the left forming a very noticeable joint. The alignment pins in the fuselage were cut off and the halves joined aligning the top edge. A lot of putty was needed on all edges and when dry, this was sanded to shape. There are also a couple of holes that need to be fixed. One is for the original stand as no stand is supplied. This hole is large enough to require a shim of sheet styrene to be glued inside to support the putty. The other hole is for the tail wheel. This hole is way oversized. To fix this this, I used a bit of stretched sprue. A cone shape length was inserted from the outside. When the glue was dry it was trimmed to shape. A new correct size hole was drilled for the tail wheel.

The fuselage is quite wide and has a large hole where the wing mounts. This give plenty of space for some rudimentary scratch building. The are plenty of online references to aircraft under restoration and these give good views of the cockpit without the skin of the aircraft being present. Most of the interior can be easily replicated from sheet and rod styrene. I started by adding some rod to the sidewalls to replicate the tube frame. A floor was made from sheet styrene to which was attached a seat and the control stick. An instrument panel was made from sheet styrene. The backs of the top instruments are quite prominent so some small bits of rod where added to the top rear of the panel, A gunsight and compass were added to the front. It was painted and gauges added to the front from a spare decal. This was cut up so that the front of the gauges matched the position of the rods at the top. Detail painting being completed along the way.
Next, I added some pedals. These appear to hang down from under the instrument panel. The shape of these pedals is fairly basic and can be easily replicated by strips of styrene. Next, the cockpit rear armour and a headrest was added to the bulkhead at the rear of the cockpit. The floor was added from underneath with some extra supports to hold it in place.
Moving on to the engine/cowling, the two engine cylinder blocks were glued together and painted. The engine was then installed into the cowling. The propeller support pin was placed into the hole. Rather than using the propeller to hold it in, I packed the rear of the pin hole with some sprue to be flush with rear of the engine bulkhead. A piece of sheet was glued on the rear of the bulkhead to retain the prop pin in place. This allows for easy handling without the propeller in place. Next the cowling was added to the fuselage lining up the wing root flares at the bottom.
With the cowling on the next issue became apparent. The air scoop at the top of the cowling should continue in a straight line to where it terminates in front of the canopy. The kit has a large kink where the cowling and fuselage meet. I built the area up with a little bit of sheet styrene before puttying and sanding to the correct profile.
The wing roots are the next area that needs attention. The top wings were added to the lower wing and allowed to dry. When test fitted to the fuselage, the fuselage wing root join is much higher than the wing top edge. This join required a lot of sanding to get to properly fit. The wing itself has a lot of rivet detail that will be lost if the wing root is sanded and filled with the wing in place. Once the root was sanded down to the correct profile, the wing was added and the join puttied, avoiding any putty on the upper wing surface. The upper/lower wing joints also need a lot of putty around the edges and the trailing edges are massively thick. The horizontal stabilizers also need a little putty around the joints.
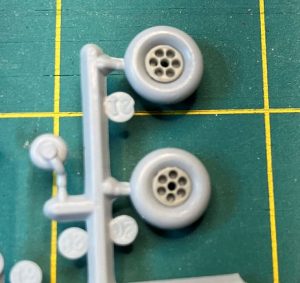 The main landing gear was added next. The main wheels have a flat disk cover on one side but are dished out on the other. Both sides should have a disk cover. Looking at photos of restored Boomerangs, most have wheels with round perforation or spokes. These are probable modern wheels. (I don’t think I’d want to be landing on an 80 year old pressed steel rim either). The disk side should face inwards. I added a disk of styrene to the dished side of the rim. This is mostly covered by the wheel well lower cover so not much can be seen.
The final parts to be added were the canopy and side windows. The canopy is a reasonable fit but the side windows are a bit off. 1 is loose, the other is oversize. These were glued in with white glue. The gun barrels also have problems. Each has a nasty knock out mark that will need to be puttied up. The mounting holes are too big so the guns will also need to be puttied in. Oddly, the lower wing has ejector ports for the .303 guns but there are no holes in the wing edges. This will be fixed during decaling as some red tape squares can be applied over their location.
Painting
As usual, Airfix recommends Humbrol paints. The paint for both schemes is Foliage Green and RAAF Earth Brown over sky blue. The respective numbers being 149, 98 & 65. There is a note to state that these are approximate colours. I didn’t have any of these colours so I used paint from the Lifecolor RAAF WW2 set 1. This set states FS numbers for the colours. Foliage Green is FS24092, Earth Brown is FS20099 and sky blue is FS25550. These are acrylic paints so should be applied over an undercoat for better adhesion. In the end, I found some Humbrol 65 and used that as the undercoat. This appears to be the closest match of the Humbrol paints. The Lifecolor paints were brushed on over that. These new acrylics are usually made for airbrushing and are quite thin. 3 coats were required.
Decals
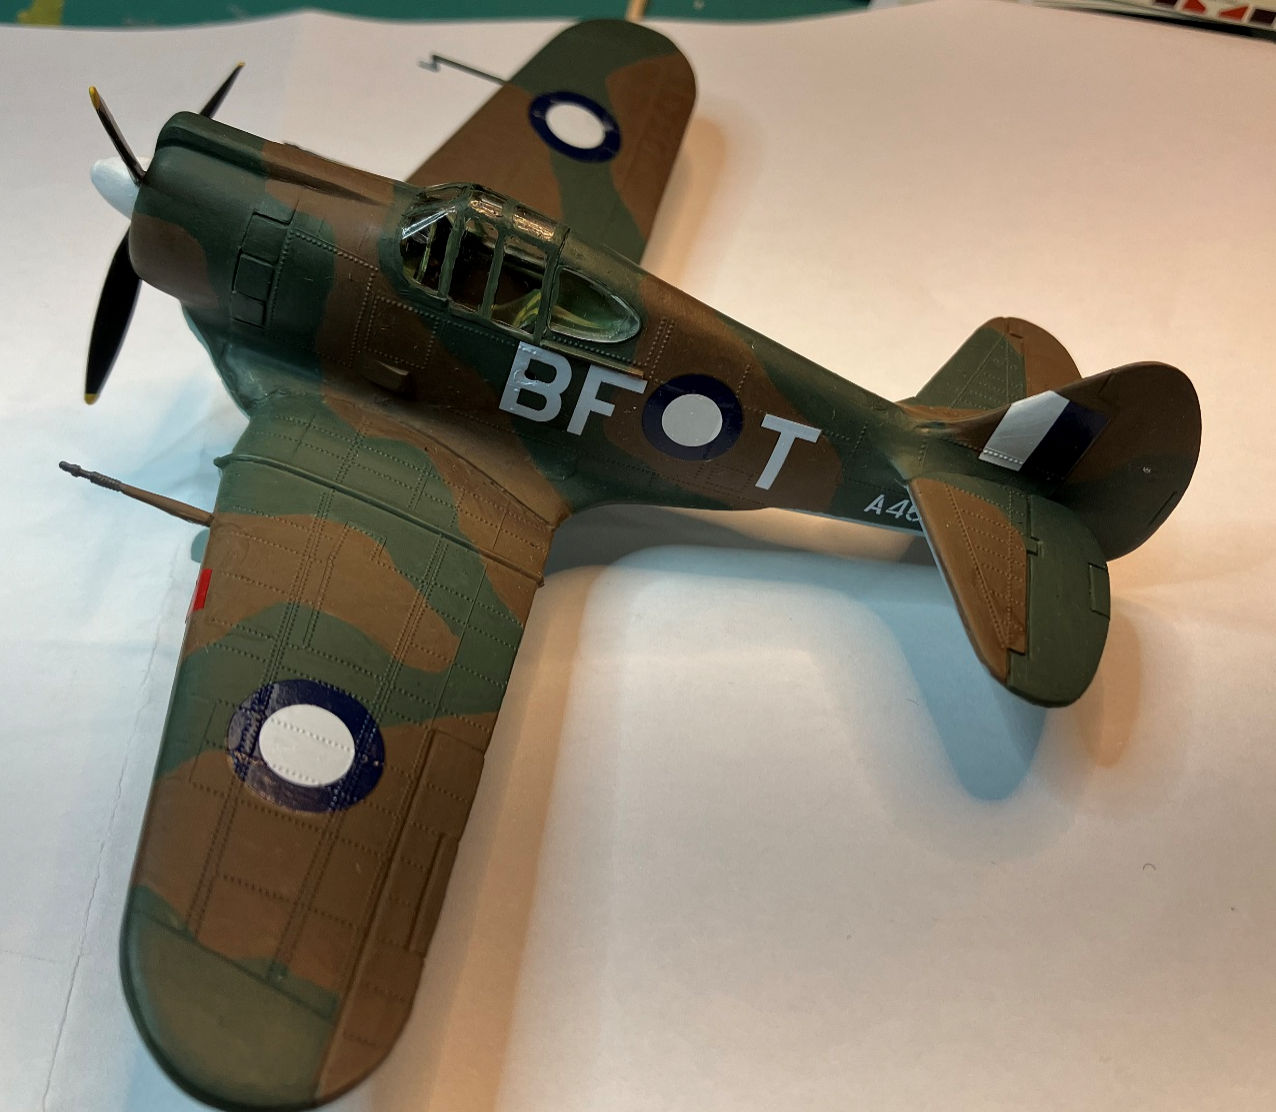
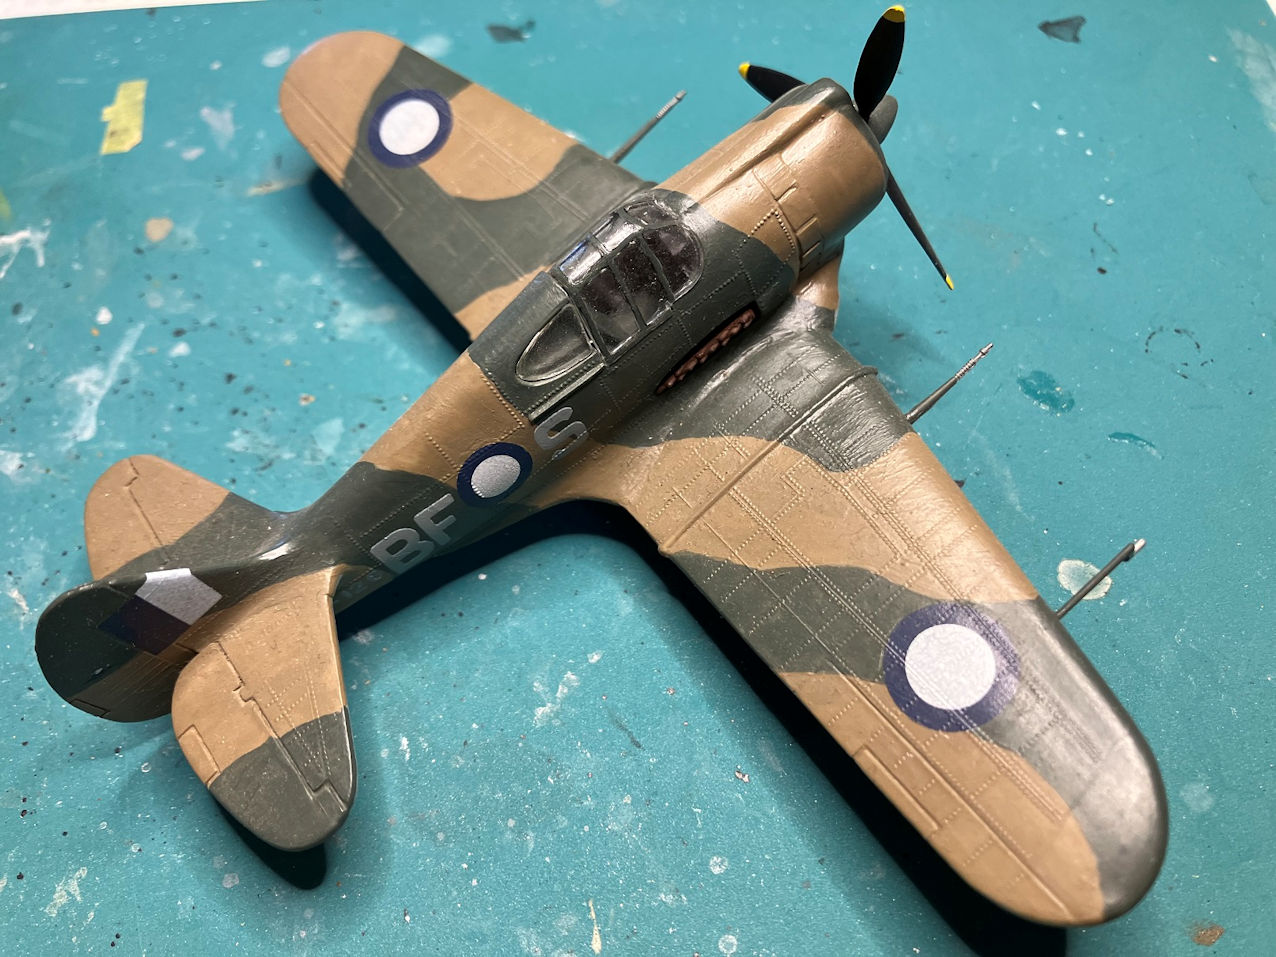
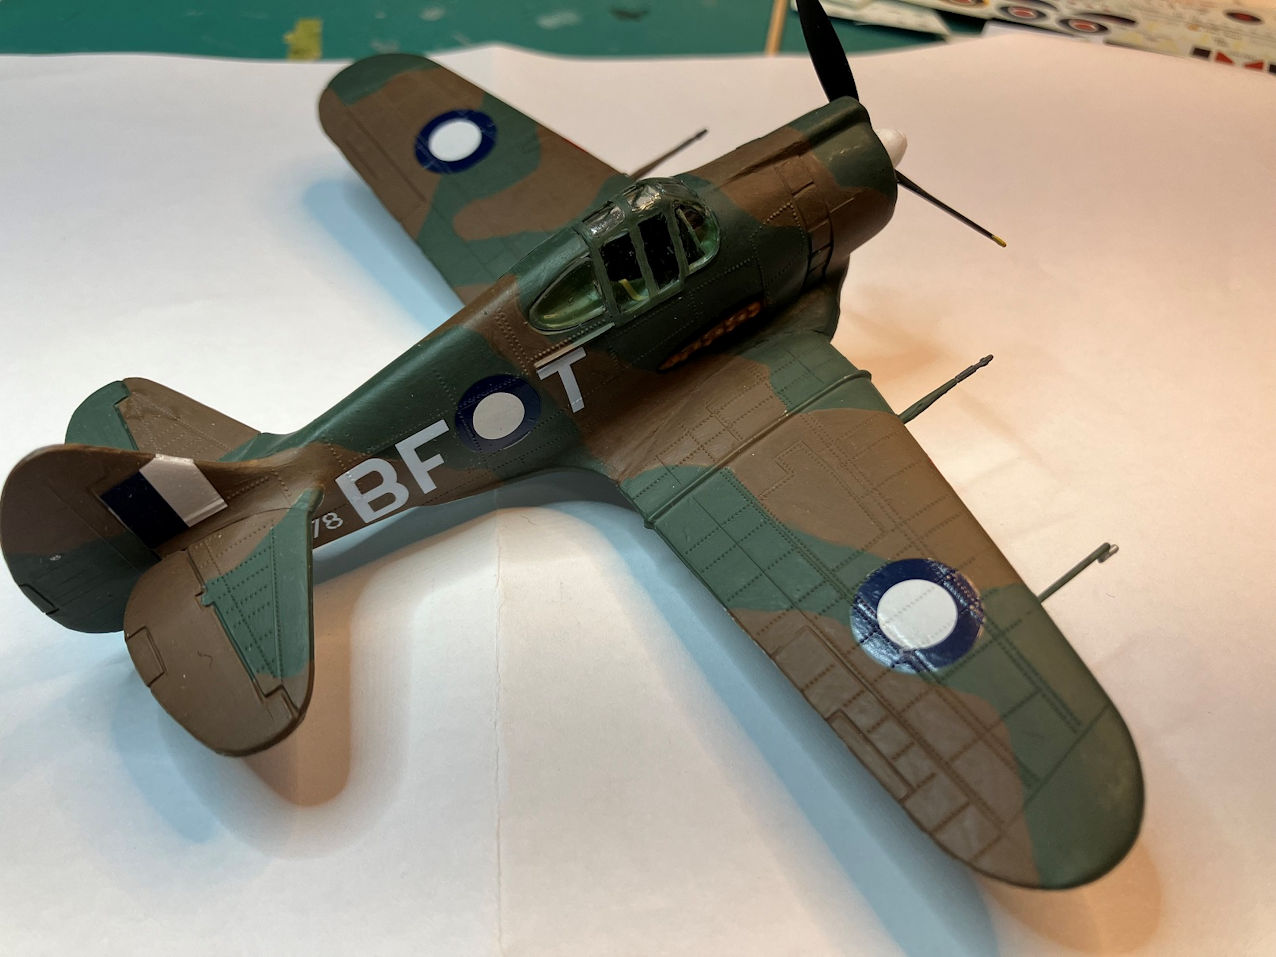
The new decals proved 2 schemes plus full stencilling (if you could be bothered with that in 72 scale). 1 aircraft from 4 Sqn, 1 from 5 Sqn. Both are Brown/Green over blue but the 4 Sqn a/c has a white tail. The 5 Sqn a/c is BF-T, the mid 80s release had BF-S. The new decals are in register and have good colour density. I used Gunze Mark Setter and Mark Softer which works quite well on these decals. The decals were wet in the usual manner. In the location for the decal, setter (Blue lid) is applied. The decal is pushed into place and air underneath squeezed out using a paint brush. Softer is then brushed over the surface of the decal. This will cause the decal to settle down nicely over the rivets. It is important to not touch theme until fully dry as they become very prone to tearing with softer on them.
Final Rant
I first built on of these in the 70s but that didn’t survive and I built the mid 80s release about 15 years ago. Comparing it with the latest release, the plastic was in better nick than in the recent issue. The decals and marking schemes are better on the recent release benefiting from modern research. It’s a pity they didn’t clean up the moulds as they have done with other vintage classics. It really needs a new canopy, a decent pilot and bomb racks would also be nice. (This can be a bit hit and miss. I have the vintage classic Fokker triplane and that has a newly sculpted pilot wearing a Mae west and an oxygen mask. The Bristol F2B released at the same time also has new figures but these at least are in period appropriate attire).
As far as other options go, Special Hobby and Tasman both offer kits. The Special Hobby kits are more accurate with engraved lines and a detailed cockpit. I have not had the opportunity to examine the Tasman offering, so “Ya takes ya chances.”
This photo shows the ’80s release with the old scheme
Steve Pulbrook
December 2023