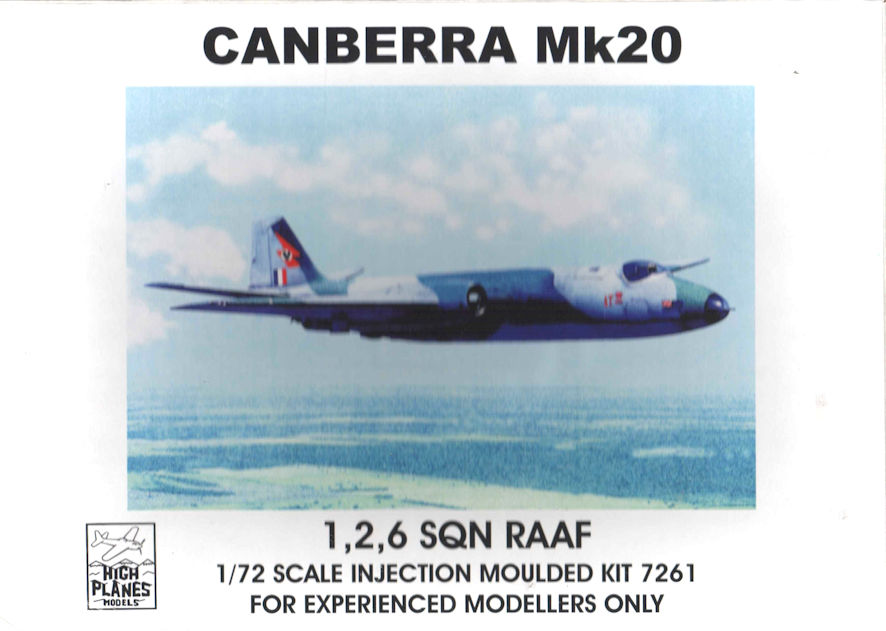
Lifting the lid on a High Planes kit does not fill one with joy at this expression of the kit maker’s art, rather it creates a feeling of dread at having to make something coherent from the roughly hewn parts found in the box. The first impulse is to put the lid back on the box and find something else that would be much more fun to make but, it you want to make a model of an Australian Canberra, this kit is probably as good as it gets. There are a lot of kits of Canberras out there but the majority of them are the ones with the ‘intruder’ cockpit canopy rather than the big round canopy found on earlier Canberras. There are a few kits with the round canopy but they are said to be not as good and accurate as the High Planes kit. Besides, the High Planes kit offers decal options for RAAF aircraft not found anywhere else.
The kit comes with some barely tolerable instructions. They are quite comprehensive in their own way, but there are lots of words and a couple of barely adequate drawings. Being an old hand at making models I more or less ignored the written instructions and worked from the drawings, which was my first mistake. It turns out that a lot of the detail in how to make this kit are buried away in the written part of the instructions and it would be best to read them twice, just to make sure you understand what’s going on.
To be fair, there are some nicely cast resin parts in this kit including ejector seats that are as good as any other resin seats I’ve seen. There is also a nice insert for the nose, so there is something inside rather than bare plastic, and some nice weighted main wheels. On the other hand, the plastic mouldings are not well cast and need extensive preparation, and the vacformed clear parts will be this kit’s Waterloo for many modellers.
This is not a kit for inexperienced or faint hearted modellers. A description of the construction process would be about as long and tedious as the process itself, The main things to mention is the need to remove a lot of excess plastic, create even and smooth mating surfaces and to sand and test fit and sand and test fit, and then do it again as many times as it takes to make sure everything is snug before the parts see any glue. Even then be prepared for lots of filler for the gaps and parts that don’t quite match up. And, a reminder, stick as much weight into the nose as you can, I put a lot of weight into mine and it is still barely a nose sitter.
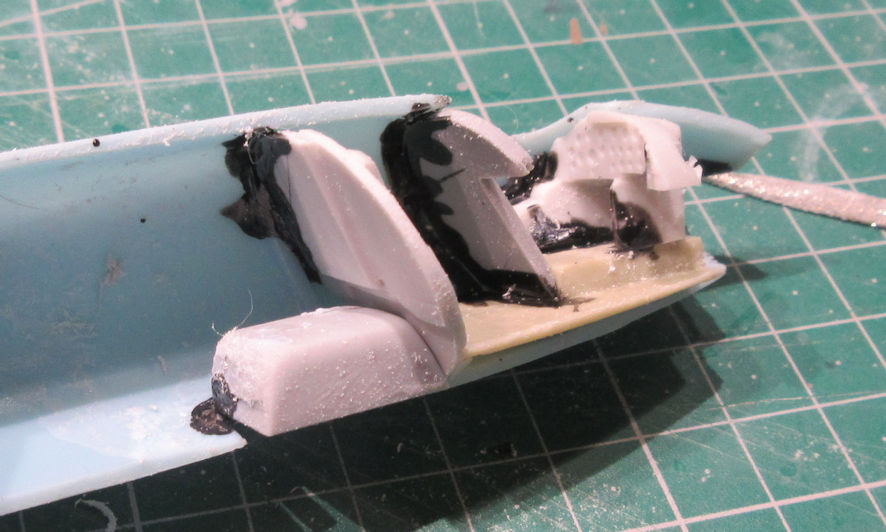
The cockpit area is particularly trying but turns out rather nicely in the end. The same might be said for the entire model and this might actually be a case of making a silk purse out of a sow’s ear (as they once said) if you proceed with great caution and patience.
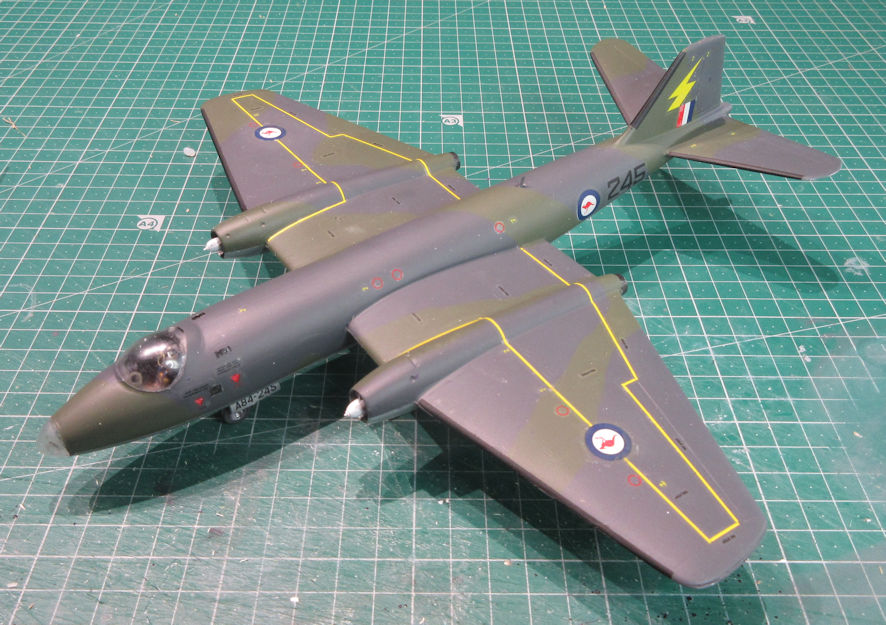
Having got this far without throwing the whole lot in the bin, it is decision time. Over its service life the Canberra appeared in three basic schemes. First there was the all over protective silver scheme, then there was the dark grey and drab olive on the upper surfaces and aluminum on the under surfaces, and finally a wrap around dark grey and drab olive wrapping over the entire aircraft, which is how it appeared over Vietnam. Had I known what was to follow I would have chosen the all over metallic scheme because there is an after market decal set for that, but I’d already made a Meteor and Avon Sabre in that scheme, and still don’t like the Vietnam war, so I had to make the most complicated of the schemes. It’s not difficult but it reminded me that of all the processes involved in painting a model the part I dislike the most is masking, and there’s a lot of it involved with this scheme.
After all that, the decals were the hard part. These aren’t your normal decals, they are the ones where the backing film is printed on top and you’re supposed to pull the film off after the decal has set. A good idea in theory but not always successful. I read a build review of this model in which the builder warned about problems with this procedure so I tried it on a spare decal and it didn’t work for me with the film pulling away part of the decal. In the end I decided that it was best just to try coping with the decal film still attached.
The other problem was that the decals have not aged well so they didn’t want to come off the backing paper and were very brittle so broke easily. All this is compounded by the number of little decals, each one of which was a trial by ordeal and a trial of patience. With the time spent waiting for the decals to detach from their backing I had time to regret not going for the all-over metallic scheme and the aftermarket decals. Eventually I discovered that the best way to handle this problem was to drop the decals into a bowl of HOT water and wait for the decals to float free from the backing paper. Then there was no glue on the decals so I used diluted aquadhere to glue them on.
After a couple of days of diligent work the decals were all attached and a couple of coats of SMS Flat Clear lacquer melded the whole lot together fairly well. This is one of those models where you wonder if the end result was worth all the stress and trouble of making it. I think it is if you want a reasonable replica of a RAAF Canberra.
Leigh Edmonds
November 2023
